
Tuesday, April 30, 2013
0 Recipe #357: Turkey Florentine Mini Roulades (Rotolo di Tacchino al Forno)


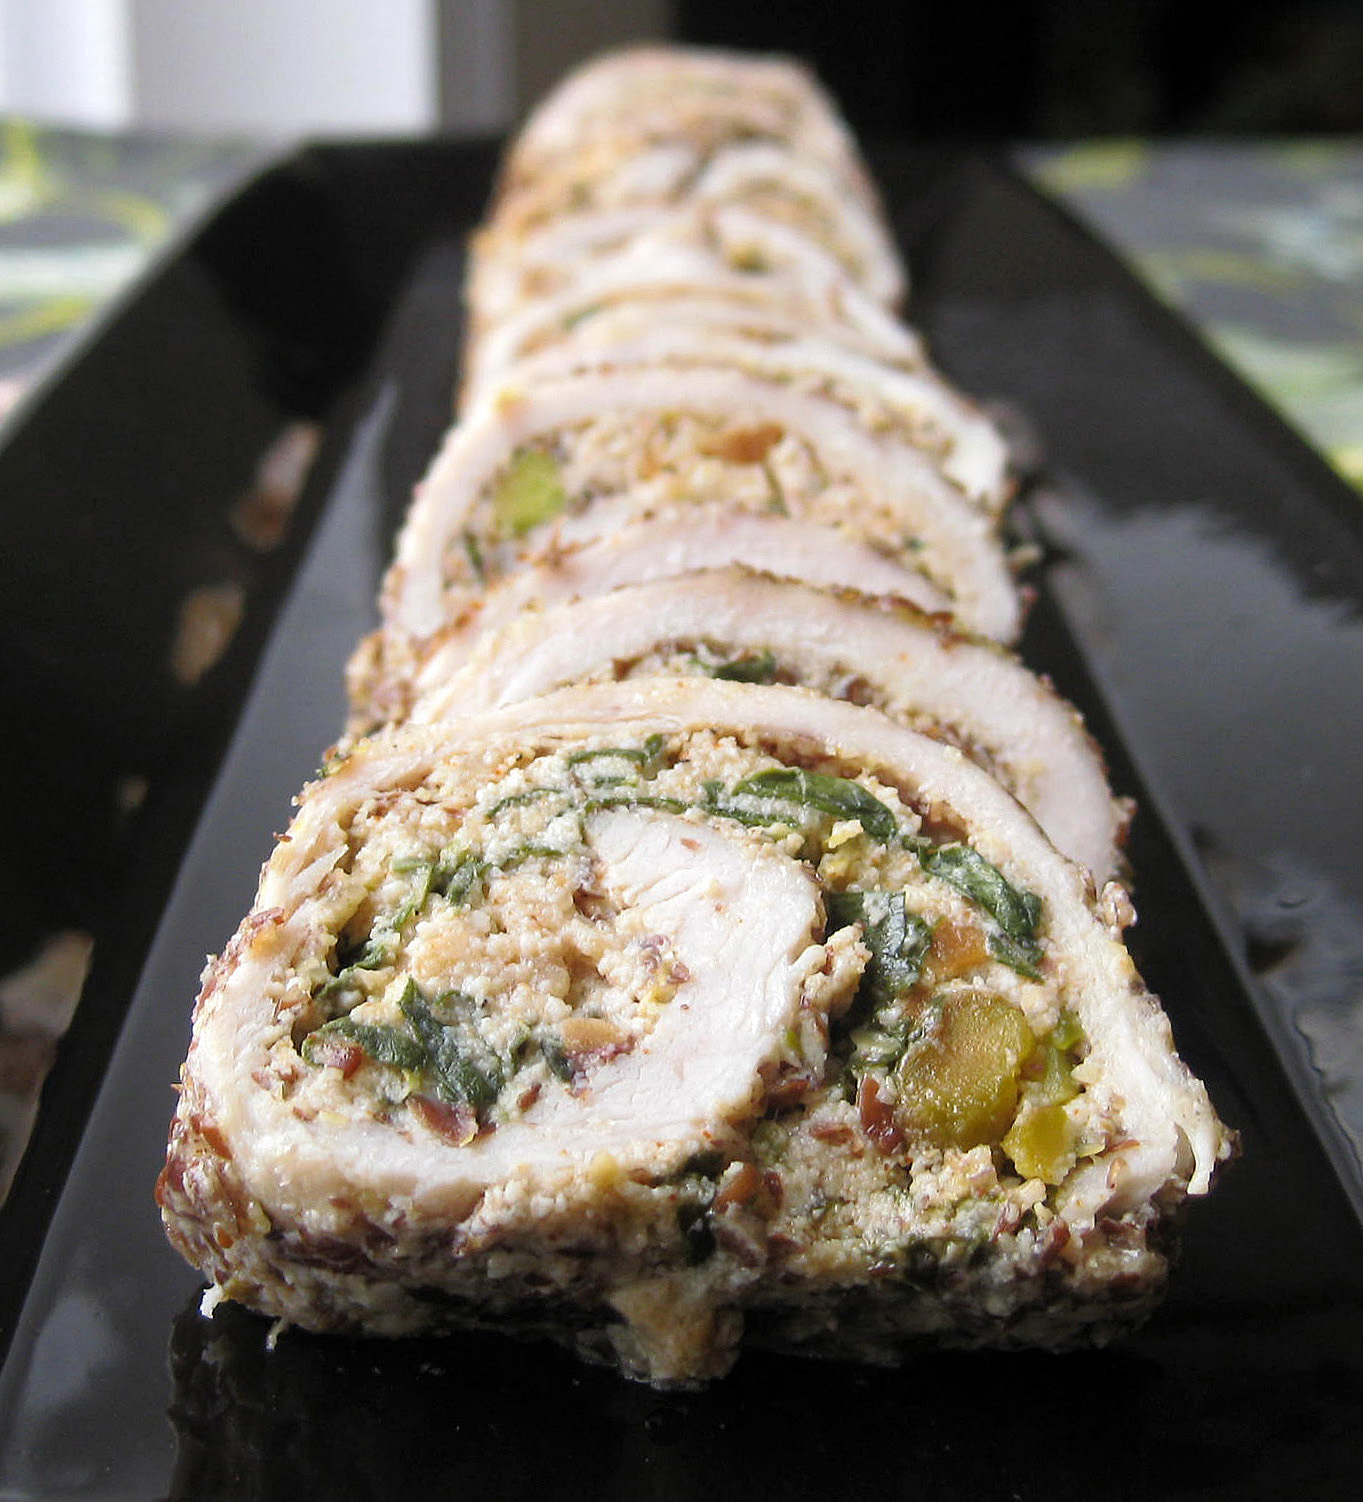
The inspiration for this recipe comes from Sicily. Roulade is a French word that's derived from the verb, rouler, which means "to roll," and rotolo (from the verb, rotolare), of course, is its Italian equivalent. Italians also commonly refer to this dish as involtini. Although roulade can be made with a variety of meats, chicken and beef are probably most common. (When it's made with beef, it's typically referred to as braciole.)
Turkey roulade, or rotolo di tacchino al forno in Italian, is admittedly less common, but of course, it's a lot leaner than chicken, so of course that's one of the reasons I've decided to use it. That, and I need to make another turkey recipe for The Athlete's Cookbook. ;)
Instead of using one large skinless boneless turkey breast, I decided to use turkey cutlets, which are a lot easier and far less time consuming to prepare. That way, there's no need to butterfly chicken breast fillets and then pound them into oblivion with a mallet just to get them to the proper thickness. :) They're already pre-cut and ready to be rolled. And how nice is that?! Also, by using cutlets, the end product turns into something else entirely, i.e., mini roulades, which I thought would be a bit more fun to prepare, as the dish then becomes an appetizer instead of a meal. Not only that, mini roulades are the perfect finger food to serve as party hors d’œuvres. Just put them on a serving platter, supply a few toothpicks, and you're ready to go!
Even better, they can be made in advance and then either frozen or refrigerated for future use. Then, all you have to do is reheat them just before serving. Or, if you're really feeling lazy, they could also be served chilled, straight from the fridge, or at room temperature, if so desired.

Turkey Florentine Mini Roulades (Rotolo di Tacchino al Forno)
Roulade Ingredients:
10 boneless skinless turkey breast cutlets, in long strips (about 1.2 lbs.)
1/2 c. ground flaxseed (for "breading" the turkey)
1 Tbsp. extra virgin olive oil (for drizzling on top of the roulades)
1/8 tsp. salt
Filling Ingredients:
1 c. part-skim ricotta
1/4 c. Parmesan, shredded
1 tsp. freshly grated lemon zest
1 Tbsp. freshly squeezed lemon juice
1/8 c. roasted and salted pistachios, shelled and slightly crushed
1 tsp. paprika
1/2 tsp. garlic powder
1/2 tsp. onion powder
1/8 tsp. ground black pepper
1/8 tsp. salt, or to taste
1/16 tsp. (pinch) ground nutmeg
3/4 c. fresh baby spinach leaves, finely minced and densely packed
1 Tbsp. Italian flat-leaf parsley, finely minced and densely packed
1 Tbsp. fresh basil, finely minced and densely packed
Directions: At least 30 minutes before cooking, remove turkey cutlets from the refrigerator and let rest to reach room temperature. Preheat oven to 375°F. Using a spatula, thoroughly combine all filling ingredients into a large bowl and set aside. Spread a large sheet of wax paper onto a clean surface. (This will be used for prepping the cutlets.) Place ground flaxseed into a large shallow bowl, then dip a cutlet into the bowl, gently pressing the cutlet into the flax seed to thoroughly coat it on both sides, and transfer onto the wax paper, spacing them evenly apart, lengthwise. Repeat this process until all cutlets have been "breaded." Next, place about 2 Tbsp. or more of the filling into the center of each cutlet and, using a knife (or your fingers) spread the mixture lengthwise along the cutlets, leaving about a 1" border on each end. Lifting up from the (long) end that's closest to you, roll up each cutlet (i.e., away from you). (Finished product should resemble jelly rolls.)
Securely tie each roulade crosswise with kitchen twine so that it holds its shape. (Or, see the Chef's Notes section below if you'd prefer to take a shortcut and forgo this step.) Here's how to do this (or you can just watch this instructional video instead): Grasp the kitchen twine with both hands, placing the short end in your dominant hand. From the end of the roulade that's farthest away from you, slide the kitchen twine under the bottom of the roulade, moving it towards you about a third of the way down the roulade. Grasping the short end of the string, tie it into a tight double knot on top of the roulade. Next, while grasping the long end of the string in both hands, slide it underneath the roulade another third of the way down. Be sure to give yourself enough slack. Then while still holding the string in your hands, lift up the free end of the kitchen twine, lace it through the loop of string you're holding in the other hand, and then tug the free end upward, pulling it tight. (If your roulade is unusually long, you can repeat this step again until you get closer to the other end of the roulade.) Pull the string down lengthwise, towards the end of the roulade that's closest to you, and while still holding the string in your one hand, roll it over (crosswise) onto its opposite side, and wrap the string over top of the roulade, lengthwise, to the other side. Then roll it over one more time and lift the string up to meet the other loose end, and tie it in a double knot. Repeat the process until all roulades are tied.
Season the roulades with 1/8 tsp. salt (or to taste), sprinkling from a good distance above to evenly distribute. Drizzle with 1 Tbsp. extra virgin olive oil to help brown the roulades. Transfer roulades to a 7" x 11"x 1 1/2" glass baking dish and cover with aluminium foil. Roast for about 25 minutes, or until the juices run clear and meat is no longer pink on the inside. Then open oven, pull out rack with baking dish, and remove aluminium foil. Continue to bake for another 10-15 minutes, or until tender when pierced with a fork. Allow to cool for 10 minutes, then transfer to a large cutting board. Using poultry scissors, remove kitchen twine from turkey. With a sharp knife, cut roulades crosswise into 1/4 - 3/8" thick rounds, about 5 rounds per roulade. Place onto a large serving platter, providing toothpicks on the side, and serve warm or at room temperature.
Can be made a day in advance and chilled in a covered container in the refrigerator.
Yield: Approximately 50 mini-roulades.
Chef's Notes: So, now that you've learned how to lace poultry, here are the rolling instructions for lazy people. :) --> Some people swear by metal poultry lacing pins, using them as a needle to lace the twine, but in truth, all you really need is kitchen twine or if you're really pressed for time, nothing at all. That simplifies things considerably. No fuss, no muss. To be 100% honest, I made these roulades without using any twine at all and as you can see from the above photo, they stayed in one piece when I sliced them into rounds. If you take the easy way out, just be sure that you roll the roulades really tightly, tuck the ends under, and tightly nestle them next to one other when you put them into the glass baking dish, so they don't start to unravel.
IMPORTANT: Some people like to use toothpicks to help them secure the roulades while they tie them together, but if you do this, just make sure that you remove the toothpicks before placing the baking dish into the oven. For future reference, toothpicks can actually be placed into the oven, but they must first be soaked in warm water for 10-20 minutes, in order to prevent them from burning, or worse, starting a kitchen fire. Personally, the idea of using toothpicks in an oven makes me rather nervous, so I'd rather just use the kitchen twine and avoid potential kitchen mishaps. On that note, it's VERY IMPORTANT that you use kitchen twine (sometimes also called cooking or butcher's twine) and not generic household string, because the latter will set on fire if placed into the oven. So please be aware of these fire hazards!
Thursday, April 25, 2013
2 Recipe #356: "Polenta-Style" Quinoa Cakes with Mushroom Ragù
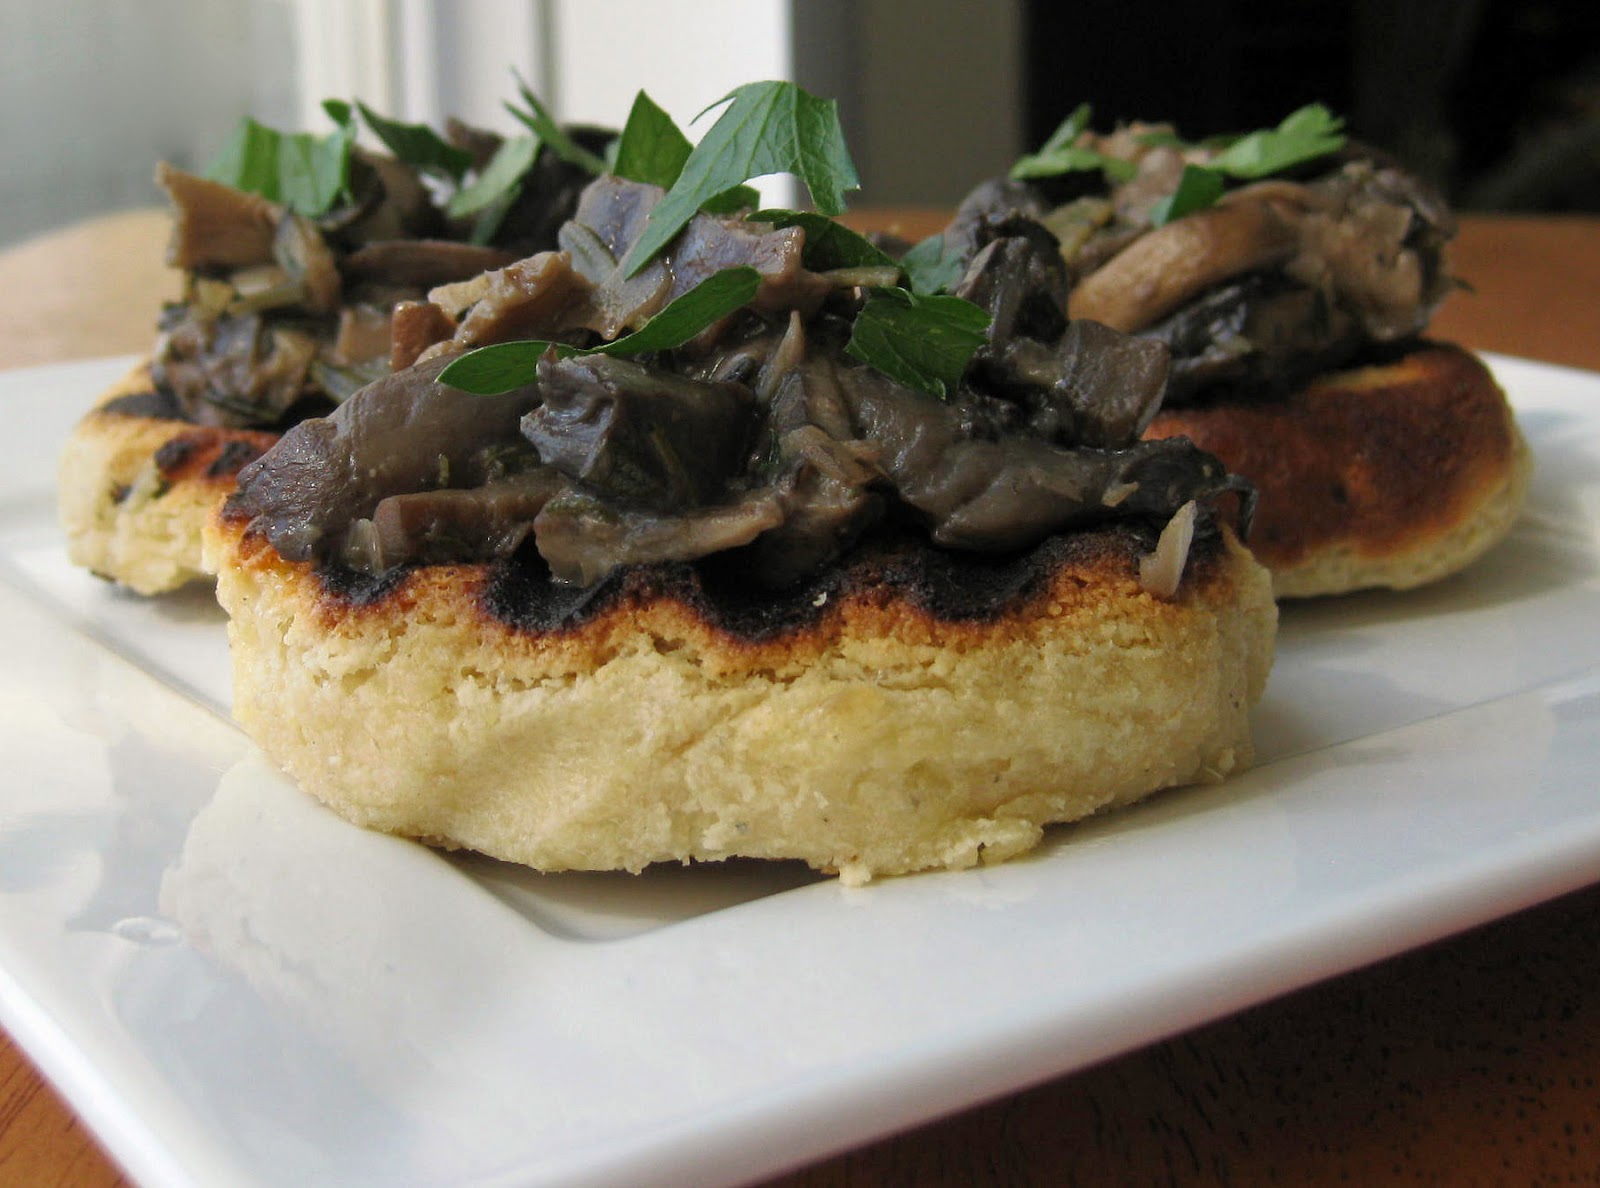
Below was today's lunch, and wow, was it was deceptively filling! I could only eat 2 cakes, and let me tell you, I have a sizable appetite. Just ask my friends and family. :) Thank goodness I work out a lot. Lol.
Today's my kung fu and gym day, so I don't have a lot of time to wax effusive about this recipe right now. Also, I'm pressing full speed ahead to meet the rapidly approaching deadline for The Athlete's Cookbook, which, of course, will include this recipe. Suffice it to say that this dish turned out well. Plus, I was able to type up the recipe in time and also complete the photo session without making myself late for class. Bonus. :) OK, enjoy the recipe.
Toodles,
-C

"Polenta-Style" Quinoa Cakes with Wild Mushroom Ragù
Quinoa Cake Ingredients:
1/2 c. quinoa, uncooked, thoroughly washed (to remove saponin), and drained (makes 1 c. cooked)
2 c. water (for cooking the quinoa)
1 c. almond meal, plus more for flouring surface for the cakes
1 c. Parmesan cheese, shredded
1/4 c. chèvre (soft goat cheese), crumbled
1 tsp. garlic powder
1 tsp. onion powder
1/4 tsp. ground black pepper
1/8 tsp. salt
1 Tbsp. extra virgin olive oil (for sautéing quinoa cakes)
Ragù Ingredients:
1 Tbsp. extra virgin olive oil
1/2 c. shallots, peeled and finely minced (about 2 shallots)
1 1/2 Tbsp. garlic, peeled and finely minced (about 1 1/2 large cloves)
1 c. generic mushrooms, thinly sliced and then cut into bite-sized pieces
1 c. portobello mushrooms, thinly sliced and then cut into bite-sized pieces
1 c. shiitake mushrooms, thinly sliced and then cut into bite-sized pieces
1/4 tsp. salt
1/4 tsp. ground black pepper
1 Tbsp. fresh rosemary leaves, finely minced
1 Tbsp. fresh sage leaves, finely minced
1 Tbsp. fresh thyme leaves
1/4 c. marsala wine (or sherry, if unavailable)
1 Tbsp. fresh Italian flat-leaf parsley
1/4 c. unsweetened organic soy milk
Directions: Make the quinoa cakes: Bring 2 c. of water to a rolling boil in a large sauce pot. Add quinoa and cook for 10 minutes. Allow to rest for 10 minutes (to cool to room temperature), then fluff with a fork. Drain into a mesh sieve and rinse with cold water under the kitchen faucet. Transfer cooled quinoa to a food processor, followed by all remaining quinoa cake ingredients, minus the olive oil, (which will be used later to sauté the cakes). Process until the quinoa is completely pulverized and all ingredients are fully incorporated. Dust a large plate with a generous amount of almond meal. Then break off a large chunk of dough about the size of a large matzo ball (about 1 3/4" in diameter) and roll into a ball with the palms of your hand. Then, with the palm of your hand, gently flatten the dough ball so that it's about 1/4" high, then shape and smooth the outer edges into a seamless disc. Place dough disc onto the almond meal "floured" plate. Repeat this process until all dough has been used up and you've made 8 uniformly sized cakes. Set aside.
Next, make the ragù: Heat olive oil on high heat until glistening, about 20-30 seconds, then reduce heat to low, add shallots and (fresh) garlic, and sauté for 2 minutes. Then add all of the mushrooms and immediately season with salt to help accelerate the moisture extraction process. Turn up heat to medium. Next, quickly add black pepper, rosemary, and sage and cook for 10 minutes, or until liquid has evaporated to a thin layer on the bottom of the pot, stirring occasionally. Stir in marsala to deglaze. Cook another 5 minutes, or until liquid has once again been reduced to a thin layer on the bottom of the pot. Add thyme and soy milk and continue to cook until liquid has been reduced by at least three quarters, about 5 more minutes. In the final 1-2 minutes of cooking, add parsley. Remove from heat and set aside.
Grill and assemble the quinoa cakes: Heat olive oil in a square grill pan on high heat until glistening, about 20-30 seconds, then reduce heat to medium-low, place 4 quinoa cakes into the pan and cook about 3 minutes per side. Place onto a clean plate and set aside. Then repeat the process for the next batch of 4 quinoa cakes. Divide up cakes into equal portions, transfer to plates, then top with ragù and serve.
Yield: 8 quinoa cakes, approximately 1/4' thick and 2 1/2" in diameter.
Chef's Notes: It's important to thoroughly wash quinoa to remove the saponin, which creates a bitter taste. This makes a huge difference in flavor and palatability. I've heard people say that quinoa tastes bitter, but really, it's because whoever prepared it for them probably didn't wash it first. :)
Also, be sure to thoroughly clean the mushrooms to remove any debris. The best way to do this is to soak them in a bowl of cold water for 15-20 minutes, then rinse them under cold water, washing them by hand.
You can buy almond meal at many, if not most, generic grocery stores these days. (Or at least you can in major cities.) I know for a fact that Whole Foods carries almond meal. It's a fairly neutral tasting "flour," which makes it the perfect canvas and/or binding agent for many different dishes, including this one. :)
Tuesday, April 23, 2013
0 Recipe #355: Vegetable Quesadillas

Packed with brightly colored vegetables, this dish is as pleasing to the eye as it is to the stomach. It makes a super-easy and nutritious go-to appetizer, dinner, or lunch. Quick and healthy, this dish can be prepared in a matter of minutes. It’s got all the bases covered -- it’s high in protein, fiber, and quality carbs but low in fat, and really satisfies.
Vegetable Quesadillas
Quesadilla Ingredients:
1 tsp. extra virgin olive oil
1 large, low-fat soft whole wheat flour tortilla
1/3 c. low-fat shredded Monterey Jack cheese
1/4 c. mushrooms, thinly sliced
1/8 c. red bell pepper, finely diced
Salsa Ingredients:
1/2 c. fresh, vine-ripened tomato, diced (about 1/2 medium-sized tomato)
1/2 tsp. dried cilantro leaves
1/2 tsp. dried oregano leaves
1/2 tsp. Mexican-style chili powder
1/8 tsp. garlic powder
1/8 tsp. onion powder
1/16 tsp. (pinch) salt
1/8 c. scallions, sliced crosswise into 1/4” rounds (about 1 scallion)
1 Tbsp. jalapeño, stemmed, seeded, and diced (about 1/2 jalapeño)
1 Tbsp. freshly squeezed lime juice
Optional Condiments:
1/2 Haas avocado, pitted, peeled and thinly sliced (or substitute guacamole)
1 Tbsp. fresh cilantro leaves, finely minced
2 Tbsp. (or more) nonfat Greek yoghurt (sour cream substitute)
Directions: Preheat oven to 400°F. Place all salsa ingredients in a bowl and mix until well combined. Set aside. Place one tortilla onto a cookie sheet and brush with olive oil. Flip over, then lift up on one side and fold over to meet the other end. Lift top side and hold open while adding ingredients. Sprinkle the cheese onto the bottom half of the tortilla, followed by the salsa, and then the mushrooms and red bell pepper. Be sure to keep the ingredients to within a 1/4" of the tortilla's outer edges. Close top of the tortilla, evenly pressing down on the tortilla all over using your fingers. Place into oven and bake for 10-12 minutes, or until golden brown. Remove from the oven and carefully cut the quesadilla into quarters while still hot. (To ensure uniform portion sizes, first cut the quesadilla in half, and then cut those halves in half.) Transfer to a plate. Garnish with desired toppings and serve hot.
Yield: 4 quesadilla wedges.
Wednesday, April 17, 2013
1 Recipe #354: Baby Rocket, Chickpea, & Hearts of Palm Salad with Shaved Manchego Cheese, Tossed in a Lemon-Mint Vinaigrette

This blog clearly needs more salad recipes, so it's time to rectify that. Like the last 10 zillion recipes I've been posting here lately, this one's also going to be in The Athlete's Cookbook, which will be released this summer, on August 13th. So, those of you who've told me that you've been eagerly awaiting its arrival won't have to wait much longer. :) It's currently available for preorder and can be purchased at Amazon.com and BN.com (i.e., Barnes & Noble).
Not only is this salad super-easy to make, but thanks to the chickpeas, which are packed to the hilt with quality carbs and protein, this salad is deceptively filling. It really doesn't take much of this salad to satisfy. In fact, I only had a small bowl of it for lunch earlier today, and I'm still full several hours later. So, to those of you who don't think salad can be filling, this salad is going to prove you wrong. :) This is not your average "rabbit food" type salad. Personally, I never like eating those types of salad either, so I'd never make a recipe for something like that anyhow. I believe in food that satisfies. So, no flimsy, wilting iceberg lettuce with mushy tomatoes types of salads here. :)
Anyhow, let's just cut to the chase and get to the recipe, shall we? So, without further ado, I bring you Baby Rocket, Chickpea, & Hearts of Palm Salad with Shaved Manchego Cheese, Tossed in a Lemon-Mint Vinaigrette, which is quite possibly the longest recipe title ever. Lol. Enjoy!

Baby Rocket, Chickpea, & Hearts of Palm Salad with Shaved Manchego Cheese, Tossed in a Lemon-Mint Vinaigrette
Salad Ingredients:
4 oz. baby rocket (arugula), well-rinsed, drained, and spun in a salad spinner until dry
1 15 oz. can chickpeas, rinsed and drained
1 14 oz. can hearts of palm, rinsed, drained, and then sliced crosswise into 1/4" rounds
1/2 c. grape (or diced, vine-ripened) tomatoes
1/4 c. Manchego cheese, shaved
Dressing Ingredients:
1/4 c. extra virgin olive oil
2 Tbsp. lemon juice
1/4 tsp. Dijon mustard
1 Tbsp. mint, finely minced
1/2 Tbsp. garlic, peeled and finely minced (about 1 large clove)
1/8 tsp. salt
1/8 tsp. ground black pepper
Directions: Place all dressing ingredients into a blender and pulse until creamy and smooth. Set aside. Place all salad ingredients, minus the Manchego cheese, into a large bowl and thoroughly toss until all of the ingredients have been coated with dressing. Add Manchego cheese and gently toss until combined. Serve and enjoy!
Yield: 6-8 servings as a side salad and 4 servings as main course.
Tuesday, April 16, 2013
0 Recipe #353: Hazelnut-Chocolate Mousse Pudding
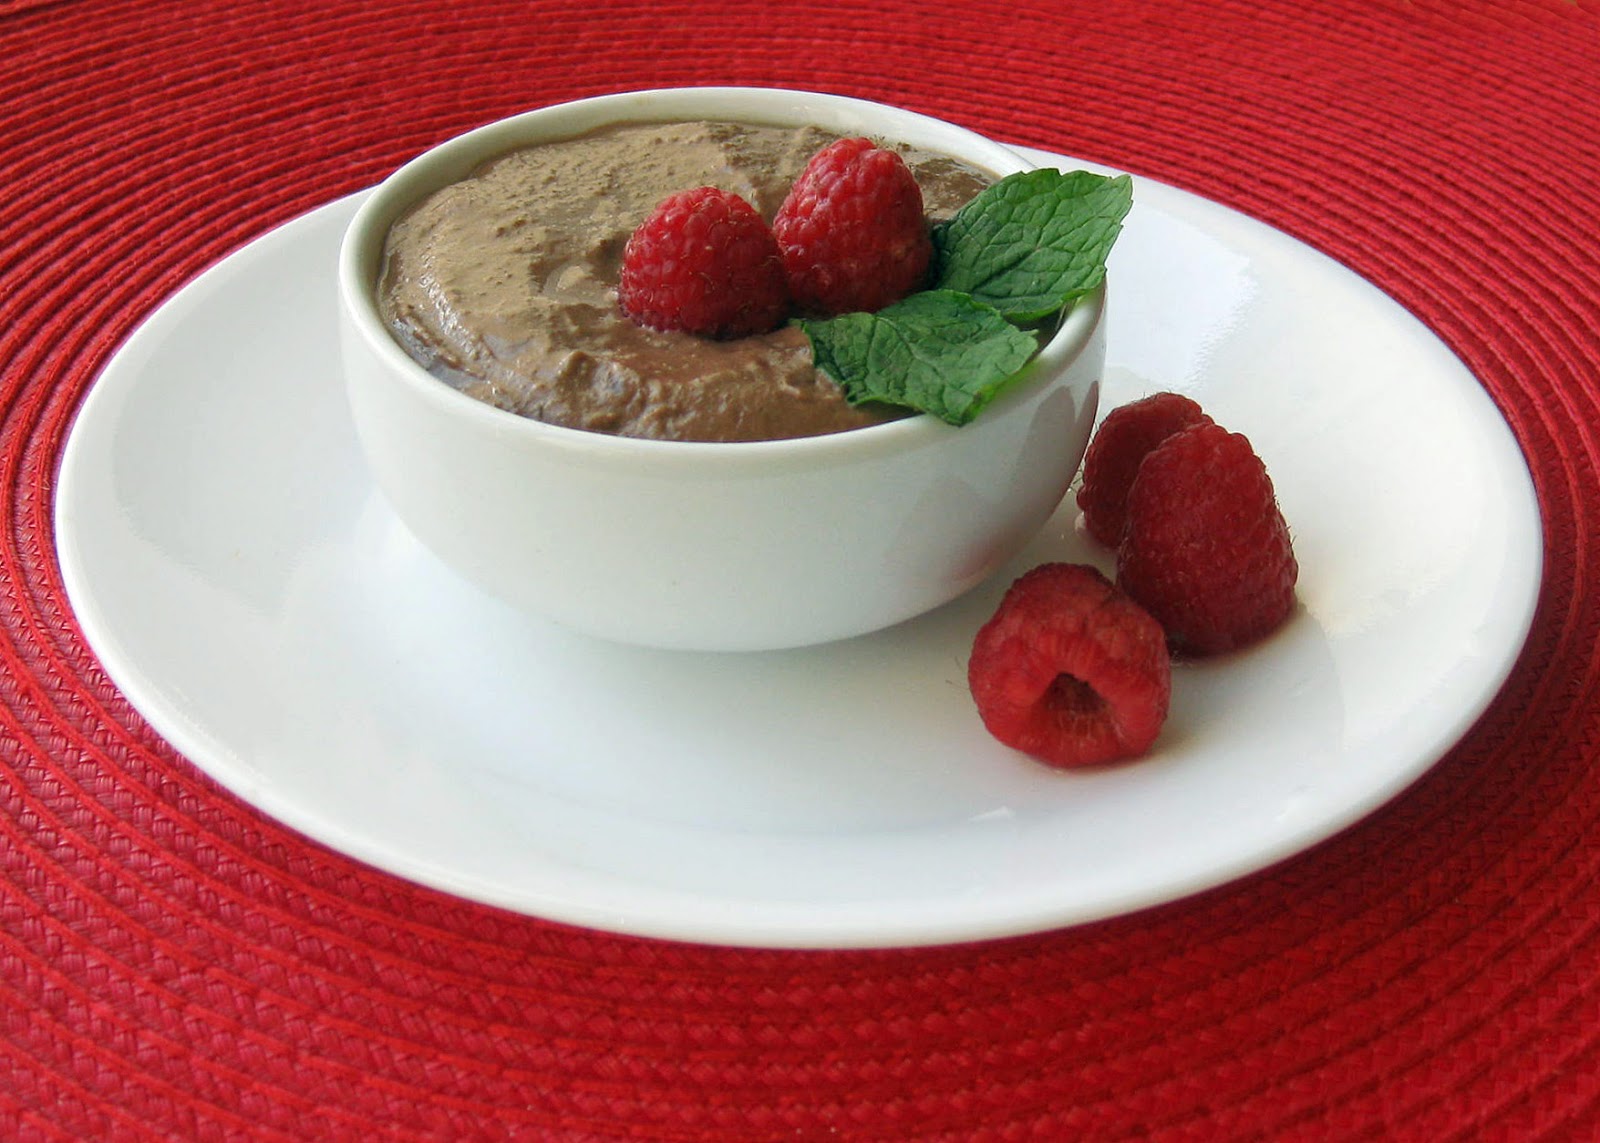
This recipe was inspired by a friend of mine. Several months ago, we'd had a conversation about how cool it would be to have a recipe for a healthy version of Nutella, and here, several months later is that recipe, albeit in pudding form. :) However, it's easy enough to turn into a spread just by removing some of the liquid from the recipe, and so, that how-to for this alternate idea has been added below in the "Chef's Notes" section for those of you who so desire to do so. Either way, it's super-easy to make!
This dish, which is yet another recipe for our book, The Athlete's Cookbook, is made without any added saturated fat or refined sugar. It makes a great post-exercise recovery snack, as it's got the recommended 4:1 ratio of carbs to protein. It's also lowfat. So that way, your body fully benefits from the carbs and protein (i.e., glycogen replenishment, muscle recovery and repair, etc.) while at the same time, burning off the food you just ingested and hopefully also some body fat. (This is known as the "afterburn" effect, in which the body burns calories at a higher rate immediately following exercise. This is why it's important to fuel your body with quality carbs and lean proteins within 15 minutes of finishing a workout. Might as well take advantage of the higher calorie burn, eh? :) )

Hazelnut-Chocolate Mousse Pudding
Ingredients:
1/2 c. Deglet Noor (common) dates, pitted, soaked in 1 c. boiling water, then drained, fully cooled, and squeezed to remove water
1/2 c. whole hazelnuts, skinned (you can buy them this way)*
3 Tbsp. unsweetened natural cocoa powder
1/2 c. lite organic silken tofu
1/2 c. plain, unsweetened organic soy milk
1 tsp. vanilla extract
1/8 tsp. salt
Directions: Add all ingredients to a food processor and blend (for about a full minute or so) until smooth. Transfer pudding to dishes and serve.
Yield: 1 c., or about 2-4 servings, depending upon appetite. :)
Chef's Notes: To turn this recipe into a Nutella-like spread, simply omit the soy milk.
*Where to find whole, skinned hazelnuts: Believe it or not, I found skinned hazelnuts at Target (in their supermarket section), of all places, but I bet you could probably also find them at a place like Whole Foods, Wegmans or Trader Joe's. A generic supermarket might even carry them as well. Best to call ahead before visiting. And of course, you can always order them online.
Sunday, April 14, 2013
0 Recipe #352: Tuna à La Tapenade

Wanna pack on lean muscle mass and reduce post-exercise inflammation? Then try this tasty, easy-to-make, no-cook dish (from our upcoming book, The Athlete's Cookbook), which is made with ZERO mayo, is simply loaded to the hilt with lean protein and Omega-3's.
Tapenade is a refreshing, not to mention much healthier (!), alternative to mayo. It not only keeps the tuna moist, but also gives it a lighter and much more flavorful taste as well. You get maximum taste with minimum saturated fat, and all done without resorting to a single, artery-clogging globule of mayo. :)
If you're looking for other mayo-less "salad" recipes, you're in luck, because this blog has several. For starters, there are recipes for Fennel Potato Salad, Mexican Egg Salad, Asian Jicama Slaw, Greco-Roman Pasta Salad, Avocado & Tomato Salad, Three-Bean Salad, and Tomato & Goat Cheese Pasta Salad with Fresh Dill & Tarragon. If you're looking for other mayo-less salads with tuna in them, there's Samurai Salad" (Wasabi Tuna Steak Salad) as well as the Tuna & Avocado Lettuce Wraps recipe I created for Paleo Fitness. (Right now, the latter recipe is only available in the aforementioned book. Back when I was testing the recipe for that book, I took a few hasty snaps of the dish for posterity's sake. However, the photos didn't turn out (the lighting wasn't optimal, etc.), so that's one of the reasons you don't see that recipe here. ;) I may or may not post it. Time is of the essence, and at present, the main priority is finishing The Athlete's Cookbook. So, anything else will have to be on indefinite hold. After that book wraps, it's onto Smoothies for Athletes, and then back to a long-standing work-in-progress, my own healthy gourmet cookbook. :) So, don't hold your breath for that recipe. It might be a while. Lol.)
OK, got to get back to writing and cooking now, so hasta la vista and all of that. :) Hope you enjoy the recipe!

Tuna à La Tapenade
General Ingredients:
2 12 oz. cans tuna in water, drained
2/3 c. Greek olives, pitted and chopped (about 14 large olives)
1 Tbsp. fresh Italian flat-leaf parsley, finely minced
4 red bell peppers, with stems, seeds, and ribs removed, cut into long strips
Tapenade Ingredients:
1 c. Greek olives, pitted (about 18 large olives)
2 large garlic clove, unpeeled (about 1 Tbsp. worth)
1 Tbsp. capers, soaked in 1/4 c. water for 10 minutes, and then drained
1/2 Tbsp. freshly squeezed lemon juice
1 Tbsp. extra virgin olive oil
1/4 tsp. Dijon mustard
1 Tbsp. fresh Italian flat-leaf parsley, finely minced
1/2 tsp. dried oregano leaves
1/2 tsp. dried crushed rosemary leaves
1/2 tsp. dried marjoram leaves
1/2 tsp. dried basil leaves
1/2 tsp. dried thyme
1/8 tsp. crushed red chili pepper flakes
1/8 tsp. ground black pepper
Directions: Wrap unpeeled garlic cloves in aluminium foil and roast at 400°F in a toaster oven for 10 minutes. While garlic is roasting, prep the other tapenade ingredients and then place them into the food processor. Unwrap and peel garlic, let cool for a few minutes, then add to the food processor. Pulse until smooth and set aside. Place drained tuna into a large, non-porous bowl. Then transfer the tapenade to the bowl using a spatula, followed by the 2/3 c. chopped Greek olives and 1 Tbsp. finely minced, fresh Italian flat-leaf parsley, and thoroughly combine. Divide into equal portions and serve with red bell pepper strips on the side. The red pepper strips can conveniently double as “utensils” to spoon the tuna-tapenade salad right into your mouth. :) If desired, place tuna-tapenade mixture and red bell peppers on top of a salad or use as a sandwich filling.
Yield: 6-8 servings.
Friday, April 12, 2013
0 Recipe #351: No-Bake Chocolate-Cherry-Almond Energy Bites

These nutritious, satisfying, and naturally sweet bite-sized treats make great pre- or post-workout snacks. They’re also the perfect portion size for a mid-day snack or even a mini-dessert. Take them with you on the go when you need something quick and healthy to pop into your mouth.
Not only are these treats healthy and portable, but they take only a matter of minutes to make. They also happen to be vegan and gluten-free.
These small mouthfuls are deceptively filling, which is actually great, because they've got built-in portion control. :) One taste, (and then maybe wait 20 minutes or so ;) ), and you're full! It's a healthy way to satisfy a sweets/chocolate craving without going overboard.
Unlike nutritionally deficient snack foods filled with refined sugar, starch, and processed ingredients, these little energy bites won't give you that empty, unsatisfied feeling after you're done eating them. No short-lived energy bursts that'll only send your blood sugar crashing down and leave you hungry again only minutes later. These little suckers have staying power. :) So, if you keep them on hand, you’re much less likely to reach for those less-than-healthy choices in a hasty moment of hunger and desperation. Instead of a quick pick-me-up, you'll be rarin' to go for hours. :)
This is just one of the easy, tasty snack recipes you'll find in The Athlete's Cookbook. :-D Not too long ago, I brought these energy bites into kung fu class and also to last week's martial arts tournament and shared them with our team. (Yes, the recipe yield is enough to feed an entire martial arts team. Lol.) They were a bit hit with my classmates, so I hope you will enjoy them as well!

No-Bake Chocolate-Cherry-Almond Energy Bites
Dough Ingredients:
1/2 c. oats, finely ground into flour in a food processor
1/8 c. slivered almonds
1/8 c. unsweetened cocoa powder
1 c. reduced fat almond butter (be sure to use the kind with salt)
1/4 c. honey
1 c. dried, sugar-free cherries, densely packed (available at Whole Foods)
Coating:
1/4 c. slivered almonds, coarsely ground in a food processor (with 3-4 quick pulses)
Directions: Combine first three dough ingredients (oat flour, slivered almonds, and cocoa powder) in a food processor and process until just incorporated. Then add almond butter and honey and pulse until smooth and fully blended. Add cherries and pulse only until just combined. Remove dough, place onto a clean surface and roll into bite-sized balls (about the size of a quarter) using the palms of your hands, then dip each ball into a small bowl containing the ground almond coating and roll around in the bowl to completely cover in nuts. Transfer each ball onto a 11" x 17" wax paper covered tray as you complete them, spacing them evenly apart from each other. Place tray in the refrigerator for 15 minutes to solidify. Eat and enjoy! Refrigerate any leftovers.
Yield: Approximately 38-40 bonbons.
Chef's Notes: If you're making these as a portable snack, I recommend individually wrapping them in small squares of wax paper and then placing them into an airtight container or resealable plastic bag. They also make great holiday treats as well.
Wednesday, April 3, 2013
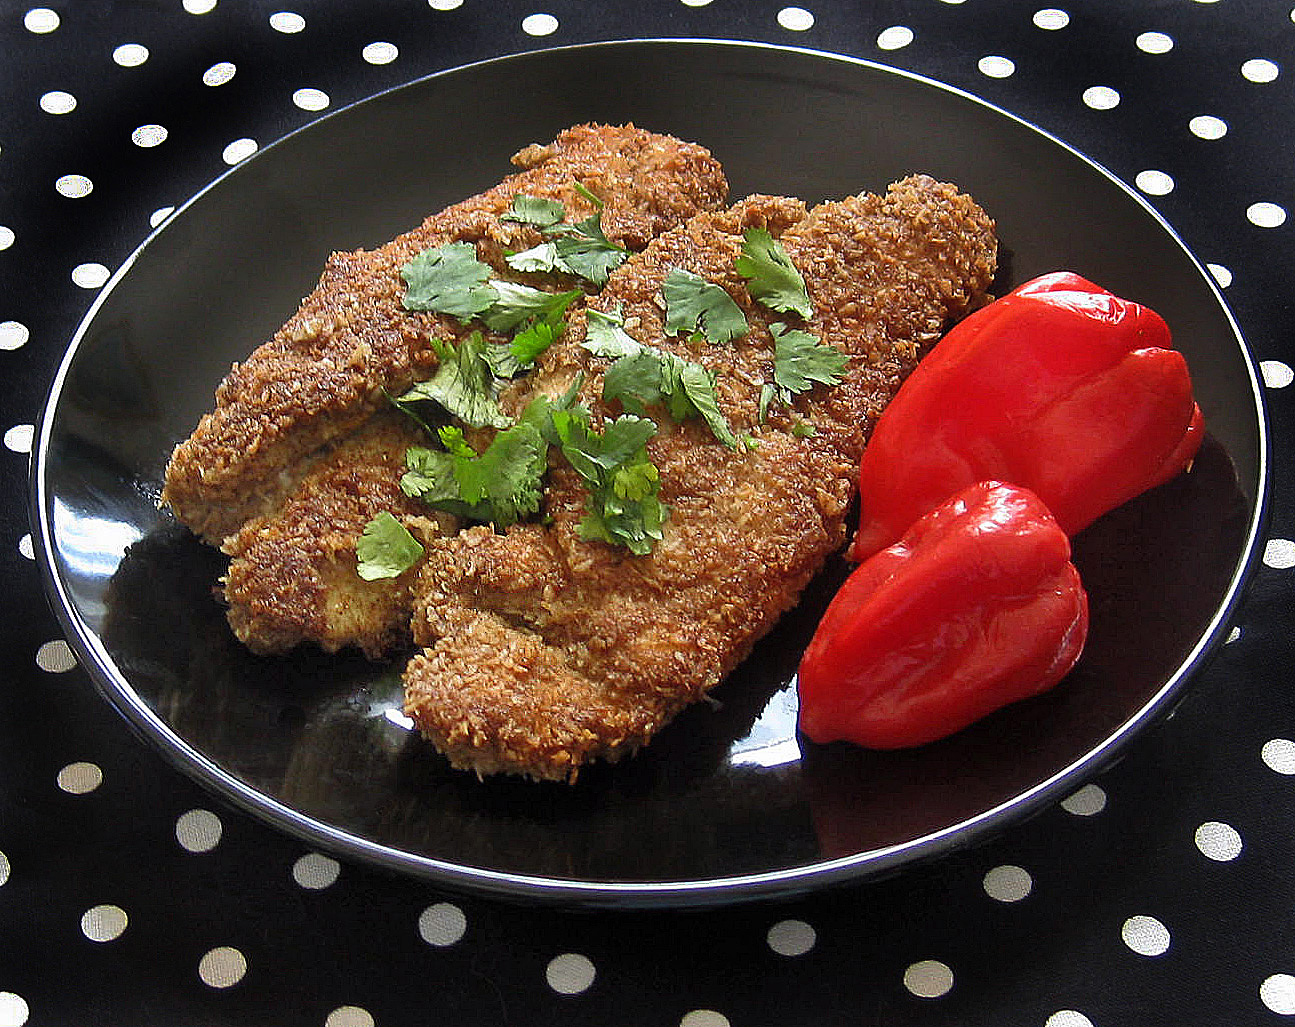
1 Recipe #350: Coconut Chicken
Coconut chicken has to be one of my absolute, all-time faves. Heck, coconut makes almost anything taste good. :) I love cooking and baking with it in all forms. It tastes great in seafood dishes (particularly fish and shrimp dishes), snacks, and all sorts of desserts and beverages, etc. Yeah, I'm loco for coco. ;)
This recipe uses coconut flakes, coconut milk, and coconut oil, so, it's got lots of coconut flavor. :) When it comes to creating delectable crusts for meat and seafood dishes, coconut flakes make a great substitute for bread crumbs, not to mention the fact that they've got a much greater nutritional value as well. Plus, in this particular recipe, the golden brown, crunchy coconut crust is not only tasty and nutritious but also has a practical culinary purpose as well -- it helps seal in moisture to keep the chicken tender and juicy.
This recipe is a little bit more unusual and exciting than your average coconut chicken recipe, because, even though it's uncomplicated and easy to make, it's got one unique thing going for it that the others don't, namely, my (no-longer-so-)secret ingredient, garam masala, which makes it a lot more flavorful and also gives it an extra kick.
Honestly, I don't know why I didn't create a chicken recipe like this sooner. :) I did, however, create a coconut shrimp recipe about a year ago entitled Indian-Style Coconut-Ginger Shrimp. That recipe and this one will both be included in the The Athlete's Cookbook, by Brett Stewart and myself, which will contain over 100 quick and easy healthy gourmet recipes to fuel the body for peak athletic performance and rapid recovery. There will be all sorts of fun and exciting entrées, appetizers, side dishes, snacks, desserts, and beverages in this book. Our book's currently available for preorder, and will be released on August 13, 2013.

Despite the bad rap that coconut oil's gotten over the years, it's actually quite good for you when consumed in moderate amounts. Most athletes have already heard about its myriad benefits out the wazoo, but I'll briefly mention some of them here, just in case you're not already acquainted with them.
"But wait, coconut oil is a saturated fat, so doesn't that automatically mean that it's bad for you?" Well, in a word, no. Let me explain: Believe it or not, coconut oil is actually one of the few healthy saturated fats that actually helps you to burn, well, fat. :) Not only that, it also provides an immediately usable, sustainable source of energy, which makes it the perfect choice for athletes. When consumed in moderation, it creates energy within the body, as opposed to most (animal-based) saturated fats, which have minimal health benefits and just end up sticking to your rear. ;)
So how can the saturated fat in coconut oil be such an effective fat-burning mechanism? The answer lies in its biochemical composition, or more specifically, its atomic structure: coconut oil contains lauric acid, a medium-chain triglyceride (MCT), which, as its name suggests, is a medium-sized chain of triglycerides. :) Unlike the long-chain triglycerides found in other types of fats, medium-chain triglycerides have a shorter chain of carbon atoms, and therefore can be more rapidly broken down (i.e., burned off) by the body and converted into energy. Since the body cannot readily store MCTs, it must burn them, thus resulting in an increase in fat oxidation (i.e., fat burning) and energy expenditure. This is how a moderate intake of coconut oil can lead to body fat loss.
Thus ends the scientific segment of this recipe post. Now onto the yummy part. :)

Coconut Chicken
Ingredients:
8 oz. (2 4 oz.) skinless, boneless chicken breast fillets
1 Tbsp. coconut oil
1/4 c. unsweetened, shredded (or grated) coconut flakes
1 Tbsp. garam masala (see below for recipe)
1 tsp. ground coriander
1/2 tsp. garlic powder
1/8 tsp. salt
1/4 c. coconut milk
1 Tbsp. fresh cilantro leaves, finely minced and densely packed (for garnish)
Garam Masala Ingredients: (Yield: 1 Tbsp.)
3/4 tsp. ground cumin
3/4 tsp. ground coriander
3/8 tsp. ground cardamom
1/4 tsp. ground cinnamon
1/4 tsp. ground ginger
1/4 tsp. ground black pepper
1/16 tsp. (pinch) ground clove
3/16 tsp. finely crushed bay leaves
1/8 tsp. ground cayenne pepper (or to taste)
Directions: About a half hour before cooking time, remove chicken from the refrigerator and let rest until it's reached room temperature. Thoroughly combine garam masala ingredients, (1 tsp.) ground coriander, garlic powder, and salt in wide but shallow bowl. Then add the coconut flakes and mix well. Set aside. Pour coconut milk into a separate bowl with the same dimensions. Place a large (12-13") saute pan over high heat for about 60 seconds. Then reduce heat to medium-low and add coconut oil. Next, quickly dip each fillet, one at a time, into the bowl of coconut milk, shake to remove excess, then dip into coconut flake mixture, gently pressing the chicken into the mixture to completely coat on both sides, and then place into the pan. Chicken should sizzle when it hits the pan; if not, the pan isn't hot enough. Cook 4-5 minutes, or until the juices run clear when pierced with a fork. Garnish each portion with cilantro. Serve and enjoy!
Yield: 2 servings.
Chef's Notes: Remember that the meat will continue to cook while it's resting on the plate (the temperature will rise by a few degrees), so be sure to cook the chicken just until the pink disappears and it's no longer fleshy. Otherwise, you risk overcooking it, and nothing's worse than dry, tough chicken. ;)
Adaptation: To make this recipe Paleo, simply omit the salt.