
Wednesday, June 30, 2010
0 Recipe #127: Blueberry-Lemon Pots de Crème


Yessssss, I finally did it! That nebulous germ of an idea that's been floating around in the back of my mind for the last several months -- i.e., some sort of dessert recipe with blueberries & lemon -- has finally materialized today into a solid recipe concept. The combination of blueberries & lemon just sounds good, so I was really pleased that inspiration (perhaps the muse of recipe writing?!) had ultimately decided to pay me a visit. :)
Gee, don't-cha just love it when a plan comes together?! :)
OK, well in this case, it wasn't so much about planning as it was just letting the magic of the creative process just happen on its own schedule. I knew that it was only a matter of time until I'd come up with something, but nonetheless, didn't want to force anything into being. Sometimes, ideas just need to be allowed to rattle around in the brain & percolate for a bit before they can bubble to the surface and take shape.
Creativity works in mysterious ways. A part of me knows that I'm not totally in control of what's happening, but that's OK. In the creative process, one can't hold on too tightly, or the ideas won't flow; that's why it's important to surrender to the tidal wave of ideas and just let it take you to where you need to go. It's all about letting go and going with the flow.
I love how the ideas arrive in my brain, wrapped up like little packages; sometimes they come right to me in clear linear fashion, one recipe line after another, & my typing fingers are struggling to keep up with the ideas flowing out of my brain, and other times they are obscured & nonsensical at first, like a 5,000 piece jigsaw puzzle, ready & waiting for me to assemble into a big picture that'll only come into view upon completion. However they arrive, they are gifts, & I truly appreciate every little one. :-D
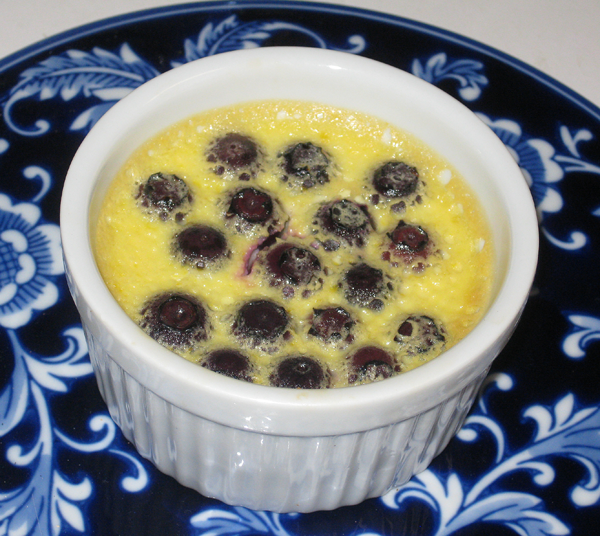
Blueberry-Lemon Pots de Crème
Ingredients:
2 large eggs
2 Tbsp. honey
2 Tbsp. freshly squeezed lemon juice (or 1 1/2 Tbsp. if you like your pots de crème less tart)
1 Tbsp. lemon zest, lightly packed (the zest of about 1 large lemon)
2 Tbsp. nonfat milk
1/4 c. light nondairy creamer
1/4 c. nonfat plain Greek yoghurt (regular plain yoghurt will also work)
1/8 tsp. salt
1/2 c. fresh blueberries
Directions: Preheat oven to 375°F. In a blender, combine eggs, honey, lemon juice & zest, milk, creamer, yoghurt, & salt & blend on high speed until frothy & smooth, about 2-3 minutes. Pour liquid mixture into 4 ramekins and evenly distribute blueberries into each petit pot. :) Place each ramekin into a rectangular Pyrex glass dish. Fill dish with water until the ramekins are submerged to the halfway mark. Cook for 30-35 minutes. Carefully remove ramekins from hot water bath. Drain water from dish. Serve immediately, while pots de crème are still hot.
Serving Suggestions: Lemon-blueberry pots de crème are tart & tangy, so they go really nicely with mellow, milk-based toppings like low-fat vanilla ice cream or a dollop of light whipped cream. :) Light/nonfat sour cream would be another alternative. Or, for an even lighter topping, top with a spoonful of nonfat vanilla or plain Greek yoghurt.
Yield: Serves 4.
Monday, June 28, 2010
2 Recipe #126: Chicken Marsala (Pollo alla Marsala)
I decided to make chicken marsala for dinner tonight. It's not something I typically make for dinner -- rather, it's usually the kind of dish we'd order for a special occasion at one of our favorite Italian restaurants -- but what the heck, it's good to live a little every now & again. :)
It made the whole kitchen smell fantastic and was quite a delectable, sumptuous treat! Needless to say, this dish got rave reviews at our house. Hope you'll like it just as much. Here's the recipe.... Enjoy!

Chicken Marsala (Pollo alla Marsala)
This classic, flavorful Italian dish gets its name two of its primary ingredients, Marsala wine -- a fortified wine which comes from the Sicilian town of Marsala, located at Italy's southern tip, i.e., the big toe of the "boot" :) -- and, of course, chicken. And of course, what would chicken marsala be without its third signature ingredient, mushrooms?! :)
The secret to good chicken marsala is in the sauce. And good sauce begins with a good-quality, imported Marsala wine. Only imported Marsala wine can give this dish its proper thick consistency and dark, rich color. Domestic Marsala wine pales in comparison, literally. :) The difference between the two can be seen after each is poured into a glass & viewed side by side: Domestic is thin and light in color, whereas imported is thick, viscous, and much darker in color by comparison. This primarily has to do with the different grapes used in production as well as the various methods of production. Imported (i.e., Marsala DOC) is made with highly specific varietals of native Italian grapes, which aren't typically found/grown in the US. Also, not surprisingly, the two wines smell & taste quite very differently as well. (For more details on the various types of Marsala wines, please see the "Chef's Notes" section at the bottom of this recipe post.)
The other important factor in making good sauce is its preparation & length of cooking time: This is why it's important that the sauce be allowed to reach the proper consistency during the reduction process. A good Marsala wine sauce should be thick and syrupy, almost as thick as molasses.
And finally, good Marsala wine sauce has the right mix of flavors: Since Marsala wine's essence only intensifies after reduction, becoming even sweeter & tangier, it needs to be balanced by savory & salty flavors (i.e., its polar "taste" opposites). This is why the addition of capers and herbs like parsley (&/or sage) are a must; they provide the necessary flavor contrast. Finally, lemon juice & nonfat creamer are added to round out the dish and give it the necessary body: The lemon juice brightens the existing flavors, and the nonfat creamer helps to mellow out the dish and provide it with a nice finish.
8 oz. skinless, boneless chicken breast, rinsed & defatted
1 T. all-purpose flour
3 T. plain bread crumbs (or plain cracker meal)
1 tsp. oregano
3/4 tsp. salt
3/4 tsp. freshly ground black pepper
1 Tbsp. extra virgin olive oil
1 tsp. butter
1/3 c. shallot, peeled & roughly chopped
1 c. yellow onion, peeled & roughly chopped (about 1/2 medium-sized onion)
1 c. white ("Baby Bella") mushrooms, sliced (i.e., 1/2 of an 8 oz. package)
1/4 c. fresh sage, finely minced & tightly packed (optional)
1 c. imported Marsala wine (i.e., Lombardo, Florio, Pellegrino, Marco De Bartoli, or comparable)
1/8 c. fresh flat leaf parsley, finely minced & tightly packed
2 Tbsp. light nondairy creamer
2 Tbsp. freshly squeezed lemon juice (the juice of about 1 lemon)
1 Tbsp. capers (garnish)
Directions: Wash chicken cutlets and lay them onto a non-porous (i.e., silicone) cutting board or other smooth, clean surface. Cover chicken with plastic wrap, and tenderize by pounding flat with the bumpy (i.e., waffle-patterned) side of meat mallet to a uniform thickness of about 1/4". After chicken has been tenderized, cut each piece crosswise into halves (or thirds, if you prefer). In a small bowl, mix together flour, bread crumbs (or cracker meal), oregano, salt, & pepper. Dip chicken cutlets into bowl filled with the bread crumb, flour, & dried spice mixture, and lightly coat each side. Shake off excess. In a large sauté pan, sauté each side in olive oil and melted butter on medium heat for about 3 minutes or until light, golden brown, & remove from pan. Either place on a warmed plate or, if desired, into an oven on lowest heat setting to keep warm. Next, turn down heat to low, & cook onions, shallots, mushrooms, (& sage, if using) in residual butter & olive oil in a large sauté pan until soft, about 5 minutes. Then, to deglaze pan, pour in Marsala wine & reduce to the consistency of a thick syrup. This will take about another 5-10 minutes or so. Be sure to scrape off the fond (i.e., the brown, caramelized residue) from the bottom of the pan while the sauce is forming; this is an important step in the dish's "flavor development." Add chicken back into the pan, & cook for another 3-5 minutes (or until chicken juices turn clear), flipping a few times during the braising process to thoroughly coat with sauce. In the final minute of cooking, add parsley, non-dairy creamer, & lemon juice, & stir well. Remove from heat, place onto plates, garnish/sprinkle with capers, & serve immediately.
Yield: Serves 2.
Serving Suggestions: This dish is commonly served with a side of pasta, potatoes, or rice pilaf, although, if you'd like to skip the starch fest, you can also serve it with a side salad or soup, or substitute a high-protein whole-grain side like Wild Mushroom Quinoa Risotto with Fresh Herbs & Hazelnuts or Herbed Bulgur Pilaf. For some salad recipes that'd go well with this dish, try the Mesclun & Baby Spinach Greens with Gorgonzola, Pear & Candied Pecans, the Lemon-Thyme-Tarragon Vinaigrette on a Bed of Watercress Greens, Corey's Gourmet Greek Salad, or the Sine Qua Non Salad, which are all from this blog. But of course. :)
Chef's Notes: When choosing a varietal for cooking & baking, here's what you need to know: Marsala wines are generally classified according to age, alcohol content, color, & flavor styles: Fine -- typically used for cooking -- is normally aged less than one year. Superiore has been aged a minimum of 2 years, & is sometimes aged up to 3 years in oak barrels with a minimum of 2 years spent in wood. Superiore Riserva has a minimum requirement of at least four, although some producers may age it up to 6 years, & is the tier you'll want to use for desserts and apéritifs. Vergine has been aged 5 years or more (i.e., typically up to 7 years) in oak. Vergine Soleras, as the name implies, is a blend of multiple vintages, & is also aged a minimum of 5 years. And finally, there's Vergine e/o Soleras Stravecchio e Vergine e/o Soleras Riserva, which has been aged for at least 10 years in oak.
Popular/well-known leading producers of Marsala include Florio (one of the oldest), and Pellegrino, Marco De Bartoli, & Lombardo* -- all from Sicily.
( * = The above link is more about the company itself. Here's a better link for more in-depth product information on Lombardo. )
Friday, June 25, 2010
0 Recipe #125: Chilled Tomato Ginger Soup
This soup recipe is something I whipped up on the fly, immediately after creating & preparing the recipe for chilled watercress soup. What can I say, I had cold soup on the brain. :)
I ended up chilling this soup in the fridge for later. It tasted even better after a day's worth of refrigeration. :)
The sources of inspiration for this recipe include various global culinary influences, particularly the cuisines of Mexico, Southeast Asia, Ethiopia, and India.
Chilled Tomato Ginger Soup
Ingredients:
1 Tbsp. extra virgin olive oil
1 Tbsp. butter
3 c. leek, sliced crosswise into thin rounds (about 1 small whole leek)
1/2 c. yellow onion (about 1/2 small onion)
1 c. celery, sliced crosswise into 1/4" pieces (about 1 large stalk)
1/2 Tbsp. fresh ginger, peeled & diced (about 1/2" piece)
1 large bay leaf
3 c. vine-ripened tomatoes, diced (about 4 large tomatoes)
4 c. water
6 Tbsp. tomato paste
1/2 tsp. ground cinnamon
1/4 tsp. ground clove
1/8 tsp. ground cardamom
2 Tbsp. fresh, Italian flat leaf parsley
1 Tbsp. basil (or mint) (about 6-8 leaves)
1 tsp. freshly squeezed lemon juice
a few sprigs of parsley (for garnish)
Directions: Melt butter in a large stock pot on medium heat. Add olive oil while butter is melting. Then quickly add leek, onion, celery, ginger, & bay leaf, and sauté on low heat until soft and translucent, about 5 minutes. Next add vine-ripened tomatoes, stirring continuously until liquid has reduced to about half. Add 4 c. water to pot, turn up heat, & allow water to reach a full, rolling boil. Then turn heat down to low, season with salt & pepper, add tomato paste & remaining dry spices (salt, pepper, paprika, cumin, coriander, cinnamon , clove, & cardamom), and simmer for 20-25 minutes, stirring occasionally, until soup thickens. With about 5 minutes of cooking left, add fresh basil (or mint) & parsley. Remove from heat & let cool. Discard bay leaf. Add lemon juice & stir. Transfer to a blender and purée for about 2-3 minutes. Blend in batches. Chill soup for 1-3 hours before serving. When ready to serve, pour soup into bowls & garnish with a few sprigs of parsley.
Chef's Notes: In cooler weather, this soup can also be served hot. It's delicious either way. :) Soup will keep in the refrigerator for a few days or it can be frozen indefinitely. (Probably best if used within 6 months to a year.)
To make this soup vegan, replace the 1 Tbsp. butter with 1 Tbsp. extra virgin olive oil, or simply omit the butter all together.
Thursday, June 24, 2010
0 Recipe #124: Cooling Off with Some Chilled Watercress Soup! (Potage Cressonnière)
It's 96°F today, and is so hot that even our air conditioning is struggling to keep up. It's time to do anything & everything possible to stay cool, including taking cover in the fridge for a while if necessary. :)
So, for today's lunch, I made the healthy gourmet version of the classic (Northern) French dish, chilled watercress soup (i.e., sans crème, etc.). This accomplished three things: (1) Helped to cool off & beat this savage heat; (2) provided a meal of high nutritional value [i.e., watercress is a low-fat, low-cal food with mildly anti-inflammatory properties, zero glycemic load, & surprisingly high-protein content for a vegetable ;), & is also a great source of Beta-carotine, Calcium, Potassium, Lutein & Zeaxanthin, Quercetin, Vitamins A & K, and Phosphorus], and lastly; (3) provided another new recipe for the blog. :)

Ingredients:
2 1/2 c. red-skinned potatoes, peeled & sliced into 1/2" cubes (about 2 large potatoes)
1 Tbsp extra virgin olive oil
1 Tbsp. unsalted butter
1 Tbsp. flour
1 1/2 c. leek, thoroughly washed & sliced crosswise into thin rounds (about 1 small whole leek)
1/4 c. chopped yellow onions, finely chopped (about 1/4 large onion)
1/2 c. celery (about 1 small stalk)
4 c. fresh, dark green watercress, thoroughly washed, dried, roughly chopped into 2" pieces, & loosely packed (about 1 large bunch)
6 c. water
2 Tbsp. light, nondairy creamer
1 tsp. freshly squeezed lemon juice
2 tsp. watercress, chopped (for garnish)
1/2 Tbsp. chives (or scallion greens), chopped
Directions: Add potatoes to a pot of 6 c. boiling water, reduce heat to medium, & cook for 20 minutes, or until easily pierced by a fork. After about 15 minutes into cooking, heat olive oil & butter in a large sauté pan on medium heat. Wait until butter completely melts before adding flour. Thoroughly stir together flour, oil, & butter to make a roux. Then quickly add leek, onion, & celery, & sauté on low heat until soft and translucent, about 5 minutes. Add watercress next and cook until wilted. Transfer pan ingredients to the pot of cooking potatoes & water. Season with salt, pepper, chervil, & nutmeg. Continue to cook for about 15 minutes, stirring occasionally, until soup thickens. With about 5 minutes of cooking left, add fresh parsley. Remove from heat & let cool. Add lemon juice, Greek yoghurt, and light non-dairy creamer, & stir. Transfer to a blender and purée for about 2-3 minutes. Blend in batches. Chill soup for 1-3 hours before serving. When ready to serve, pour soup into bowls & garnish with chives & a few sprigs of watercress.
Chef's Notes: This soup can be chilled overnight or up to 1 day before serving. As a fun idea for parties, serve in shot glasses as an amuse-bouche.

0 Cool Kitchen Gadgets: Digital Timers -- Ever So Handy For Simultaneous Cooking, Baking, & Recipe Writing :)
Often, I like to use digital timers on my netbook in order to keep track of various things going on in the kitchen at once, or to prevent things from burning while I'm typing. ;) This way, I can see and, more importantly, hear (!), the timer(s) while I'm working in the kitchen. They've also been invaluable, time-saving devices as well. These are just some of the reasons why I like virtual, computerized solutions, particularly web-based ones.
 One such web-based tool I like is Poturi's Timer, a no-fuss, compact, & easy-to-use widget which can be added to your website or iGoogle dashboard. Its simple & straightforward digital display goes up to 00:99:99 (99 minutes & 99 seconds).
 Or, if you'd prefer using a desktop-based solution, another digital timer widget I recommend is the Kitchen Timer Yahoo! Widget. Those of you who use Yahoo! widgets (for your Mac or PC desktop), might like the Kitchen Timer tool. It's simple & easy to use, and you can set the timer up to 4 hours and 1 minute max (i.e., 3 hours in the hour column, 60 minutes in the minutes column, and 60 minutes in the seconds column). There's a play/pause button & a delete button to clear & reset the timer back to zero. This is pretty good option to use if most of your tasks fall within the 3-4 hour completion range.
 Additionally, there are various smartphone timer apps as well. Since I don't currently possess a mobile smartphone, I can't recommend specific ones. However, I do know that they do exist, and there are lots of apps out there from which to choose.
Alternatively, there are many time management software programs available, in either online or desktop format (full-fledged software programs, widgets, Twitter APIs, etc.), which contain timer functions. These will also probably also do the trick, especially if you find that you need more than just a timer to manage your kitchen-related &/or other daily activities. After all, time management software is often multi-purpose. :)
Of course, there are times when you might not always want to bring your laptop/netbook into the kitchen. [Splattering spaghetti sauce, anyone?! ;) ] Or, you might not even own a portable networked device like a laptop/netbook. In that case, there's always the solution of purchasing a separate mechanical or digital device. The variety of timers available for purchase -- online & elsewhere -- appears to be practically limitless. :)

However, if you're like me, you might need to keep track of more than one dish at a time: In my own case, there are often multiple activities going on in the kitchen at once -- cooking, baking, recipe writing, dish-washing, cleaning up, putting away food, etc. I do this primarily because I'm trying to finish writing my cookbook as soon as possible. :)
In order for the above process to work as smoothly, quickly, and efficiently as possible, a lot of orchestration & planning is required, particularly with regard to the timing of various activities. There's a lot of "gears in rotation" at once, and if done correctly, the process can go surprisingly well. Thanks to a combination of many years of experience in the kitchen & the timer gadgets I use, I've gotten it down to a fairly precise science. The rotating usage of multiple kitchen appliances, the allocation of countertop space while work is in progress, the movements & steps of the cooking process, etc. You name it, I've learned how to coordinate it. At this point, I feel like a well-oiled machine. :) Of course, when it comes to completely new territory (like my recent tamale-making experience!), it might take a bit longer for me to orchestrate all of the steps, but that's to be expected during the initial stages of a new learning curve. However, as far as the orchestration of the entire recipe creating & making process is concerned, I've mastered the art & science of the mechanism via hard-won experience. :)
 Additionally, if you're an exceptionally busy person, like me, you also might be short on time or perhaps just striving to juggle all of your activities without going completely bonkers. ;) Also, there might be cases in which you happen to have multiple cooks in the kitchen at once. :) Delegation of kitchen tasks to fellow chefs & budding "mini-cook" helpers -- young kids are potential chefs in the making! -- certainly helps things go faster as well!
Now, if you're going to go basic & old-school, I guess you could always resort to a combination of the old standbys, that is, if don't mind using multiple timers normally found in different locations around your kitchen & house: Let's see what happens when you set the timers on your stopwatch, your alarm clock, the oven, & the microwave, all at once. ;) Haha! Since most of these devices only allow one alarm setting per device, it'd surely be a bit impractical to rush around the house turning off all your timers, not to mention highly comical for others to watch! LOL. OK, perhaps you could relocate them all into the same room, so you can hear them all when they go off. ;) ), but I doubt that'd be a very calming, convenient, or permanent solution.
 This is particularly useful if you happen to have more than 1 oven (usually in a top-bottom configuration), or if you're lucky enough, an additional woodfire burning oven (for pizza, etc.). This way, you can coordinate and keep track of multiple things cooking at once.
I hear they also prevent kitchen fires. ;)
Wednesday, June 23, 2010
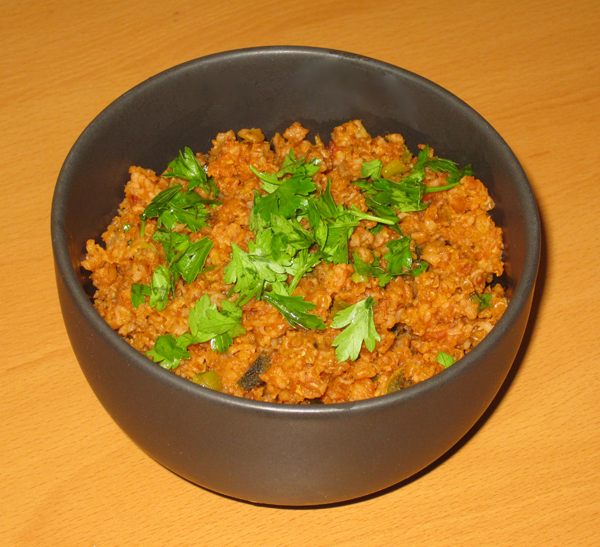
0 Recipe #123: Summer Vegetable Masala
I whipped up this little number for tonight's dinner. I basically just looked in the fridge to see what was inside -- an eggplant, a zucchini, mushrooms, & some asparagus -- and went from there.
This is the second night in a row that I had absolutely zero idea of what I was going to cook for dinner. And you know, a lot of the time, that's just the way I like it. :) It keeps things exciting & also keeps me on my culinary "toes." It's not always due to a lack of planning; a lot of the times it's deliberately done.
I don't always want to know what's next, because in my case, it usually only takes a few minutes to find out. :) Ideas just pop into my head, and fingers crossed, these little "last-minute" challenges are actually just what I need to help me finish writing my cookbook. :)
I find that when one is creating recipes, it's best to go with the flow, and find inspiration along the way. Although I have a solid understanding of the science behind food & cooking, a lot of the time I find that I do my best creative work when I go by feel & remain flexible.

Summer Vegetable Masala
I ate this dish as a main course for one (i.e., Erik's not a fan of the below veggies, so he ate something else for dinner tonight), but most people will probably want to eat it as a vegetable side. :) If you're planning to eat this as an entrée, just add a little protein (like chicken or tofu, etc.) and you're good to go!
Ingredients:
1 Tbsp. garlic, finely minced (about 2 large cloves)
1/2 Tbsp. ginger, peeled & finely minced (about 1/2" piece)
1/2 tsp. salt
1/8 tsp. red chili pepper flakes
2 Tbsp. shallot, finely minced (about 1 large shallot)
1 Tbsp. extra virgin olive oil
1 c. eggplant, diced into 3/4' cubes (about 1/2 small eggplant)
1 c. zucchini (about 1 small zucchini)
1 c. asparagus, sliced crosswise on the bias into 1" pieces (about 5 large stalks)
1 c. mushrooms, sliced (about 5-6 medium-sized mushrooms)
1/2 tsp. ground cumin
1/4 tsp. ground cinnamon
1/8 tsp. ground clove
1/8 tsp. ground nutmeg
1 large bay leaf
1 Tbsp. fresh Italian flat leaf parsley, finely minced (for garnish)
Directions: In a mortar & pestle or food processor, combine garlic, ginger, salt, & red chili pepper flakes & pulverize to make ginger-garlic-chili paste. In a large nonstick sauté pan or skillet, sauté ginger-garlic-chili paste, bay leaf, & shallots in olive oil over low heat until soft. Add eggplant & zucchini cubes and cook for about 1-2 minutes & occasionally stir. Next, add asparagus & mushrooms, as well as all of the remaining dry spices. Stir well to thoroughly combine ingredients. Cook until vegetables are tender and slightly crispy around the edges. Discard bay leaf. Garnish with fresh Italian flat leaf parsley and serve immediately.
Yield: Serves 2-4 as a side dish (or 1 as a main course).
Tuesday, June 22, 2010
0 Recipe #122: Grilled Herbed Chicken in a Lemon-Sage Butter Sauce
Yeah, I know. Still no chicken tamale recipe in sight. ;) Kinda put it on the backburner, because there's been too much going on lately & I haven't yet had a solid, dedicated block of time to devote to finishing it. If you can't guess, it's a long & complicated recipe that I had to make more than once to perfect. :) However, the recipe's almost done; there are just a few more (very involved!) steps & details to write out.
Anyhow, here's what I made for tonight's dinner, which clearly took a lot less time to write out. :) It's a really simple but delicious way of serving chicken. And, it can be cooked in a matter of minutes. Presto chango, instant food on the table. :)
 Grilled Herbed Chicken in a Lemon-Sage Butter Sauce
Ingredients:
0.8 lbs. (or roughly 12.8 oz.) boneless, skinless chicken breast, quartered
4 Tbsp. plain bread crumbs or cracker meal
2 tsp. paprika
1 tsp. dried parsley leaves
1 tsp. dried rosemary leaves
1/2 tsp. dried oregano leaves
1/2 tsp. dried marjoram leaves
1/2 tsp. ground savory
1/2 tsp. ground black pepper
1/4 (heaping) tsp. salt
2 Tbsp. extra virgin olive oil
2 Tbsp. fresh garlic, finely minced (about 2 large cloves)
4 Tbsp. shallot, finely minced (about 1 small shallot)
4 Tbsp. fresh sage leaves
4 small bay leaves or 2 large bay leaf
2 Tbsp. red wine vinegar
1 Tbsp. lemon juice
2 Tbsp. butter
Directions: Lay chicken on a non-porous cutting board (silicone works well for this purpose), cover with plastic wrap, and tenderize by pounding with the bumpy (i.e., waffled-patterned) end of a meat mallet, to a 1/4" thickness. Set aside. In a small bowl, thoroughly mix together breadcrumbs/cracker meal with all of the dry spices (paprika, parsley, rosemary, oregano, marjoram, savory, black pepper, & salt), & set aside. Heat olive oil in a large nonstick grill or sauté pan. Add garlic, shallot, fresh sage, bay leaves, red wine vinegar, & lemon juice, & cook on low heat until garlic & shallots are soft. Stir occasionally, so that the ingredients do not brown or stick to the bottom of the pan. Next, add butter & let it completely melt in the pan before adding chicken. Quickly dip each side of the chicken fillets into the bowl filled with the breadcrumb/cracker meal mixture and immediately place into sauté pan. Cook for about 3-4 minutes on each side, or until cooked all the way through but still tender. Discard bay leaf. Serve & enjoy!
Optional Ingredient Suggestions: This dish would also taste really good with the addition of mushrooms, olives, and/or capers. If you are adding capers, you can probably omit the salt, as capers will certainly supply enough salty flavor alone.
Yield: Serves 2.
Friday, June 11, 2010
0 Recipe #121: Pineapple Popsicles
.jpg)
Pineapple Popsicles
Here's yet another recipe for homemade fruit popsicles. This time, pineapple is the featured fruit -- a tantalizing, tropical treat! :)
Ingredients:
1/2 c. fresh pineapple chunks
1/2 c. nonfat, plain (or vanilla) yoghurt
1 Tbsp. honey
1 tsp. freshly squeezed lemon juice
 Directions: Toss everything into a blender & pulse until smooth. Pour mix into popsicle maker. For the silicone popsicle molds, it takes approximately 2 hours for them to freeze all the way through.
Yield: Makes enough to fill 4 Orka-brand popsicle molds. You might have to readjust quantities if you are using different sized molds. This quantity will probably also work for most Kinderfield or Tovolo brand molds as well, provided they are similar in total fluid ounces.
Thursday, June 10, 2010
0 Recipe #120: Herbed Bulghur Pilaf
This Turkish-inspired recipe has an American twist to it. Not only is this dish delicious & very satisfying, but it's also low in fat, high in fiber, and extremely nutritious. And, it also is very quick & easy to make. What's not to like?! :-D
Ingredients:
1/2 cup medium-grade bulgur
1 1/2 c. water
2 tsp. extra virgin olive oil
1/2 c. scallions, including green stems, sliced crosswise into thin rounds (about 3-4 scallions)
1/2 Tbsp. fresh sage leaves, finely minced (about 6 large leaves)
1/4 tsp. salt
1/8 tsp. ground black pepper
2 Tbsp. tomato paste
1 Tbsp. fresh flat leaf parsley, finely minced
2 tsp. fresh mint leaves, roughly chopped (about 5 large leaves) (optional)
Serving Suggestions: This dish goes really well with chicken & fish.
Yield: Makes 2-4 servings.
Wednesday, June 9, 2010
0 Recipe #119: "Peaches & Cream" Frozen Fruit Bars
"Peaches & Cream" Frozen Fruit Bars
As promised, here's another recipe for homemade fruit popsicles. These frozen fruit bars are a sweet & creamy treat that's fun & refreshing to eat. :) Enjoy!
Ingredients:
1/2 c. nonfat, plain (or vanilla) yoghurt
1/2 c. frozen peaches
1 tsp. freshly squeezed lemon juice
2 tsp. honey
Directions: Toss everything into a blender & pulse until smooth. Pour mix into popsicle maker. In the silicone popsicle molds, it takes approximately 2 hours for them to freeze all the way through.
Yield: Makes enough to fill 4 Orka-brand popsicle molds. You might have to readjust quantities if you are using different sized molds. This quantity will probably also work for most Kinderfield or Tovolo brand molds as well, provided they are similar in total fluid ounces.
Tuesday, June 8, 2010
0 Got Any Recipe Requests?

This actually helps out BOTH parties, because it provides the both requestor & the reader with new recipes and also helps provide ample inspiration and additional motivation for me to create new recipes for this blog. :) And, of course, these individuals will also have the extra satisfaction of very likely seeing their very own recipe suggestion appear in my upcoming cookbook. :) They can point to the cookbook and say, "Hey, that's my recipe suggestion in there!" :) And if these individual requestors would like, I would even be up for making personal mention of them in the book as the genesis of inspiration behind the recipe idea.
So, if you need a recipe with a particular ingredient, or are in the mood for a particular meal or type of cuisine, -- or maybe you don't have a clue for what to make & are yourself in need of some culinary inspiration -- just ask me & I'll see what I can come up with for you.
As most of you know, this is a healthy gourmet food blog that emphasizes fruit & vegetable-centric fare low in sugar & fat, so if you have a recipe suggestion which falls outside of these parameters, or one that I can't create due to dietary restrictions, please be aware that I'll probably be referring to you another website that satisfies your requirements. :) In other words, I won't leaving you hanging, either way.

So, in other words, if I directly confirm that I'll be creating a recipe idea for a particular individual, I will keep my word, even if I might not always be able to fulfill the requirement right away.
Requests can be made in multiple ways: You can either leave a comment at the end of this post (probably the simplest/fastest method), email me (via this blog's contact form), tweet (or DM) your request to me, or email me on Facebook.
Wednesday, June 2, 2010
0 Recipe #118: Frozen Red Raspberry Fruit & Yoghurt Popsicles For Summer!

Homemade fruit pops are a lot healthier than most of the ones found in the frozen aisles of grocery stores. It's a great way to encourage your children to eat healthy, sweet treats they are bound to like. After all, what kid doesn't like popsicles? :) Plus, they're a fun & easy project to make with kids. And let's face it, even the adults have just as much fun making & eating them too. :) For so many of us, they are a connection to childhood and the fond memories of that time period.
So, in anticipation of summer, I thought I'd post some fruit popsicle recipes here, which'd also give me a chance to play with my new kitchen toy. :) Here's the first recipe in the series.... Enjoy!

Frozen Red Raspberry Fruit & Yoghurt Popsicles
These are super-easy to make. It only takes a minute to blend everything together. :) They are a tart & refreshing treat on a hot day... like today! :) (It's supposed to get up into the 90's here again!)
Ingredients:
1/2 c. + 1 Tbsp. nonfat, plain (or vanilla) yoghurt
1/4 c. + 1/2 Tbsp. frozen raspberries
1 tsp. freshly squeezed lemon juice
1 Tbsp. honey
4-5 large, fresh mint leaves, torn into small pieces (optional)
Directions: Toss everything into a blender & pulse until desired consistency has been reached. I like to still taste bits of raspberry in mine, so, for a chunkier texture, I only pulse just enough for the ingredients to combine, i.e., only a few seconds or so. Pour mix into popsicle maker. In the silicone popsicle molds, it takes approximately 2 hours for them to freeze all the way through.
Yield: Makes enough to fill 4 Orka-brand popsicle molds. You might have to readjust quantities if you are using different sized molds. This quantity will probably also work for most Kinderfield or Tovolo brand molds as well, provided they are similar in total fluid ounces.