
Tuesday, December 3, 2013
Avocado-Pesto Dip


This effortless, flavorful dip recipe combines two of my favorite ingredients -- avocado and pesto. I came up with the idea yesterday afternoon when putting together dishes for our weekly menu. I'd just finished prepping the vegetable side dish for that night's dinner, i.e., Pesto Pattypan Squash and Baby Zucchini (recipe forthcoming), and so the pesto was still lying out on the countertop. Just as I was about to put the pesto away, I swiveled around to grab it and my eyes happened to land on a lonely avocado not but a few feet away in the opposite corner of the kitchen. Of course, that's when the idea dawned on me to combine the two ingredients. :) Since we'd just had the squash last night, we'll be saving the dip for later this afternoon. No one in my family's complaining though; right after we'd finished last night's dinner, my sister found out about the avocado-pesto dip and said, "How soon can we eat THAT?" Hahaha. Too much pesto? Apparently, in our family, there's no such thing. ;)

Avocado-Pesto Dip
Ingredients:
1/2 ripe Haas avocado, peeled and pitted (makes about 1/2 c. mashed)
1/4 c. pesto (see recipe)
1 Tbsp. freshly squeezed lemon juice
2 Tbsp. Italian flat-leaf parsley, finely minced and tightly packed
1/2 Tbsp. garlic, peeled and finely minced
1/8 tsp. ground black pepper
Directions: Mash avocado in a medium-sized bowl but leave it a little bit chunky to give it some texture. Add all remaining ingredients to the bowl and mash everything together until just combined. (Or, if you'd like to take the ultimate shortcut, then don't bother chopping up any of the produce; just peel the garlic and peel and pit the avocado, then toss everything into the food processor and pulse until just combined.) Serve with crudités or other accompaniments and enjoy!
Yield: 1 c.
Thursday, November 21, 2013
Don't Know What to Serve with the Bird? Here are Some Thanksgiving Dinner Menu Ideas....
 Yes, it's that time of year again, when many of us start thinking about what we're going to serve for our
Thanksgiving Day dinners. Some will take the traditional route, while others will toss in some unexpected choices. Whether you're still scratching your heads or just need a few dishes to round out your meal, I'm here to help you with your menu planning by providing you with suggestions to suit a wide variety of needs. Plus, if you're serving an army, it's typically a good idea to offer several different appetizers, sides, and desserts to keep everyone happy and well fed. Below, you'll find a comprehensive array of choices from all of these different dish categories. The only thing that's missing is the bird. :) However, it's usually the other stuff (i.e., everything else!) that people have more of a challenge figuring out, so this extensive list should give you more than enough meal ideas to get you started with your menu planning.
As a chef and frequent host, I've planned lots (and I do mean LOTS!) of menus for dinner parties and large gatherings in the past, and have also helped family and friends with this as well. In fact, for one of our previous Thanksgiving Day gatherings (from a year or two ago), I helped my aunt draw up a menu and calculate food amounts for her guests. If memory serves, they had over 20 people at their house that year, along with three very large hungry poodles, one of whom suddenly decided to jump up on the table after dinner to help clean up the scraps. :)
We really went all out that year: One family friend made a sweet potato dish, my aunt made the turkey, some salads, and vegetable side dishes while I "filled in the blanks" with pumpkin soup, cranberry sauce, two pumpkin pies, and a fruit tart. Everyone's dishes were homemade, so although it was a lot of work (and several days worth of kitchen prep and cooking!), it was lots of fun to make everything. Despite the chaos that sometimes surrounds the process, the end result is usually well worth it, because Thanksgiving is a time when the food and conversation will (hopefully!) bring everyone together and provide a happy background for friends and family to relax and more fully appreciate each other's company.
Anyhow, enough verbiage. I hope you'll find the below meal ideas useful to keep your menu fresh and exciting. Have fun cooking (and eating!), and I wish you all a Happy, Healthy Thanksgiving!
-C

Traditional Selections (Updated & Revamped):
Appetizers:
- Pumpkin-Potato Soup with Fresh Sage, Rosemary, & Basil: This one was a huge hit at one of my aunt's previous Thanksgiving dinners. Even Erik ate it, and he doesn't typically even like pumpkin soup. :) My friend Charlie's also made it and told me his family liked it a lot as well.

- Antipasto: Well, it's considered to be a traditional fall holiday appetizer if you've got Italian relatives. :) Erik's family will typically serve this at their Christmas dinner, so since these two fall holiday meals are often very similar in nature, it'll surely work for Thanksgiving dinner as well. My version, Italian-Style Marinated Vegetable Salad (Antipasto), still contains all of the traditional elements but, unlike the plated variety, combines them into an easy-to-eat form that fits onto crackers. Just provide a serving spoon and some crackers or bread for your guests, and you're all set. Or, if you'd rather stay away from (or limit) the starch component, cut up crudités for your guests, like cucumber rounds, etc., which can serve a similar purpose.
- Hors d'Oeuvres: It's a good idea to give your guests something to munch on before the meal starts: This is done just as much to stave off hunger as it is to keep curious guests from wandering into the kitchen before meal time and nibbling on dishes for an "advance preview." We all know people who like to break off bits of our unfinished dishes to sample things before they before they are really supposed to be doing that. ;) So, keep them at bay by offering them finger food like Mushrooms Canapés Stuffed With Goat Cheese, Kalamata Olives, & Fresh Herbs or various types of dips served with crudités, chips, &/or crackers. On that note, check out the wide selection of dips on this site as well -- from freshly made guac, hummus, and pinto bean dip to Caponata Siciliana, Creamy Red Hot Pepper Dip, and Tuna à La Tapenade.
Sides:
- Cranberry Sauce: To liven things up a bit, try my Cranberry Sauce Spiked with Cointreau. Think of this as "cranberry sauce for adults." Actually, most of the alcohol evaporates during the cooking process, leaving behind just a hint of Cointreau flavor for an extra special kick to the taste buds. So, really, it's perfectly suitable to serve to the kiddies as well. I assure you, unless you just pour in the Cointreau at the end instead of cooking it, or drink it while you're making it, absolutely no one will get inebriated from consuming this dish. :)
- Mashed Potatoes: Typically a popular choice at holiday gatherings, this side is sure to please and always goes well with the bird. If you'd like to stay traditional, go with Mashed Red-Skinned Potatoes with Roasted Garlic & Fresh Herbs or for the Irish(wo)man in you, try my Colcannon instead. :)
- Au Gratin Casseroles: Try Cauliflower & Orange Bell Peppers Au Gratin or Potatoes & Butternut Squash Au Gratin. These dishes are real people pleasers. I've served both in the past, and dinner guests frequently request the recipes, both during and after the meal. :)
- Pasta & Potato Salads: Marinated salads are yet another holiday staple, and there are so many different offerings from which to choose! For example, you could try Tomato & Goat Cheese Pasta Salad with Fresh Dill & Tarragon, Greco-Roman Pasta Salad, or even a cold pesto pasta salad using a recipe for fresh basil pesto with walnuts and almonds, or go with something like Fennel-Potato Salad instead, which is a nice change from the plain version. This potato salad is very light and will allow you to leave room for all of the other selections on the Thanksgiving table that you'd like to try. :)

- Green Vegetable Side Dishes: Broccoli, in particular, is a good selection because it works with almost any traditional holiday entrée, including poultry. Try a simple and versatile version of this dish like Italian-Style Sautéed Broccoli with Fresh Herbs. Or go with Wilted Spinach or Quick & Easy Italian-Style Beet Greens instead.
- Carrot Dishes: These seem to be pretty stock and trade for Thanksgiving at many people's homes. Try my Grilled Carrots or Ginger-Garlic Baby Carrots.
- Sweet Potatoes: Sweet potatoes are another traditional holiday selection. Instead of making sweet potato mash the sweet way (i.e., with marshmallows, etc.), shake things up a bit and offer a savory (and much healthier!) preparation in another form, like Swoon-worthy Sweet Potatoes. This dish is super-easy to make, and best of all, you don't need to spend all that extra time stirring and mashing. :)

- Rosemary Potatoes: Another holiday standard, or at least it is in our family. :) Need a recipe? Try my Rockin' Rosemary Potatoes.
- Rice Pilaf: You can either do a fairly plain and neutral tasting pilaf like Herbed Bulghur Pilaf or a standard mushroom pilaf like Mushroom Rice Pilaf with Fresh Herbs.
- Pumpkin Pie: For Thanksgiving dinner, it doesn't get much more traditional than good ole' pumpkin pie. This is a non-dairy version for people who are Paleo, vegan, or kosher. It's also gluten-free. For the Paleo version, substitute almond flour for the oat flour and if you're strict Paleo, look for another viscous binding agent (perhaps maple syrup?) to replace the honey. This recipe is one of my most requested holiday dishes. :)

- Tiramisù: Again, if you've got Italian relatives, this one is pretty standard fall holiday fare as well. My own version, Tantalizingly Transcendent Tiramisù, uses both ricotta and mascarpone for a lighter (and far less fattening) flavor, while still remaining incredibly rich and indulgent tasting. This way your taste buds can revel in dessert-esque ecstasy without you having to loosen a few notches on your belt buckle after the meal. ;)
Novelty Dishes:
Appetizers:
- Elegant But Simple Salads: For example, try Cucumber, Tomato, & Artichoke Salad: So easy (only three basic ingredients!), it can be made in a snap! Or, for an elegant touch, make Baby Rocket, Chickpea, & Hearts of Palm Salad with Shaved Manchego Cheese, Tossed in a Lemon-Mint Vinaigrette -- You could probably finish making that salad by the time it takes to read the recipe name. Lol. When you've already got enough labor-intensive (and time-consuming) tasks like turkey prep and cleaning your house before the arrival of your guests, simple salads like these (and other no-brainer selections!) can be a huge timesaver, not to mention a lifesaver too. :)

- Hearty Soups: These are the types of wintry/fall soups that would nicely complement a Thanksgiving Day meal. Particular suggestions that come to mind include Mushroom Barley Soup, Kale-Potato-Leek Soup, Potage Provençal aux Légumes Verts (Provençal Greens Soup), Corey's Cream of Broccoli, or "Potatoes in Paradise" Potato Soup. Or try a bean-based soup like Italian-Style Two-Bean Soup or Tomato-Zucchini Soup with Kale, Yellow Squash, & Cannellini Beans (Topped with Parmesan Cheese & Pesto Drizzle).

Sides:
- Celeriac Remoulade: This dish is very similar to coleslaw, but with a sophisticated twist. It's a neat idea if you're looking for a menu update to keep things interesting. :)
- Cauliflower Mash with Rosemary & Roasted Garlic: This dish is a nice (and much healthier!) alternative to mashed potatoes. Plus, it's really tasty too! It also makes a great selection for guests with particular dietary restrictions -- it's Paleo, vegan, and gluten-free. :) Whoopeeeeee! Hahaha.
- Pumpkin Risotto: Still in keeping with the pumpkin holiday theme and yet, it adds an element of surprise. This could also be served as a vegetarian (or vegan) main course as well.
- Mushroom-Olive Quinoa Pilaf with Fresh Herbs: Instead of the usual rice pilaf accompaniment, try this dish to add some interest and round out your menu.
- Lavender-Infused Potatoes with Garlic & Fennel: Highly aromatic and unexpected, this dish is a bit more creative and sophisticated than your average potato dish.
Desserts:
- Cherry, Apple, & Pear Tart (Made with Asian & Bosc Pears): This one's another big Thanksgiving dinner hit. It's also a nice alternative to pumpkin pie.
.png)
- Poached Persimmons: Delicious and appropriately seasonal, this dish has a taste that's both tart and sweet. Be sure to allow these fall fruits enough time to blet in order to reach the full peak of their flavor.
- Baked Figs (or Pears): Another seasonal selection, this dish is soaked in Marsala wine, which makes them taste even better. :)
- Apple Tart: Simple but decorative, this version of apple tart is healthy and delicious!
Wednesday, November 20, 2013
3 Tomato-Zucchini Soup with Kale, Yellow Squash, & Cannellini Beans (Topped with Parmesan Cheese & Pesto Drizzle)

First of all, congratulations to the two very knowledgable winners of the Fall Fun Contest! Your pumpkin and squash expertise is truly impressive! Hope everyone had fun with the contest. It seems that a lot of you did, since you gave me lots of positive feedback about it. So, because it was such a smashing success, I might hold another one next year, with new and different types of squash and pumpkins for you to identify, but of course. And who knows, maybe I'll even toss in a few edible gourds or two to make it even more challenging. :)
But really, it was about time to climb back onto the horse again. So here I am again, back in action after 2 1/2 months, in case you were wondering if I was ever going to post another recipe here ever again. ;)

Tomato-Zucchini Soup with Kale, Yellow Squash, & Cannellini Beans (Topped with Parmesan Cheese & Pesto Drizzle)
Ingredients:
1 Tbsp. extra virgin olive oil
1/4 c. shallots, peeled and finely minced
1 Tbsp. garlic, peeled and finely minced
4 c. vegetable stock, divided
2 c. fresh kale leaves, stems and ribs removed
2 c. zucchini, diced (about 1 large or 2 medium zucchini)
2 c. yellow squash (about 1 large or 2 medium yellow squash)
2 c. vine-ripened tomato, diced
15.5 oz. can cannellini beans
4 c. water
8 Tbsp. tomato paste
1/4 tsp. ground black pepper
1/4 tsp. salt
1/4 c. fresh basil, roughly chopped
1 Tbsp. fresh thyme leaves
Toppings:
shredded Parmesan cheese, about 1 Tbsp. per serving
pesto, about 1 tsp. (or more) per serving
Yield: 6-8 servings.
Wednesday, November 6, 2013
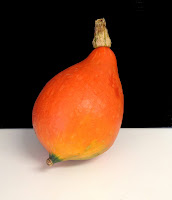
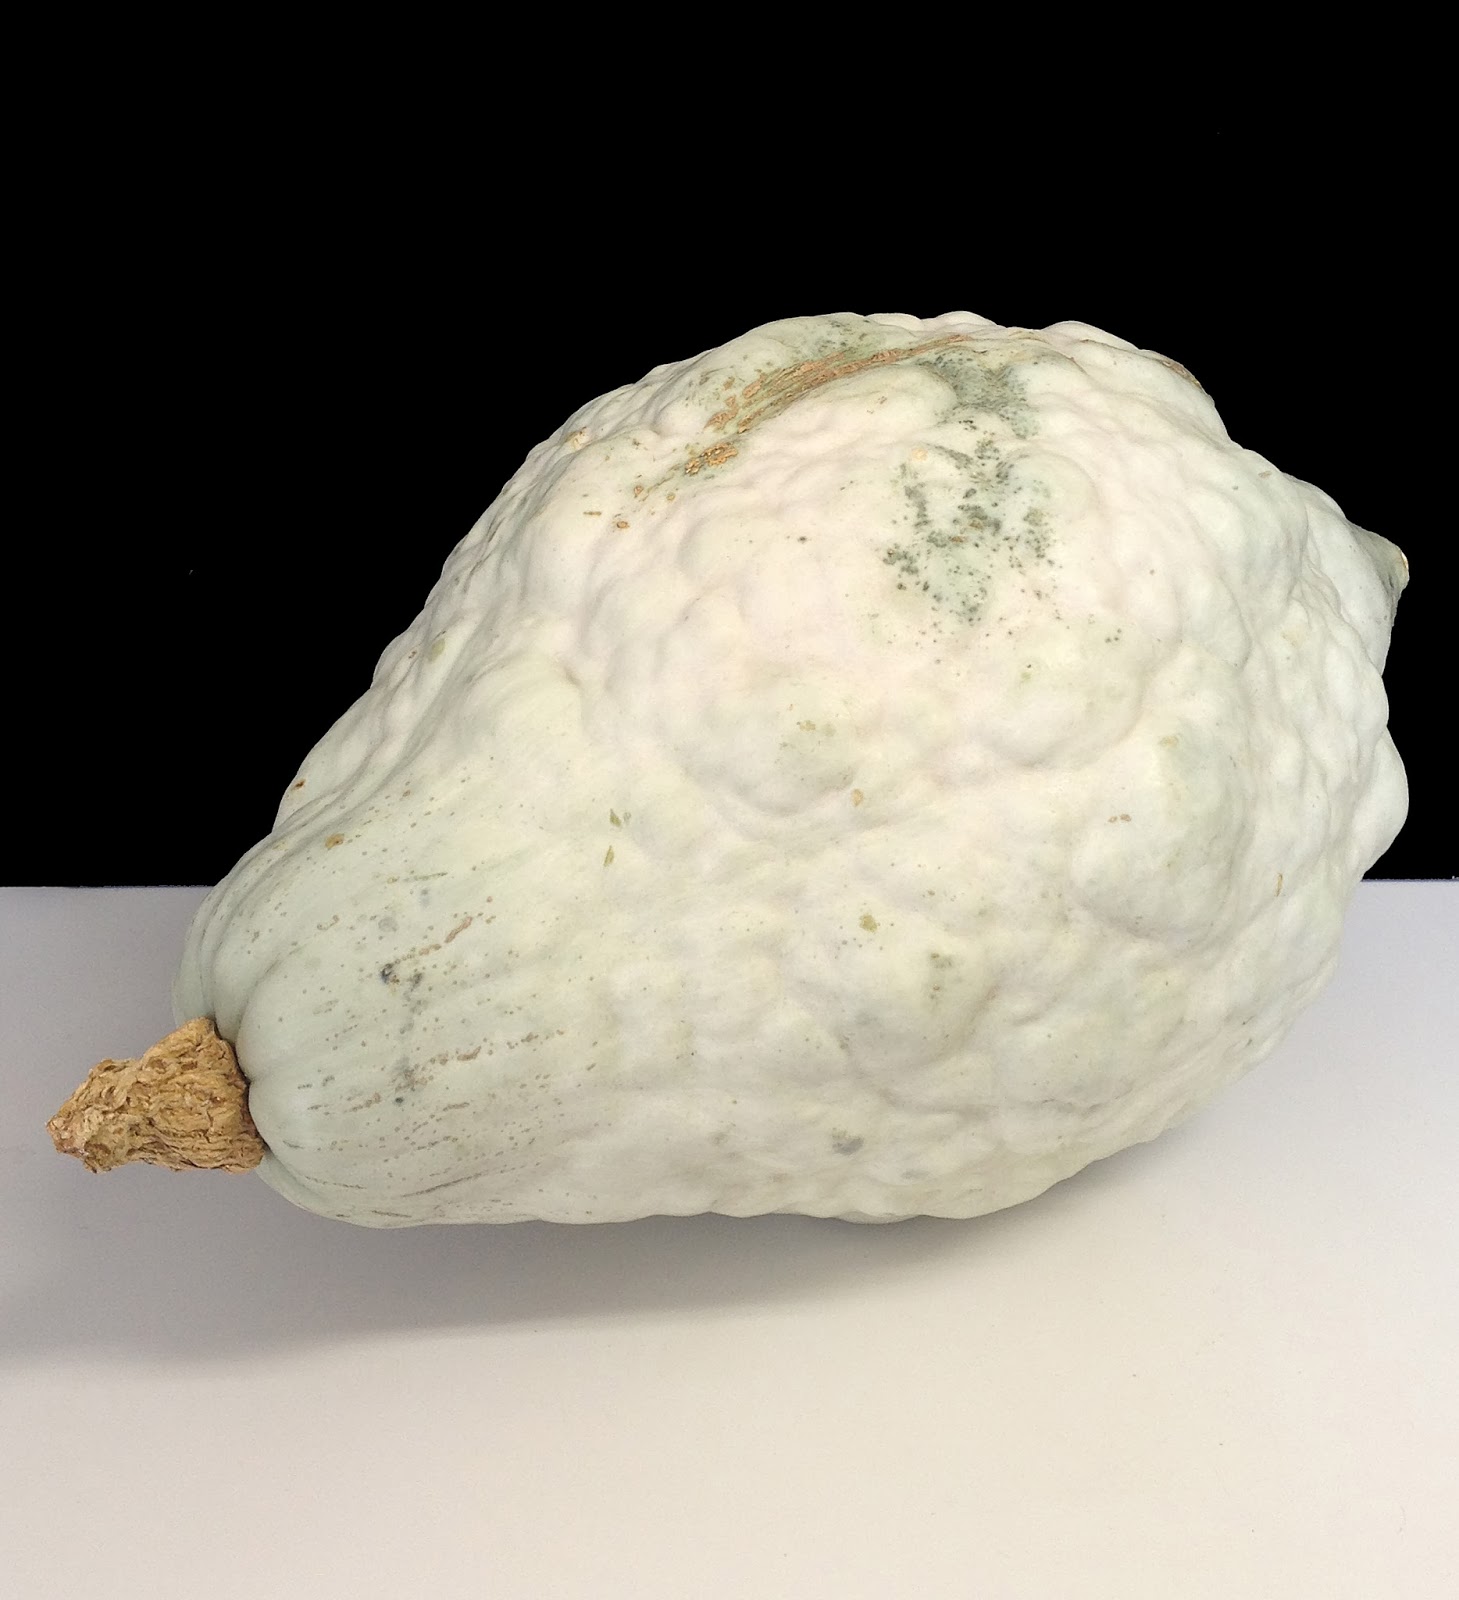
1 Fall Fun Contest!
Time to have some fun! How well do you know your squash and pumpkins? Name that squash or pumpkin, from left to right. And no cheating by googling. :) Please post your answers (or guesses!) in the comments section of this post for all 6 types shown below.
 |
| #1 |
 |
| #2 |
 |
| #3 |
 |
| #4 |
 |
| #5 |
 |
| #6 |
The first two (2) people to correctly identify all (or the greatest possible number) of the above produce by this Friday, November 8 will get a private preview of special, unreleased recipes that can ONLY be found in either the Cooking with Corey cookbook or The Athlete's Cookbook. The winner will have their choice of 2 of the following, "top-secret" recipes:
(To whet your appetite and help you choose which recipes you'd like to win, click on the below links to view the corresponding photos.)
(1) Oven-Baked Rosemary-Parmesan Sweet Potato Fries
(2) Crème de Cassis Hazelnut Chocolate Fudge Brownies
(3) Guilt-Free Peanut Butter Fudge
(4) White Chocolate Almond Butter Cookies
(5) Gourmet Halva/Halwa Bonbons
(6) Pear & Pecan Clafouti
(7) Toasted Chili-Lime Pumpkin Seeds
(8) Olive Hummus
(9) Parmesan-Crusted Asparagus in White Truffle Oil
(10) Greek-Style Eggplant Gratin with Feta & Tomato Sauce
Good luck and have fun!
-Corey
Tuesday, September 10, 2013
0 "Lemon Cooler" Smoothie

I just created the below "Lemon Cooler" Smoothie recipe this morning. Tart and refreshing, creamy, cooling, and a little bit sweet, this beverage is reminiscent of those lemon cooler cookies many of us used to enjoy as kids, except this time, what you're eating is actually good for you. :)
Creating smoothie recipes is a blast, especially since I've been intentionally creating many of the recipes to taste like treats and mocktails. :) Plus, it's been really fun to name these drinks too. Of course, unlike many other smoothie recipes, these smoothies are actually good for you and have been specifically created to boost athletic performance and aid recovery while at the same time, providing exceptional nutritional value for overall health and well-being. Tasty for the tummy and good for your body, what more could a person ask for?! :-D

"Lemon Cooler" Smoothie
Ingredients:
1/2 c. freshly squeezed lemon juice, plus some of the pulp (for extra fiber and body) (the juice of about 3 large lemons)
1/2 c. lite silken tofu
1 c. unsweetened organic soy milk
1 scoop (1/3 c.) vanilla whey isolate protein powder (if vegan, use vanilla soy isolate protein powder instead)
2 c. ice cubes
3 Tbsp. honey
1/8 tsp. salt
Directions: Add all ingredients to a blender and pulse until smooth. How's that for quick and easy?! Serve and enjoy!
Yield: A little over 32 oz., or roughly 4 (8 oz.) servings.
Sunday, September 8, 2013
0 "Pumpkin Pie" Smoothie

Since fall is almost upon us, I thought it'd be nice to create an autumn-themed smoothie to usher in the season. This recipe will be appearing in my next book/cookbook, Cooking with Corey. After this book has been completed, there will hopefully be more time to write recipe exposition here that's more than a mere paragraph or two. :-D

“Pumpkin Pie” Smoothie
Smoothie Ingredients:
1/2 c. canned purėed pumpkin
1/2 tsp. pumpkin spice (see below for ingredients)
1 c. soy (or coconut) milk
1/2 tsp. pure vanilla extract
2 Tbsp. honey, or to taste
2 c. ice cubes
Pumpkin Spice Mix Ingredients: (Yield 2 tsp.)
1 tsp. ground cinnamon
1/2 tsp. ground nutmeg
1/4 tsp. ground ginger
1/8 tsp. ground allspice
1/8 tsp. ground cloves
Directions: Place pumpkin into a small bowl, cover, and microwave on high for 45 seconds, then allow it to fully cool. (Cooking the pumpkin will mellow the flavor and also take away its canned taste.) Mix all pumpkin spice mix ingredients together in a bowl. Store any leftovers in an airtight container (in a dark, cool place). Add all ingredients to a blender and pulse until smooth. Easy as (pumpkin) pie. :)
Yield: 2 (1 1/4 c.) servings.
Chef's Notes: Paleo modification: To make this recipe (strict) Paleo, simply omit the vanilla extract, honey, and substitute almond or coconut milk for the soy milk. If you're not strict Paleo, you might want to leave in all or some of the honey, because otherwise, it's not going to taste as much like "pumpkin pie." ;) It's a fairly small amount of honey per serving, but of course, how you choose to make the recipe is up to you. Just don't blame me if it doesn't taste the same as the original recipe. ;)
Tip: Leftover pumpkin spice mixture can be sprinkled onto hot cereal, applesauce, baked apples, or added to hot cocoa or tea.
Thursday, August 29, 2013
0 Edamame & Chickpea Salad with Tahini-Lemon Dressing

Looking for a fun new way to prepare edamame? Then try this colorful Mediterranean-style salad. It's a bit more unexpected than some other preparations you may've seen.

Edamame & Chickpea Salad with Tahini-Lemon Dressing
Salad Ingredients:
3 c. (frozen or fresh) edamame beans (in their pods) (makes about 3/4 c. cooked, shelled edamame)
1/2 c. (frozen or fresh) corn kernels
1 c. canned garbanzo beans (pre-cooked), drained and well-rinsed
1 c. red onion, peeled and thinly sliced into 1/8"-thick crescents
3/4 c. Kalamata olives, pitted and sliced
1/4 c. scallions, sliced crosswise into 1/4"-thick rounds
1/4 c. fresh Italian flat-leaf parsley, finely minced and densely packed
1/8 c. (2 Tbsp.) fresh mint leaves, finely minced and densely packed (optional)
Tahini-Lemon Dressing Ingredients:
1/4 c. tahini
3 Tbsp. freshly squeezed lemon juice
1 Tbsp. sesame oil
1/4 tsp. ground black pepper
1 Tbsp. garlic, peeled and finely minced (about 2 large cloves)
Directions: Make the dressing first: Before you use the tahini, be sure to stir it first to combine, since there's usually a layer of oil on top. (The oil tends to separate from the rest of the tahini after it's been sitting in the can for a while.) Thoroughly combine all ingredients in a small bowl and set aside to allow flavors to meld while you prepare the salad. Prepare the salad ingredients: Bring a medium-sized pot of water to a rolling boil (on high heat), then add edamame. Boil frozen edamame pods for 2-3 minutes, or if you're using fresh instead, 7-10 minutes. (Be careful not to overcook edamame, or it will be mushy and inedible. Properly cooked edamame should be tender but still have some give.) Drain into a colander and then rinse under cold tap water to cool. When cool to the touch, shell edamame and place them into a large salad bowl. Next boil the corn: Pour water into the same medium-sized pot you just used to boil the edamame, and bring it to a rolling boil. Add corn kernels and boil: Boil frozen corn for 4-5 minutes, or if using fresh instead, 5-10 minutes (i.e., cook fresh corn just until it starts changing color). Drain into a colander and rinse under cold tap water to cool. Assemble the salad: Place cooled corn into the same salad bowl containing the edamame. Add all other salad ingredients to the bowl, then pour the dressing on top and toss thoroughly until ingredients are fully coated with dressing. Marinate in the refrigerate for 30 minutes. Serve and enjoy!
Yield: About 4-5 c.
Thursday, August 15, 2013
0 Creamy Coconut Kheer (Indian Rice Pudding)
.jpg) |
| As you can see, black rice pudding is incredibly difficult to photograph. I promise that there are loads of almonds and pistachios in there, even though you can't see them. Black rice "dyes" pretty much everything it touches. :) |
I created this recipe specifically for The Athlete's Cookbook, so of course, it has a great number of sports performance benefits for athletes. It also just so happens to be vegan, although that wasn't the impetus for creating it. ;)
Kheer is a wonderfully fragrant Indian rice pudding that's commonly served in many Indian restaurants. Most kheer recipes typically call for several gallons of cream or whole milk. OK, that's only a slight exaggeration (Hahaha!), but of course this recipe is a healthy version, so it doesn't contain either. Instead, I've used coconut milk, which, most notably, contains healthy fats that increase the rate of fat oxidation to provide an immediately available source of energy for athletes. :)
Traditionally, kheer is made with basmati rice (and sometimes also short-grain varieties). However, this recipe calls for black rice, a superfood that’s naturally sweet and unusually high in antioxidants, fiber, and protein, and as a result, is much healthier for you than most other varieties of rice. In fact, it's higher in protein than either white or brown rice, and at the same time, it's also lower in calories and carbs. Black rice contains a significant amount of the antioxidant, anthocyanin, which may fight cancer and heart disease. It's also good for your immune system, blood circulation, eyes, stomach, kidneys, and spleen. Black rice has a much thicker outer hull than many other types of rice, so it that means it takes longer to cook. However, it's worth the wait, as it's very nutritious. :) Its hardy outer hull (the bran) is what makes it high in fiber, plus it's also got a ton of vitamins (especially vitamin E) and minerals (like iron, potassium, and magnesium) and is unusually rich in amino acids, the building blocks of lean muscle mass, so it's an athlete's dream. :-D
Black rice is sometimes also called "Forbidden Rice" because only the royalty of ancient China (i.e., emperors and nobles) had been permitted to eat it. Black rice has a nutty flavor with chocolate-like undertones, so as you can imagine, it tastes great in puddings like kheer, which already contain nuts (usually pistachios &/or almonds, but sometimes also cashews). Simply put, it not only complements this type of pudding, but also enhances what's already there.
This dish also contains a plethora of fragrant ingredients -- cardamom, saffron, and rose water -- a wonderful, heady combination that'll make your kitchen smell divine. Get ready for a rich, complex, and intensely flavorful experience for your taste buds. This all natural, no-sugar added pudding is, quite literally, as sweet as pie. So, if you’re a sweet tooth but still want to eat healthfully, this recipe’s for you.

Creamy Coconut Kheer (Indian Rice Pudding)
Ingredients:
1 c. water (for boiling rice)
1/2 c. black rice, washed, soaked for 30 minutes, and then drained
1/2 tsp. cardamom powder
1/2 tsp. saffron threads, soaked in 2 Tbsp. of hot water for 30 minutes (or ideally for 2 hours, if there's time)
1 1/2 c. honey
1/2 tsp. rose water (omit if unavailable)
2 Tbsp. almonds, slivered
2 Tbsp. unsalted shelled pistachios, plus more for garnish
1/8 tsp. salt, or to taste
Directions: Crush almonds and pistachios coarsely using a mortar and pestle (or place onto a clean surface, cover with plastic wrap, and smash with the side of a knife), and set aside. Pour coconut milk and water into a large pot, cover, place over high heat, and bring to a boil. Uncover, add rice, including reserved liquid, saffron, cardamom, cover again, and bring to a boil once more. Then reduce heat to low and simmer for 40 minutes, or until rice is tender and almost all of the water has been absorbed. Rice is done when it starts to crack open slightly and develop at least 2 or more beads. In the last 2 minutes of cooking, add honey, rose water, almonds, pistachios, and salt and stir until honey is fully dissolved, then add almonds and pistachios. (Be careful not to overcook the rice or it'll be mushy and unpalatable.) Remove from heat, let rest for at least 10 minutes, and then gently fluff with a fork. Remove from heat. Spoon the rice pudding into small ramekins (or custard dishes) and top each portion with crushed pistachios. Serve either warm or at room temperature.
Servings: Makes 2-4 servings.
Chef's Notes: Please note, this pudding has a short shelf-life, and will last for only about a day.
If you can't find unsalted pistachios, use the shelled salted ones but then omit the salt.
Saffron can be soaked for much longer, anywhere from 2 to 12 hours, so you can also soak the saffron overnight. The longer it steeps, the more intense the saffron flavor will be.
Be sure to use Chinese sticky black rice and not wild rice. (Wild rice is a dark color, but trust me, it's not what you want to use for this pudding. The taste of wild rice is woody and savory, and totally wrong for a dish like this. Furthermore, wild rice isn't even technically considered to be rice.) Also, since this pudding is very sweet, it's a good idea to balance the sweetness by serving it with something plain or mild tasting, like a cup of (herbal) tea or a glass of milk.
Wednesday, August 14, 2013
0 Recipe #366: Roasted Vegetable Pita Pizza

Pitas are the perfect size for making your own personal-sized pizzas. These colorful and easy-to-make pizzas are packed full of fiber, protein, and healthy carbs, which makes them deceptively filling. The vegetable toppings and freshly made pizza sauce, with its vine-ripened tomatoes and fresh herbs, are what give this recipe its vibrant flavors. (This is yet another recipe from The Athlete's Cookbook.)

Roasted Vegetable Pita Pizza
Pizza Ingredients:
4 large (7 1/2”) whole wheat pitas
1 c. shredded mozzarella cheese, divided
1/4 c. soft crumbled goat cheese (chèvre), divided
1 c. orange bell pepper, seeded and sliced into thin strips, divided (3/4 large pepper)
1/2 c. Greek olives, pitted and sliced, divided (about 12-14 olives)
2 Tbsp. fresh julienned basil leaves, divided
Pizza Sauce Ingredients:
1 Tbsp. olive oil
¼ c. shallots, peeled and finely minced
1 Tbsp. garlic, peeled and finely minced (about 2 cloves)
1 large bay leaf
15 oz. can crushed tomatoes
½ c. fresh, vine-ripened tomatoes, diced (about ½ small tomato)
2 Tbsp. tomato paste
½ c. water
1 tsp. fresh, finely minced oregano leaves
1/4 c. fresh, julienned basil leaves
2 tsp. fresh thyme leaves
Directions: Preheat oven to 400°F. In a medium-sized sauce pot, heat olive oil on high heat until glistening, then reduce heat to low, add shallots, garlic, and bay leaf, and sauté for 5 minutes or until tender. Add water, crushed tomatoes, vine-ripened tomatoes, and tomato paste, and stir until tomato paste has been fully incorporated. Cover, bring to a boil, then reduce heat to medium and cook for 5 minutes. Uncover, add fresh herbs, cover again, and cook for an additional 5 minutes. Let cool, discard bay leaf, and set aside. Place pitas onto a large metal baking sheet. Using the back of a large spoon, spread sauce onto each pizza, then sprinkle with equal amounts of mozzarella cheese, followed by equal amounts of goat cheese, orange bell pepper, and greek olives. Place into oven and bake for 8-10 minutes, or until pizza has reached desired level of crispness. Top with fresh julienned basil leaves and serve hot.
Yield: 4 servings.
Chef’s Notes: To save time, make the pizza sauce a few days in advance of when you plan to serve it. If stored in a tightly sealed container, the sauce will keep for several days in the refrigerator.
Alternate Topping Ideas: Try substituting one of the vegetable toppings with 1/2 c. sliced wild mushrooms (a mix of cremini, portobello, shiitake, etc.). Note that I say "substituting," and not "adding." Since these personal-sized pizzas are small, they can only hold so many toppings before they start falling off as you're eating them. :)
Tuesday, August 13, 2013
0 Recipe #365: Hot Quinoa Cereal with Nuts, Cinnamon, & Nectarines

Due to another impending book deadline, there's zero time today to wax effusive, so I'll just cut straight to the chase. Below is a dish I cooked up for breakfast this morning, which will also be appearing in The Athlete's Cookbook, in a modified form.

Hot Quinoa Cereal with Nuts, Cinnamon, & Nectarines
Ingredients:
4 c. water (for cooking quinoa)
1 c. quinoa + 1 c. water (for soaking)
1 tsp. pure vanilla extract
1 Tbsp. ground cinnamon
1/8 tsp. salt
3/4 c. organic soy or coconut milk (or skim milk, if you prefer)
Toppings:
2 Tbsp. honey, or to taste
1/4 c. sliced almonds
1/4 c. walnuts, halved or crushed
1 c. nectarines, pitted, peeled, and diced
Directions: Bring a large covered pot of water to a rolling boil, about 6-8 minutes. Meanwhile, soak quinoa for 5-10 minutes until it starts to puff up a bit. (This is a very important step as quinoa needs to be soaked in order to release its saponin, which creates a bitter taste unless removed.) When quinoa is ready, transfer into a fine mesh sieve, rinse under running water, and then drain and set aside. Reduce heat to low, then add rinsed and drained quinoa into the pot, stir, cover, and simmer for 5 minutes. Uncover, add vanilla extract, stir, cover again with lid, and cook for a final 5 minutes. While the cereal is cooking, place nuts onto an aluminum-foil covered toaster pan and toast on 350°F for 2-3 minutes, or until light golden brown. Watch nuts carefully, as they will burn very easily. When finished, set tray aside to allow nuts to cool for 5-10 minutes. When cereal is ready, uncover, and then stir in honey, cinnamon, and salt. Fluff, then let stand another 5 minutes to cool slightly. Pour in milk, then stir in fruit and nuts. Place into bowls, serve, and enjoy.
Yield: 4-6 servings.
Chef's Notes: Another great idea is to add raisins &/or other types of dried fruit (dried cherries, cranberries, etc.) to your hot cereal, which can either be incorporated separately or mixed together with whatever fresh fruit you have on hand. Or, add fresh coconut slivers or unsweetened shredded coconut, either in addition to or as a replacement for, the almonds and walnuts.
Friday, July 26, 2013
0 Yeah, I Know ;)
Just a brief update: I know the social media experts advise not starting posts with the words, "I know it's been a while since my last post," so I won't state the obvious. :) I've been really busy book writing, and the parts I've been working on lately are almost exclusively focused upon sports nutrition, not recipes, so that doesn't leave much time for photographing and posting recipes here as of late.
 However, after I get everything done, which should hopefully be very soon, I'll be back to posting recipes here again and bit-by-bit will also post the rest of the articles in the continuing saga I'd started writing about sometime back in mid-June. Didn't mean to leave you hanging, but you'll have to wait for the exciting conclusion (lol) until I get these books done, which takes precedence as you can well imagine. Anyhow, I've got to run off (well, really, just close this window and go back to my Word document ;) ) and get more book writing done. So that's all, folks. I apologize in advance that this pitifully tiny update is just about all the blogging I have time for now. Just didn't want you to think that I'd dropped off the edge of the earth or quel horreur, had completely stopped blogging. ;) I know it's been like the Sahara here lately, but hang in there and I promise what's to come will be worth the wait.
Have a great weekend!
-Corey
Tuesday, June 18, 2013
0 Cheese, Please: A Cautionary Tale of a Dairy-Loving Lass and Her Ensuing Internal Conflict :-D (Part 1)
Since this post has expanded from its original conception, I've decided to break it up into multiple, more easily digestible parts. :)

 I grew up in an area with lots of dairy farms and so, not surprisingly was raised in a cheese-a-holic family. :) You could probably toss a wheel of cheese into the air like a frisbee, and it'd land on a cow. Lol. Our town had one particularly excellent ice cream place, which was also a dairy and restaurant and -- you guessed it -- there was a large replica of a white and brown spotted cow on top of the building. :) College students who attended the nearby university used to love playing the following, very memorable prank: they'd unhinge the cow from the top of the restaurant and then would place it in various locations around campus. When you're going to school in a small town, apparently this can provide endless hours of amusement. ;) While removing the cow from the top of the building might've looked like a herculean task, it was later discovered that the cow was actually made of a styrofoam-like material. So, it didn't require "Man of Steel" strength to remove it, after all. :) The restaurant eventually had to close, which was a very sad day for the town, as not only were we losing the place where most of us got our milk and ice cream, but many of us felt like we were also losing a little piece of the town -- the place was an institution and so many of us had formed fond childhood memories there. Before the place closed, I think my mother was singularly responsible for buying the very last of their exceptionally delicious peanut butter ice cream. :) It was rich and creamy, and had these thick, luscious ribbons of peanut butter spun throughout. Seriously, to this very day, aside from one other place in my state, I can honestly say that I can't even think of one place in my home state that even comes close to matching how good their PB ice cream was. In fact, it's probably the best peanut butter ice cream I've ever had, and believe me I've tasted enough PB ice cream to know the difference. ;) Anyhow, I'll stop waxing poetic about the myriad virtues of their PB ice cream. You get the basic idea. :)
 Upon making these changes, it was clear to me from the start that I'd just have to make sure I was getting enough calcium from plant-based food sources. And here's an added bonus: As I later found out, consuming plant-based forms of calcium is actually a way more effective means of getting calcium, as plant-based calcium can be actually absorbed by our bodies at a much higher rate than the calcium contained in dairy products. (This is due to latter's problematic calcium-magnesium ratio and the presence of vitamin D, both of which hinder the absorption process. This is an important point, but let's put a pin in that topic for now, because I'll be revisiting it in greater depth a bit later.)
Wednesday, June 12, 2013
0 Recipe #364: Date & Almond Clusters

From the photo, I realize that this sweet, no-bake treat might look like a cookie, but it's not. However, if you'd like to imagine it's a cookie while you're eating it, of course, that's perfectly fine too. :) What it is, actually, is a healthy, quick, and easy-to-make snack that's great to eat as a pre- or post-workout snack, and of course, that's why this recipe will be appearing in The Athlete's Cookbook. This recipe can literally be made in a matter of minutes! So, it's perfect for busy athletes, families on the go, or for those times when you just want to eat a quick snack without putting a lot of effort into the process. In other words, it's for those moments when both your brain and your stomach are screaming in unison, "FEED ME NOW!!!!" :)
During the recipe creation phase, the idea was to take the classic Mediterranean combination of dates and almonds and do something a bit more unexpected. Instead of just making these ingredients into another bonbon or energy bite recipe, (although you could certainly do that if you'd like!), I thought it'd be fun to turn them into a new kind of bite-sized snack. And thus, this is how the idea for this snack was born.

Date & Almond Clusters
Ingredients:
1 c. Deglet Noor (common) dates, pitted*
1/4 c. slivered almonds
1/2 c. almond meal
1 tsp. pure vanilla extract
1/8 tsp. salt
12 raw, unsalted almonds
Directions: Place all ingredients, minus the whole raw almonds, into a food processor and pulse until well combined. Spread a large piece of wax paper across a large, clean plate and set aside. Wet your hands first, then roll a piece of the dough in your palms to form a half-dollar sized ball, and place onto the wax paper. Repeat this process until all dough has been rolled into balls. Then rewet your hands and flatten each ball into a disc. Press an almond into each cluster, then refrigerate for 10-15 minutes to solidify. Serve and enjoy! Refrigerate any leftovers.
Yield: 12 clusters.
Chef's Notes: *Be sure to use super fresh and soft dates to avoid damaging your food processor. :)
If you're going to make a batch for future use, I'd advise wrapping each cluster in wax paper before storing them in a sealed container or resealable plastic bag in the refrigerator. Or alternatively, you can place a layer of wax paper on the bottom of a wide, shallow container, followed by a layer of clusters, and then another layer of wax paper, etc., and then seal it with a tightly fitting lid. Even after refrigeration, they can still be a bit sticky, so the wax paper will ensure that you won't have to pry them apart, or force yourself to eat 6 clusters at once. ;)
Friday, June 7, 2013
Recipe #363: Red Beans & (Black) Rice
+Rice.jpg)
I created this version of a Creole classic and Mardi Gras favorite for my friend, Brian, who asked for an easy beans and rice recipe to eat as a pre-race meal for his upcoming Eagleman Half Ironman (70.3) this Sunday. He'll be competing in this race -- as well as the Nations Triathlon this September, and the Seagull Century Ride and Marine Corp Marathon, both of which are in October -- to help raise funds to find cures and more effective treatments for blood cancers like leukemia, lymphoma, Hodgkin’s disease, and myeloma. This will help to vastly improve the quality of life for patients and their families. To help make a difference and donate to this worthy cause, please visit his TNT Team Lewis Contirbution Page. Good luck with your race this Sunday, Brian!
Beans and rice make for an excellent pre-race meal, because they are a great source of complex carbs, protein, and fiber, and thus, have a lot of staying power. So I hope that this recipe will help power Brian across the finish line! :)
And of course, since this recipe is perfect for (endurance) athletes, it'll be appearing in The Athlete's Cookbook. So thank you, Brian, for being the source of inspiration for this recipe. :-D

Although every Louisianan seems to have their own version of red beans and rice, there are some common elements, namely, well, beans and rice. :) At any rate, I've kept this version fairly straightforward and traditional -- red beans, rice, hot sauce, celery, green pepper, onion, Creole seasoning, etc. The only place where I've strayed a bit from tradition is the use of black rice (a superfood) instead of white (for its antioxidant/health benefits) and canned red beans versus dried ones, which, let's face it, take forever to soak and cook. Of course, the latter substitution was done in order to expedite the cooking process. We endurance athletes are a busy lot, and most of us don't have an eternity to spend cooking.
This version is just straight beans and rice, although it's typical for NOLA natives to add various forms of "oink." There's a very small list of (unprocessed) foods I won't eat, and that's one of them. (You can add liver, tongue, and meatloaf to that list as well. Lol.) At any rate, since chefs often like to make recipes their own, feel free to add whatever other complementary ingredients you like. Just be aware that any additions to the recipe might alter the balance of ingredients, so you might have to make some adjustments to even out the amounts, particularly with regard to the water, onions, celery, and seasoning. Of course, cooking is all about ratios, and baking, even more so. If you need to add more water, the way to incrementally calculate cooking time is as follows: For every cup of water you add, add 10 minutes to the total cooking time.
Anyhow, I hope that you will enjoy this simple but flavorful classic! Laissez les bon temps rouler!

Red Beans and (Black) Rice
Ingredients:
1 Tbsp. extra virgin olive oil
1 c. uncooked black rice (a.k.a. Chinese "Forbidden Rice"), washed
1 c. yellow onion, peeled and finely diced (about 1/2 medium-sized onion)
1 Tbsp. garlic, peeled and finely minced (about 2 large cloves)
1/2 c. celery, finely chopped (about 2 celery stalks)
1 large bay leaf
4 c. water
1 15.5 oz. can kidney beans, rinsed and drained
1/2 c. green bell pepper, finely diced
1/4 tsp. (or more) cayenne pepper hot sauce (optional) (for authenticity, use the Crystal brand, which Louisianans swear by)*
2 Tbsp. fresh Italian flat-leaf parsley, coarsely chopped
Creole Spice Mix Ingredients:
1 Tbsp. paprika
1 tsp. garlic powder
1 tsp. onion powder
1/2 tsp. dried oregano leaves
1/2 tsp. dried thyme leaves
3/8 tsp. salt, or to taste
1/8 tsp. ground black pepper
1/8 tsp. ground cayenne pepper (or substitute 1/8 tsp. ground chipotle pepper, if you prefer a smoky flavor)**
Directions: Combine Creole spice mix ingredients in a small bowl until well blended. Set aside. Heat olive oil on high heat in a large stock pot until glistening. Reduce heat to low, then add the uncooked rice and brown for 2 minutes, stirring frequently to make sure the rice is completely coated with the olive oil. Let rice crisp but do not burn. (Crisping the rice seals its exterior to keep it from getting mushy when the water is added.) Then add onions, garlic, celery, and bay leaf, and sauté for another 2-3 minutes. Add water (it should sizzle when it hits the pan), then stir in kidney beans, green bell peppers, hot sauce (if using), and spice mix. Thoroughly combine ingredients. Turn up heat to high and bring to a rolling boil, then reduce heat to low again, quickly cover pot with a tightly fitting lid, and simmer for 40 minutes. IMPORTANT: To perfectly cook the rice and maximize its fluffiness, do NOT, under any circumstances, lift the lid and peek at the rice while it's cooking. Only after the 40 minutes is up should you check the rice to see if it's ready. If necessary, use a clear (glass lid) so that won't be tempted to peek. :) When rice is done, remove from heat. At this point, the water should be fully absorbed and all of the rice grains should've split open. Rice should be fluffy, not dry or sauce-like. If grains are still hard and haven't yet split, add another 2 cups of water and cook for another 15-20 minutes or so. Allow rice to steam, uncovered and undisturbed, for 5-10 minutes. Discard bay leaf. Gently fluff with a fork. (For a more authentic consistency, you can mash the beans with a fork.) Garnish with parsley and serve hot.
Yield: 3-4 servings.
Chef's Notes: *Tabasco sauce or other hot pepper sauce can be substituted for the cayenne pepper sauce in a pinch.
**Chipotle pepper can be used as a substitute for the smoky flavor that would typically be provided by porcine products. :)
Please note: If you'd rather use dried red (kidney) beans instead, you'll have measure out about 1/2 lb. dried beans, and then soak them overnight in a large bowl of water. (The ratio of water to beans should be 2:1.) They'll also need to be boiled in water for about 2-3 hours (!) to soften them before combining them with the other ingredients. And this, my friends, is why my recipe calls for canned beans. :)
Also, avoid using stale dried beans, because they either won't disintegrate or will take a lifetime to do so. I realize that the expression, "stale dried beans" might seem like an oxymoron, but even dried beans can get stale to the point of being über-rock-hard and unusable. (Plus, they'll be completely unpalatable as well.) The hallmark of well-made red beans and rice is a nice thick sauce-like consistency, and the beans need to be broken down as they're cooked in order to achieve this. If your beans don't break down, you can always use an emulsion blender, or mash the beans and add them back to the pot, but of course, it's easier to just use dried beans that haven't been in your kitchen pantry for ten eons. :)
If you're going for a super authentic end product, go with Camellia red (kidney) beans, a popular new Orleans brand used for this dish. Southerners will obviously have more luck finding this brand locally. However, this product can be ordered online, directly from their company website. However, when you factor in shipping, it actually costs less to order them directly from Amazon.com. To ship a 1 lb. bag, which costs $2.49, Camellia's site charges $10.20! For the same 1 lb. bag at a more or less comparable price, one Amazon third-party vendor charges $6.20. (Third party vendors aren't eligible for free shipping using Amazon Prime.) However, the best deal is to buy directly from Amazon.com, so you can use Amazon Prime. The only option I saw was to order 6 2-lb. bags for $20.70. Of course, when you buy in bulk, the unit price is less expensive, at 11¢ per oz., as compared to 18¢ per oz. if you were to buy a 1 lb. bag from the aforementioned third-party Amazon.com vendor. Then again, if you buy 6 2-lb. bags, you'll have to make a lot of dishes using red beans. :) However, dried beans will keep for a long while, so it's not like they'll be spoiling anytime soon.
Alternate cooking methods: You can also make this recipe in a slow cooker (i.e., a crock pot). Since I haven't yet made it this way, I'm not going to provide precise instructions at present, although I guestimate that the process will take somewhere around 6-8 hours on low heat and about 3-4 hours on high heat, in order to fully cook the dish in this manner. (In general, when you're cooking rice in a slow cooker, just remember that the harder the grain of rice that you use, the longer it will take to cook. For example, white rice will cook faster than brown or black, which have a tough outer hull, and therefore take longer to cook) Also, the order that you add the ingredients during cooking would be very similar. At some point, I'll try using a slow cooker, and will then update the instructions at that point.
Friday, May 10, 2013
0 Popcorn Snack Bars

What?! A candy-coated popcorn snack bar that's actually GOOD for you?! Are you kidding me?! Does such a thing even exist? Yep. :)
Salty and sweet, and yes, healthy, this snack covers all of the bases. It's got all-natural carbs, healthy fats, and protein, Omega-3's and -6's, etc., is an abundant source of energy, and heck, it even fights germs (i.e., the honey, walnut oil, walnuts, almonds, and cashews). It's sort of like Cracker Jack's healthier, badass cousin. :)
Unlike other kinds of candy-coated popcorns, this one doesn't have tons of refined sugar, artificial ingredients, or boatloads of saturated fat. For example, if you read the label on a box of Cracker Jack, you'll see the following ingredients: sugar, corn syrup, popcorn, peanuts, molasses, salt, corn &/or soybean oil, and soy lecithin. Note that popcorn is listed third, after sugar and corn syrup (!). Or, check out the label on a can of Poppycock, another candy-coated popcorn that tastes very similar: Mixed nuts (almonds, pecans, cashews), corn syrup, sugar, butter (cream, salt), popcorn, brown sugar, salt, partially hydrogenated vegetable oil, cottonseed oil, corn oil, soybean oil, or soy lecithin. Popcorn isn't even one of the top ingredients. It's listed fifth, after mixed nuts, corn syrup, sugar, and butter. Wow, that's a real eye-opener, eh?
These popcorn bars are really easy to make, so why not make a healthier version and enjoy a guilt-free snack instead? :) Plus, it also makes a great gift for the holidays or other special occasions!

Popcorn Snack Bars
Ingredients:
8 c. plain, freshly air-popped popcorn (about 3 Tbsp. popping corn kernels)
Directions: Preheat toaster oven to 350ºF. Pour plain, freshly air-popped popcorn into a large heat-proof bowl. Pick out and discard any unpopped kernels. (After all, you don't want people to swallow whole kernels or break their teeth!) Set aside. Spread almonds onto an aluminium-foil covered toaster oven tray and bake in the toaster oven until golden brown and fragrant, about 10 minutes, opening the oven after the first 5 minutes to stir them a bit. (Nuts burn easily, so watch them carefully as they toast.) Transfer the nuts to a separate heat-proof bowl and let them cool for about 5-10 minutes.
While nuts are cooling, preheat (a regular) oven to 350ºF. Then, add honey, maple syrup, and salt, to a large sauce pot, stirring once to combine, and then simmer, undisturbed, over low heat. (Watch it carefully so that it doesn't boil over.) Cook until honey dissolves, about 5 minutes. Stir in the walnut oil in the last 30 seconds. Remove from heat, then stir in the vanilla and baking soda, the latter of which will cause the mixture to foam. Quickly add nuts and stir until fully coated with syrup. Then, using a heat-proof spatula, immediately transfer nuts and any remaining syrup to the bowl with the popcorn and mix together rapidly until the popcorn and nuts are completely covered in syrup. Then swiftly transfer the mixture to 9" x 13" baking tray lined with parchment paper. Using the heat-proof spatula, firmly press the mixture into the baking tray, evenly distributing it across the tray. Make sure there are no gaps anywhere and that the mixture is of a uniform thickness. Bake in oven for 7-8 minutes, or until bars have solidified and become golden brown. Let the bars fully cool, then refrigerate for 1 hour to further solidify. Cut into 10 uniformly sized bars, slicing once lengthwise (down the center of the 13" side), and then four times crosswise (equidistantly down the 9" side). Serve and enjoy!
Yield: 10 (2 3/5" x 4 1/2") bars.
Chef's Notes: It's best to consume these snack bars within 1-2 days of making them. Otherwise, they'll become sticky and will crumble fairly easily while you're eating them. And that'll make for some very messy eating. More popcorn will probably hit the floor than your mouth. :) If you're not going to eat them right away, then be sure to store them in an airtight container to keep them fresh.
After the syrup has finished cooking, do not delay any of the steps immediately following, from the moment you remove it from the stove top up until the instant after you've just pressed the syrup-coated popcorn and nuts into the baking tray. Otherwise, the syrup will begin to harden and will make the popcorn and nut mixture difficult to handle.
0 Recipe 361: Za'atar Crackers with Sesame, Cumin, Caraway, & Nigella Seeds

This is a super-easy and delicious high-protein snack that goes well with all sorts of condiments, particularly hummus. The various types of seeds, plus the homemade za'atar, which is made with fresh herbs as opposed to dried, is what gives this recipe a particularly vibrant flavor.
I brought these into my kung fu class, and they disappeared pretty quickly. I even saw some people go back for seconds. :)
This is yet another recipe from The Athlete's Cookbook. Not only is this recipe rich in protein, but it's packed with antioxidants as well. Since it's important to get protein into your system within 15 minutes of finishing a workout, it also makes a great post-exercise recovery snack too. Just be sure to ingest some carbs along with it, (in a 4:1 carb to protein ratio), to replenish your depleted glycogen stores.
Included at the bottom of this recipe are vegan and Paleo adaptations of this snack as well.
Nothing like fresh, warm crackers straight out of the oven. CRUNCH! :)
Enjoy!
-C

Za'atar Crackers with Sesame, Cumin, Caraway, & Nigella Seeds
Cracker Dough Ingredients:
1 c. almond meal
1 large egg
1/4 c. ground flaxseed, plus another 1/8 - 1/4 c. for dusting
1 tsp. baking soda
1/4 tsp. kosher salt
2 Tbsp. water
1/4 c. brown or white sesame seeds
2 Tbsp. nigella seeds
1 Tbsp. caraway seeds
1/2 Tbsp. cumin seeds
Za’atar Spice Mix:
1 Tbsp. fresh thyme
1 Tbsp. fresh oregano, finely minced and then densely packed
1 Tbsp. ground sumac
salt, to taste (omit if the sumac you purchased already contains salt)
Directions: Preheat oven to 375°F. Place all za'atar ingredients and all dough ingredients, minus the whole (sesame, nigella, caraway and cumin) seeds, into a food processor and pulse until all of the ingredients are fully incorporated and form a dough ball. Add whole seeds and pulse until just combined. Remove dough ball from the food processor and place onto a flat, clean surface that’s been covered in parchment. Place another piece of parchment on top of the dough and press down on top of it with a rolling pin until flattened. Then proceed to roll out the dough with the rolling pin until it’s 1/8” thick. Peel off top sheet of parchment paper and cut into 1 - 1 1/2” wide strips. (If you’ve rolled out particularly long strips, it’s a good idea to also make a horizontal cut across the center of the flattened dough, so that the dough strips aren’t too long and unwieldy to transfer to the baking tray.) Line a 11” x 17” metal baking tray with parchment, then dust it with 1/4 c. ground flaxseed. Slide a long spatula underneath each strip of dough and transfer it to the baking tray, spacing them evenly apart. (Depending upon how you’ve rolled out the dough, you may have to bake them in batches or use two baking trays.) Place the crackers into oven and bake for about 10 minutes, or until golden brown. Serve and enjoy!
Yield: About 30 (1 1/2” x 4 1/2”) crackers.
Chef’s Notes: You can also prep the dough in advance and either chill or freeze it until you’re ready to make the crackers. Also, please note that za'atar typically contains sesame seeds. However, since I've already included them as a cracker dough ingredient, and didn't want them to be pulsed into oblivion along with the fresh herbs in the za'atar, this is why the sesame seeds are supposed to be added later as a separate entity, along with the other seeds.
Adaptations: To make this recipe vegan, either use an egg substitute like Ener-G Egg Replacer or prepare the following homemade egg substitute: Pour 1 Tbsp. flaxseed into a small bowl, add 2-3 Tbsp. water, and stir until well-combined. Allow mixture to sit for about 10 minutes or so, or until it puffs up a bit and forms a gel. This mixture will take the place of the egg as the binding agent for the crackers.
To make this recipe Paleo, simply omit the salt and the baking soda. Your crackers will be a bit flatter without the baking soda, but if you'd prefer your crackers to be a bit thicker, then roll them out to the desired thickness, which after baking, will remain about the same.