
Monday, February 28, 2011
0 Recipe #247: Seaweed Salad


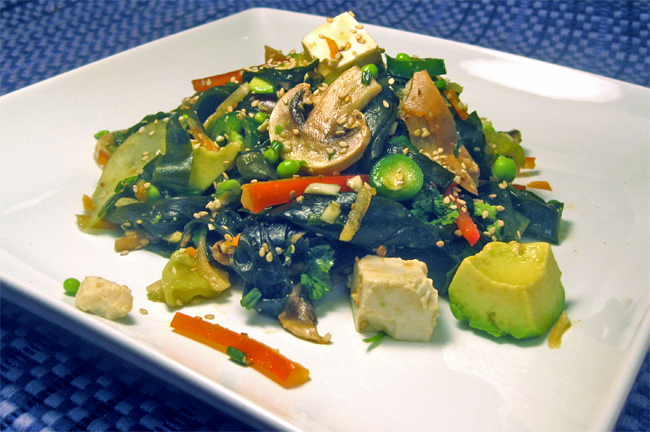 This salad -- with its many colors, shapes, & textures -- is very eye-catching, and its flavors are equally as bold.
Those of you who love Japanese food and enjoy the umami flavor of seaweed, this recipe's for you. :) And for those of you who have never had seaweed before and are curious to try it, let me just state the following disclaimer: For many Americans, this food is probably an acquired taste. ;) The dressing in this recipe does considerably reduce the fishy taste of the seaweed, but it doesn't mask it completely. And, if you're not used to eating foods like this, it might take a little bit of time to get accustomed to its flavor. (Did that scare you off yet? ;) ) If you like seafood or enjoy eating sushi, chances are you might like seaweed salad. And of course, if you've already tried sushi, then you already know what seaweed tastes like. :)
[Please note: The outer wrapper of a sushi roll is actually a different type and form of seaweed (i.e., dried, pressed -- & sometimes roasted -- sheets of nori seaweed) than than the kind featured in this recipe (i.e., dried strips of wakame seaweed, reconstituted in water). These two types do, in fact, taste quite different from one another. For more info on the types of seaweed most commonly used in Japanese cuisine, please see this link.]
Here are some quick nutrition stats for you: Seaweed is an extremely low-calorie, low-carb food (only 4 calories and 1 gram of carbs per 2 Tbsp.). It's got zero fat and cholesterol, and zero glycemic load. However, it is high in sodium, which, of course, isn't too surprising considering that it floats around in salt water for days on end before it's plucked from the sea. ;) However, in this particular recipe, you'll be soaking the seaweed in warm water and then washing it in 3-4 changes of water before you add it to the salad, which will help somewhat to remove some of the salt content.
The recipe itself is loaded with nutrients: The vegetables, avocado, and miso paste all have excellent health properties.
Anata no kenkō ni kanpai! (あなたの健康に 乾杯!) (To your health! Cheers!)

Seaweed Salad
Salad Ingredients:
1 c. dried, precut strips of wakame seaweed, loosely packed
3 c. warm water (for soaking/reconstituting seaweed)
3/4 c. (English) cucumber; peeled, seeded, & sliced (with a peeler) into paper-thin 3"-long strips*
1/2 c. red bell pepper, stemmed, seeded, de-ribbed, and julienned (1/8" x 1 1/2" slices)**
1/2 c. scallions (about 6 large scallions)
1/3 c. (or more) fresh cilantro, densely packed & roughly chopped
1/4 tsp. wasabi paste (from a tube), or to taste
1/8 tsp. ground white pepper; or to taste
1 Tbsp. garlic, peeled & finely mince (about 2 large cloves)
2 Tbsp. sesame oil
Make dressing: In a separate mixing bowl, combine tamari, white wine rice vinegar, lime juice, mirin, wasabi, white pepper, and garlic. Next, stir in the dissolved mixture of honey & miso paste, and whisk until smooth. Gradually incorporate the sesame seed oil into the dressing, whisking the dressing rapidly as you slowly pour a thin stream of the oil into the bowl. Stir in sesame seeds, mix well, and then pour the dressing over the seaweed salad and toss well.
Assemble remaining ingredients: Add tofu and avocado to salad, and gently toss the salad this time around, being careful not to mash these last two ingredients into oblivion. Chill in the fridge (to marinate) for at least 15-20 minutes before serving. Divide into equal portions & serve immediately.
Yield: 4-6 servings.
*Cucumber prep: It's easier to make paper-thin slices by peeling lengthwise strips, rotating around the whole cucumber as you peel until you reach the seeds, than it is to slice it in half first, then scoop out seeds, & peel the cucumber into thin slices. This way, by using the former, recommended method, you can get a better grip on the cucumber while you're peeling it into slivers.
**Effective, time-saving technique for julienning red peppers: The fastest and most efficient way to julienne red pepper is to first slice off the top and bottom of the red pepper, then remove the ribs and seeds, and slice it in half lengthwise. Next, hold each pepper half upright and slice with a quick, repeating downward motions to make thin vertical strips. After some practice, this can be done with great speed.
**Both Whole Foods and Amazon.com both have vegetarian miso paste made without MSG.
Sunday, February 27, 2011
0 Recipe #246: Pollo alla Milanese con Salsa Cremoso di Primavera (Milanese-Style Chicken in a Creamy, Springtime Sauce)
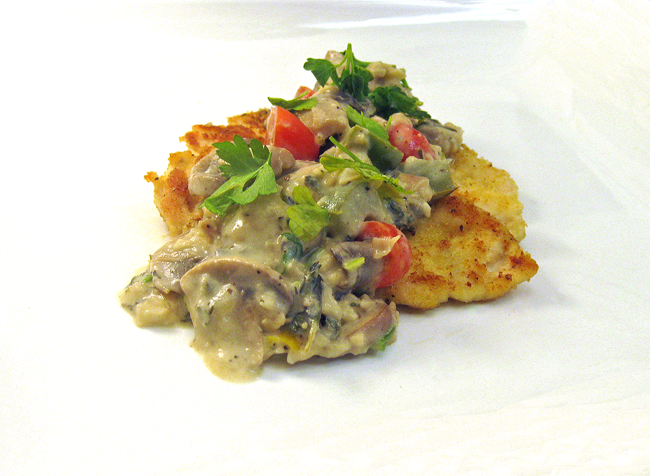
In honor of spring, which is fastly approaching (Yay!), I decided to make an Italian-style chicken dish with a bright & colorful sauce reminiscent of the hues of spring. Chicken Milanese, which is basically just tenderized, breaded chicken, is a little bit too plain on its own. Sure, it has a great flavor, but it still needs something a bit more exciting to perk it up & enhance its flavors. Hence, the addition of the sauce. :)
Again, this meal is probably one that I'd categorize as a "splurge dish." While it uses less mascarpone (i.e., 1/4 c.) than the recently posted Farfalle Alfredo con Funghi e Spinaci recipe, & is still relatively lower in fat than most other mascarpone-based recipes you'll find elsewhere, nonetheless, it's not exactly what I'd consider to be a low-fat meal. ;) Yeah, it's relatively low-fat to the previously mentioned recipe, but not in comparison with most of the other recipes on this blog. :) So, I'd recommend saving it for a special occasion or eating it as a once-in-a-blue-moon treat.
There's a great contrast of textures & flavors in this dish. The crisp exterior of the breaded chicken & the slight crunch of the vegetables are balanced out by the creamy flavor & consistency of the sauce. The flavor of the mushrooms go really marvelously with the green pepper & cheesy sauce. (This mushroom-pepper-cheese combination was actually inspired by a favorite pizzeria from home, which offers a pizza with the exact same toppings. :) ) The fresh herbs add an amazing vibrancy to the sauce, while the tomatoes & lemon juice give the dish the necessary tang to complete the meal.
Enjoy!
Pollo alla Milanese con Salsa Cremoso di Primavera (Milanese-Style Chicken in a Creamy, Springtime Sauce)
1/4 c. shallots, peeled & finely minced (about 1 large shallot)
1 large fresh bay leaf
1 tsp. fresh tarragon, densely packed & finely minced
1/2 tsp. fresh marjoram leaves, densely packed & very finely minced
1/2 c. grape tomatoes, halved
1 Tbsp. lowfat, nondairy creamer
1/4 c. Parmigiano-Reggiano cheese, (freshly) shredded
1/16 tsp. (a pinch) ground nutmeg
Chicken Dish Ingredients:
1/2 lb. (8 oz.) skinless, boneless chicken breasts, rinsed, defatted, tendons removed, & patted dry
3 Tbsp. unbleached, all-purpose flour
2 extra large egg, beaten
1 Tbsp. milk
3 Tbsp. plain bread crumbs
1 Tbsp. Parmigiano-Reggiano cheese, finely grated
Garnishes:
1 Tbsp. fresh Italian flat-leaf parsley, densely packed & roughly chopped
lemon wedges or slices
Directions: Tenderize the chicken: Remove chicken from fridge 30-45 minutes before you plan to start cooking, so that it reaches room temperature before adding them to the pan, to ensure even cooking. (This will take about 15-30 minutes.) Next, place rinsed, defatted chicken breasts onto a large, clean, non-porous cutting board & cut into 2" wide strips. Cover with plastic wrap & tenderize, pounding with the bumpy, textured end of a meat mallet until flattened 1/8" thick. (If you're buying pre-packaged chicken that's already been precut into 2" pieces, then just place an extra long piece of plastic wrap underneath chicken & then fold over to cover for even easier cleanup. Cutting chicken that's already been placed on top of plastic wrap pretty much defeats the purpose of double-wrapping it. ;) ) Discard plastic wrap & set aside.
Next, make the sauce: Heat (1/2 Tbsp.) olive oil in a large (12-13") sauté pan on medium heat until glistening. Then, reduce heat to low & sauté shallots, garlic, & bay leaf until tender, about 5 minutes. Stir occasionally. Push ingredients to one side of the pan, to make enough room for the roux: Melt butter on the opposite side of the pan & then quickly stir in flour to form a roux. (Stir well until smooth; there shouldn't be any lumps of flour after you've finished stirring.) Immediately deglaze with 1/4 c. white wine, stirring to remove fond (i.e., the brown bits) from the bottom of the pan. Then add mushrooms, season with salt & pepper, and cook until tender, about another 5 minutes. (Add more wine if liquid's volume gets too low during cooking. Liquid should never be allowed to completely evaporate.) Add green peppers & remaining 1/4 c. wine, and cook for an additional 3 minutes, or until lightly steamed. (Green pepper should still retain its bright green color & a good bit of its crunch.) Next, add all fresh herbs, cook for another minute, then add tomatoes, & cook for 1 minute more, reducing liquid's volume to a thin layer on the bottom of the pan. Remove from heat, stir in creamer, mascarpone, Parmigiano-Reggiano, & nutmeg, mixing throughly to combine. Transfer to a medium-sized bowl & set aside. (Wash out pan first if you'll be using it again to cook the chicken.)
Saturday, February 26, 2011
0 Recipe #245: Velouté d'Asperges avec Estragon et Thym (Cream of Asparagus with Tarragon & Thyme)
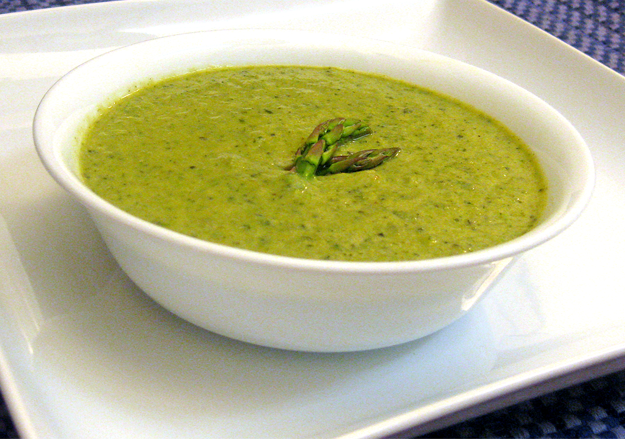
Yes, another French dish for dinner. :) This one's a childhood favorite of mine. The fresh flavor of this soup is so much better than eating the condensed version out of a can! And by "better" I mean not only in terms of taste, but also in terms of nutritional value & one's overall health. :)
It's easy enough to round up the supporting evidence. To illuminate the differences, all you have to do is check the ingredients listed on a can of Campbell's Cream of Asparagus Soup: "Water, Asparagus, Vegetable Oil (Corn, Cottonseed, Canola And/Or Soybean), Modified Good Starch, Wheat Flour, Contains Less Than 2% Of: Cream (Milk), Salt, Dried Why (Milk), Soy Protein Concentrate, Sugar, Monosodium Glutamate, Spice."
Not exactly nutritious, eh?! Note that vegetable oil is the third ingredient after water & asparagus. That's a lot of oil. Plus, vegetable oil is nowhere near as good of a choice as (extra virgin) olive oil, or even canola oil for that matter. (See my previous post entitled "Cooking Oils: Which One is Best?!" for further background info on this topic.) Also, you'll see that Campbell's version contains cream, sugar, & MSG. Do I even need to continue? ;)
And now let's look at the nutritional info, listed below: If you total everything up, you'll see that one 10.75 oz. can of their soup contains 275 calories, 17.5 grams of fat, and 2075 mg. of sodium! Not only that, but in one serving (120 ml., or 4.3 fl. oz.), 60 out of 110 calories come from fat. That's over half (54.5%) of an entire serving of soup! Do you really want to put that much fat into your body for such a small amount of food? (I'd personally rather get more "bang for the buck" & also more evenly spread out my 25-30% RDA of fat calories. ;) )
| Nutrition Facts | |
| Serving Size 120 mL Servings Per Container 2.5 | |
| Amount Per Serving | |
Calories 110
Calories from Fat 60
| |
| % Daily Value* | |
| Total Fat 7 G | 11 |
Saturated Fat 1.5 G
|
8
|
Trans Fat 0 G
| |
| Cholesterol 5 Mg | 2 |
| Sodium 830 Mg | 35 |
| Total Carbohydrate 9 G | 3 |
Dietary Fiber 3 G
|
12
|
Sugars 2 G
| |
| Protein 2 G | |
| Vitamin A | 4 |
| Vitamin C | 0 |
| Calcium | 0 |
| Calories: | 2,000 | 2,500 | |
|---|---|---|---|
| Total Fat | Less than | 65g | 80g |
| Sat. Fat | Less than | 20g | 25g |
| Cholesterol | Less than | 300mg | 300mg |
| Sodium | Less than | 2400mg | 2400mg |
| Potassium | 3500mg | 3500mg | |
| Total Carbohydrate | 300mg | 375mg | |
| Dietary Fiber | 25mg | 30mg | |
Still want to eat the canned version now?! ;) Didn't think so. :) Sorry, Campbell's, but I'd rather make it fresh any day of the week. :) I value my health, thank you very much!
My version of cream of asparagus is much lower in fat & sodium, and only contains whole, natural ingredients. It's smooth & creamy tasting without relying on major amounts of butter, cream, crème fraîche, & other tremendously fattening ingredients that are typically found in a "cream of...(insert name of vegetable here)" type of soup. :) So, now you can enjoy the rich & creamy taste of cream of asparagus and still be able to zip your pants afterwards. :)
Velouté d'Asperges avec Estragon et Thym (Cream of Asparagus with Tarragon & Thyme)
Ingredients:
1/2 Tbsp. extra virgin olive oil
1 c. leeks (white parts only), well-washed & sliced crosswise into 1/4"-thick rounds (about 1 large leek)
3 c. low-sodium chicken or vegetable broth
1 Tbsp. fresh thyme leaves
1/2 c. skim milk
1/4 tsp. freshly squeezed lemon juice, or to taste (or if you like your soup extra tangy, try 1/2 tsp.)
1 Tbsp. chives (optional, for garnish)
2-3 Tbsp. nonfat plain Greek yoghurt or low-fat sour cream (optional, for garnish)
Directions: Heat olive oil in a large non-stick stock pot over low heat. Add leeks, shallots, & bay leaf, and sauté until tender, about 5 minutes. Then, push leeks & shallots to one side of the pan, so you'll have enough room to make the roux: Melt butter & then quickly stir in flour to form a roux. (Stir well until smooth; there shouldn't be any lumps of flour after you've finished stirring.) Immediately deglaze with white wine. Add asparagus stalks (but not the tips), season with salt & pepper, & cook for another 2-3 minutes, until wine has been reduced to a thin layer on the bottom of the pan. Then add chicken/vegetable broth, a 1/4 c. at a time, allowing each addition to be fully absorbed before adding the next, & cook until asparagus is tender but still green, about 10-15 more minutes, stirring occasionally. Reduce broth's volume by half, turning the heat down even further should the soup begin to bubble. (Add more stock if the soup's level gets too low.) Add asparagus tips, nutmeg & all fresh herbs minus the chives, & cook until tips are tender & fresh herbs have wilted, about 3-5 more minutes. Remove from heat & set aside. Let cool for 5-10 minutes, discard bay leaf, then stir in skim milk, buttermilk, & lemon juice. Next, remove about 1/4 c. of the asparagus tips from the pot, strain, & reserve. (Tips will be used later for garnish.) Then, either use an emulsion blender (i.e., placing it into the soup pot & blending until smooth) or transfer soup to a blender & purée in batches, pulsing until smooth. (If you are using a blender, be very careful when transferring the soup to the blender, especially if it's still a bit hot. Also, don't fill the blender too full, or the soup will very likely splurt out & possibly burn you. Place kitchen towel over the blender lid & firmly press down on it before blending.) Ladle soup into bowls. Garnish with reserved asparagus tips &/or chives (if using). If desired, top with nonfat plain Greek yoghurt or low-fat sour cream. Serve chilled or hot.
Yield: 2-4 servings. (Makes about 4 c.)
Chef's Notes: Vegans can try substitute a 1/2 Tbsp. olive oil for the 1/2 Tbsp. butter & 1 c. plain lowfat soy milk for the 1/2 c. skim milk + 1/2 c. buttermilk. Please note that some kinds of so-called "plain" soy milk actually have a sweet taste (i.e., Silk, etc.), which won't work for this soup, so you'll want to look for a soy milk that doesn't add refined sugar or any other type of sweetener. It might just be safer to use a combination of tofu & water, puréed in a blender to achieve the same creamy consistency & taste as the milk & buttermilk. :) It's up to you. Although I haven't tested the balance of tofu to water, I'd guestimate that it's probably going to be something like 3/4 c. tofu to 1/4 c. water.
Friday, February 25, 2011
0 Recipe #244: Homemade Apricot-Nut Energy Bars
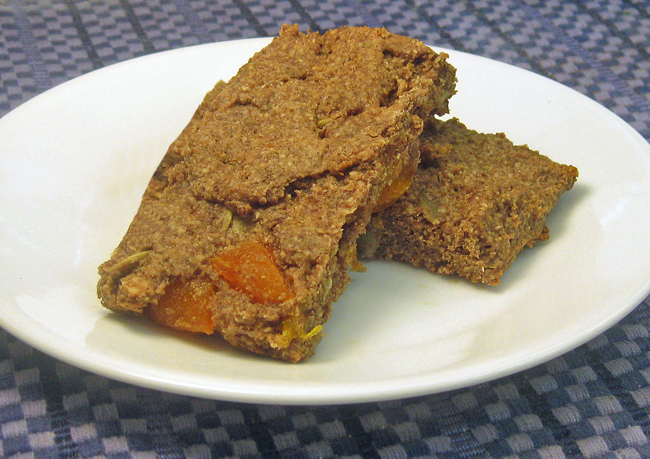
I decided to do some baking this afternoon, & so, created this original recipe for homemade apricot-nut energy bars. As you can probably tell from the number of baked goods recipes on this blog, weekend baking, or any baking at all for that matter, doesn't happen very often in our household. :) I cook more than I bake. Probably healthier that way too. :)
However, when I do bake, I'll usually make healthy treats, but only ones that I know are going to be super yummy. :) In other words, I'm not going to create a recipe just for the sake of its nutritional value if it's not going to taste good. Of course, we all know what happened the last time I tried to do that. Ah yes, the infamous "scones experiment." It wasn't pretty. LOL. I even made a second attempt, but to no avail. You see, I've never made scones before, nor did I grow up eating lots of sweets or baking that much, if that isn't already patently obvious. ;) You'll also notice that that said elusive scones recipe has never actually made it to print here. ;) (Poor Steve & Andy; they're still waiting for that recipe, not that they're holding their breath by this point. ;) Might be waiting a rather long time I'm afraid until I can figure out a way to make it healthier!)
Thankfully, my baking skills have improved considerably since then. Several months ago, I made a cranberry-apricot banana bread & I'm happy to say that it turned out remarkably well. Banana bread is one of the few things I've actually baked on a repeat basis throughout the years. On previous attempts, the flavor of the banana bread had been decent but I could never seem to achieve the desired consistency I'd been so patiently searching for all those years. :) The cool thing is that, as I was creating the cranberry-apricot banana bread recipe a few months ago, I had a "light bulb" moment. I finally figured out how to make a light & airy banana bread, instead of the dense rocks I used to create. ;) I also started to read more about the chemistry of baking, & that, of course, helped greatly as well.
That being said, you'll be pleased to know that the below recipe doesn't require a PhD in chemistry. ;) It doesn't need to rise, so unless you burn it beyond recognition, it's going to be really hard to screw it up. :) In fact, this recipe is SO easy to make that you can just toss all of the ingredients into a food processor, save the apricots & pumpkin seeds, mix everything together & spread it out onto a baking sheet, bake it, & there you go. Yes, it's really that simple.
The nice thing about making your own energy bars at home is that you can control what goes into them & keep them healthy. ;) These bars are great snacks for hiking or fueling for long runs. They're nutritious & fiber-rich, and will help power you through your workouts. :-D
This recipe is dedicated to my runner pals, Stu, Tracey, & Thad, since they provided the inspiration for this recipe. Enjoy!
Homemade Apricot-Nut Energy Bars
Ingredients:
1/2 Tbsp. extra virgin coconut oil (for coating the baking tray)
2 c. oats
1 c. ground flaxseed
1 c. blanched unsalted almonds, slivered
1 c. dry-roasted unsalted peanuts
1/2 c. unsweetened coconut, shredded (can find online or at international supermarkets)
1/2 c. dry nonfat milk powder
4 tsp. ground cinnamon
1 tsp. ground allspice
1 tsp. ground cardamom
1/2 tsp. ground cloves
1/2 tsp. ground nutmeg
1/2 tsp. ground aniseed
1/2 tsp. salt
1/2 c. orange juice (or pineapple juice)
4 Tbsp. honey
4 Tbsp. pure maple syrup
2 tsp. pure vanilla extract
1/2 c. unsalted whole pumpkin seeds, shelled
1/2 c. dried apricots, densely packed & diced
Directions: Preheat oven to 325°F. Line a 9" x 12" baking tray with aluminium foil (for easy cleanup) & coat with extra virgin coconut oil, using a pasty brush. In a food processor, mix together all dry ingredients, minus pumpkin seeds & dried apricots, & pulse until finely ground. Pour in all wet ingredients & pulse just until dry ingredients have become moist. Transfer mixture to a large mixing bowl. Add pumpkin seeds & thoroughly combine with a spatula. Next, add dried apricots & gently mix together, being very careful not to press down on them too hard or they'll become mushy. (You don't want to mash them into oblivion. ;) ) Spread mixture onto the baking tray, to a 3/4" thickness, pressing down to evenly distribute it across the tray. Bake for 15-20 minutes. Watch oven carefully to make sure bars do not become brittle and overly dry, &/or burned. When ready, remove from oven & place onto a wire cooling rack or heat-proof trivet. Let cool for at least 5 minutes before dividing into bars, but don't wait too long either. Cut into them while they're still warm or they'll be more difficult to cut. Divide into 12 rectangular bars, 2 1/4"x 4" x 3/4" each. Any bars you won't be consuming right away can be placed into a plastic container, tightly sealed with a lid. Or, divide up bars into snack-sized portions & place into Ziploc/plastic bags for on-the-go snacking. Serve & enjoy!
Yield: Makes 12 rectangular, 2 1/4"x 4" x 3/4" bars.
Chef's Notes: For people with tree-nut allergies, just eliminate the tree nuts & substitute with soy nuts. To make this recipe vegan, just substitute nonfat dry soy milk powder for the nonfat dry milk powder.
Also, there's no need to freak out about the use of coconut oil. ;) Coconut oil, when consumed in moderate amounts, is actually one of the few healthy saturated fats that actually helps to create/burn energy within the body, as opposed to most saturated fats, which have minimal health benefits & just end up sticking to your rear end. ;) It's not uncommon for athletes to ingest small amounts of coconut oil to naturally enhance their energy during workouts. When used in moderation, it's also been shown to be beneficial as a weight loss aid as well.
Thursday, February 24, 2011
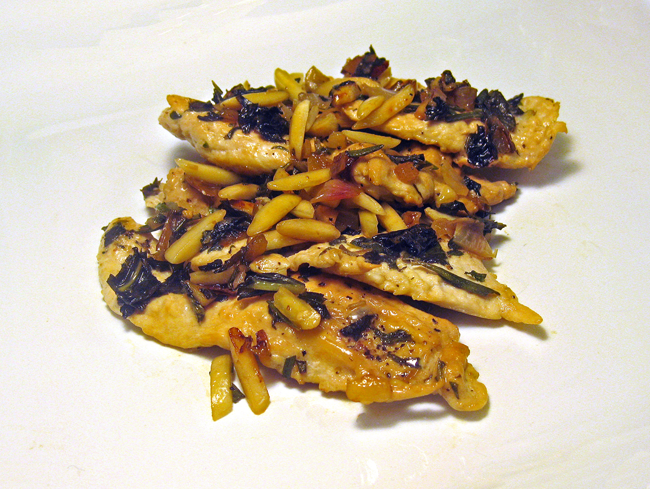
2 Recipe #243: Poulet Amandine (Chicken with Almonds)
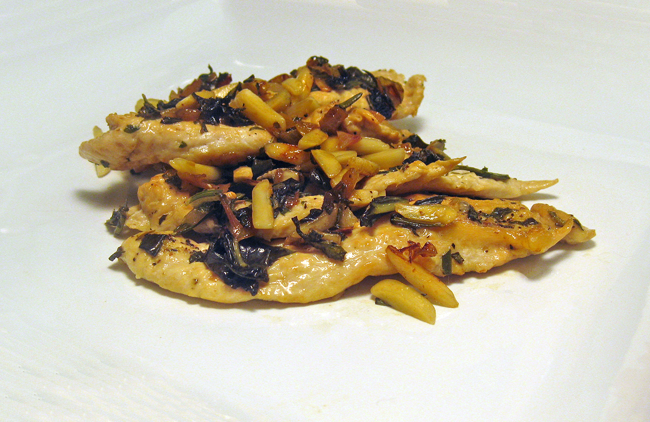
This French classic is quick & super-easy to make.
The word "amandine," sometimes mispelled as "almondine" in American cookbooks, is a French culinary term, which, of course, means "prepared or garnished with almonds." The almonds in this preparation can be sliced, slivered, flaked, or whole. Fish (particularly sole & trout) & green beans are mostly commonly served amandine, although chicken is another popular option.
The typical amandine dish is made with lots of butter &/or oil, but of course, my recipe is a much healthier version. It's still flavorful & satisfying, but there's a lot less fat. The fresh herbs, wine, & lemon juice make this dish particularly vibrant.
Poulet Amandine (Chicken with Almonds)
Ingredients:
1/2 lb. (8 oz.) skinless, boneless chicken breasts, rinsed, defatted, tendons removed, & patted dry
1 Tbsp. fresh marjoram leaves, densely packed & very finely minced
1/4 c. fresh basil leaves, densely packed & finely minced
2 Tbsp. blanched slivered almonds
Directions: Remove chicken from fridge 30-45 minutes before you plan to start cooking, so that it reaches room temperature before adding them to the pan, to ensure even cooking. (This will take about 15-30 minutes.) Next, place rinsed, defatted chicken breasts onto a clean, non-porous surface & cut into 2" wide strips. Cover with plastic wrap & tenderize, pounding with the bumpy, textured end of a meat mallet until 1/8" thick. Discard plastic wrap. Season chicken with salt & pepper and set aside.
Sauté onion, garlic & bay leaf in olive oil in a large (12-13") sauté pan on low heat until tender, about 5 minutes. Stir occasionally. Deglaze with 1/4 c. white wine, reducing liquid until there's only a thin layer on the bottom of the pan before adding chicken. Transfer chicken to the pan, spacing pieces far enough apart so as not to crowd the pan. Add all fresh herbs & almonds, & cook chicken for about 2-3 minutes per side, or until chicken is no longer pink, its juices run clear, & its exterior has turned golden brown on both sides. While chicken is cooking, add the remaining 1/4 c. white wine, to prevent chicken from burning or sticking to the bottom of the pan. Watch the pan carefully as tenderized chicken doesn't take very long to cook through & brown. (Lower heat even further if chicken starts to burn.)
When ready, remove from heat, discard bay leaf, & pour lemon juice over chicken. Divide into equal portions. Transfer to plates & serve immediately, with couscous, orzo, or rice.
Yield: 2 servings.
Chef's Notes: This particular recipe doesn't call for bread crumbs. However, if you'd like to bread the chicken, simply place about 2-3 Tbsp. plain bread crumbs into a medium-sized bowl & dip each piece of chicken into the bowl, thoroughly coating both sides. Shake off excess & lay onto a plate. Repeat this process until all chicken pieces have been breaded.
Wednesday, February 23, 2011
0 Recipe #242: Harira with Spinach, Olives, & Couscous
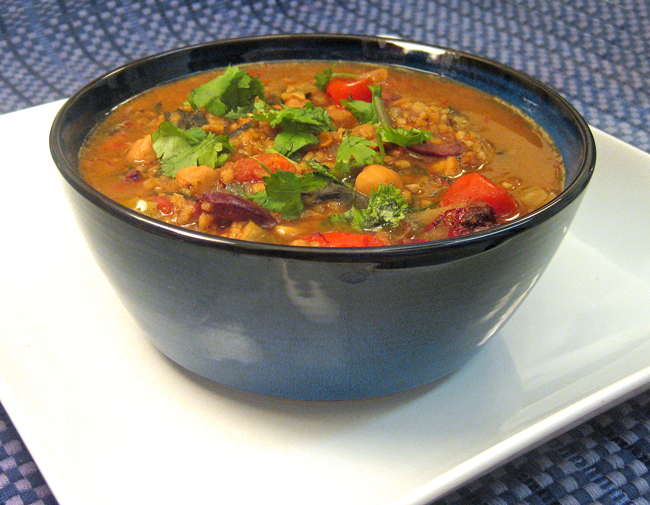
Harira is a traditional Morrocan soup, typically served during Ramadan to break the fast each evening, at sunset, or on special occasions like weddings, etc. Moroccans actually eat it throughout the year, and of course, you can too. :) It's also served in other North African countries like Algeria & Tunisia, etc., as well as in Pakistan & India. Of course, each region has its own way of preparing & serving harira. For example, in Algeria, harira is served with slices of lemon. The soup is often eaten with a special wooden spoon called a mgurfa (in Moroccan Arabic) or taghanjat (in Morrocan Tamazight).
As it's a very hearty, filling soup, harira is considered by Moroccans to be a meal unto itself. Like much of North African cuisine, harira is extremely nutritious, not to mention extremely tasty too! :)
There are a zillion different variations of this soup, which can contain any number of ingredients. Most start with a base of vegetable or meat-based broth, chickpeas, lentils, tomatoes, onions, & various "warm" spices like ginger, saffron, cinnamon, & pepper. Some versions may also contain beaten eggs, cubes of meat (usually lamb or sometimes chicken - beef is far less common), potatoes, rice or broken vermicelli noodles, semolina flour (which is mixed with water to form a semolina paste that's similar to a roux), spinach, carrots, celery, scallions/spring onions, etc. I've even seen some versions with tahini &/or sesame seed oil. Some may also contain smen, a preserved, salted butter that's similar in concept to Indian ghee (i.e., clarified butter), except that it has a distinctive Parmesan-like taste to it. If eggs are added, a squeeze of lemon juice is usually added to the beaten egg before it's added to the soup.
Spices in this dish can vary widely. A lot of versions of harira (as well as many other Morrocan dishes) contain a spice mixture called "Ras el hanout," which again, can vary widely depending on the region, family traditions, & individual preferences. Ingredients in this spice blend may include, in varying amounts, any of the following herbs & spices: ground coriander (&/or fresh cilantro), parsley, mint, cumin, cinnamon, cloves, allspice, nutmeg, mace, ground or grated ginger, cardamom, sweet paprika, turmeric, saffron, red chili powder (i.e., cayenne, etc.), black pepper, salt, anise, nigella seeds, dried flowers such as lavender & rose petals, & even galangal. Some blends have been known to contain up to 50 ingredients (!). It's been said that some spice merchants make custom blends for "special clients" that contain hashish or Spanish fly. Don't worry; those last two ingredients won't be making an appearance in this recipe. :)
Also, my version is slightly unusual in that I've added couscous, which functions as a replacement for the semolina paste & vermicelli noodles (or rice or potatoes), all of which are typically used as thickening agents for this particular soup. Couscous is, of course, also made with semolina flour, and basically has the same net effect. :)
In Morocco, before one digs into a big piping bowl of harira, it's customary to first eat snacks like dried figs, apricots, or dates (which are often stuffed with almonds or almond paste), hard-boiled eggs sprinkled with salt & cumin, fresh seasonal fruit, honey-drenched pastries, & other baked goods, which are typically served with milk, coffee, or mint tea.
Harira with Spinach, Olives, & Couscous
Ginger-Garlic Paste Ingredients:
1 Tbsp. fresh ginger, peeled & finely minced (about 1" piece)
1/4 tsp. salt
Dry Spice Mix Ingredients:
1/8 tsp. ground black pepper
1/8 tsp. ground cayenne pepper
1/4 tsp. turmeric
1/4 tsp. ground cloves
1/4 tsp. ground allspice
1/4 tsp. ground nutmeg
1/2 tsp. ground cardamom
1 tsp. sweet paprika
1/2 Tbsp. saffron threads, or to taste*
Soup Ingredients:
1 Tbsp. extra virgin olive oil
1/2 c. large cracked green olives, pitted & halved
1/4 c. Kalamata olives, pitted & halved
1/4 c. Greek olives, pitted & halved
3 oz. (half of a 6 oz. bag) pre-washed, fresh baby spinach (about 2 c. fresh)
2-3 Tbsp. tomato paste, or to taste
1/4 c. dry, uncooked couscous
2 Tbsp. freshly squeezed lemon juice, or to taste
Garnishes:
2-3 Tbsp fresh cilantro, chopped (can substitute or also add parsley &/or fresh mint)
a few drops of harrissa (optional)
1/4 c. nonfat, plain Greek yoghurt
Yield: 4-6 servings.
Chef's Notes: It's a good idea to do as much of the kitchen prep as possible in advance (i.e., soaking the lentils overnight, making garlic-ginger paste, measuring & blending the dry spices, etc.), it'll make the whole endeavor go even faster. It's also possible to make this soup ahead of time, although I probably wouldn't make it more than a day in advance, in order to keep it as fresh as possible. In fact, this soup tastes even better the following day, as it will thicken a lot while it's resting in the fridge. If you'll be making it a day in advance, you'll probably need to reconstitute the soup (i.e., add several cups of water to it) before reheating it.
This recipe can also be made in a slow-cooker/crock pot. Also, if you prefer, you can substitute orzo or other miniature pasta for the couscous if you so desire. If you decide to take the traditional route & make this dish using vermicelli noodles, be sure to break them into small pieces before adding them to the soup.
*There are many different kinds of saffron -- Spanish, Turkish, Persian, Kashmiri, French, Italian, Portuguese, Californian, Algerian, etc. -- and both the potency and the price can vary greatly depending on its origins. High-quality Spanish saffron will be more expensive than say, Algerian saffron, but it'll also be the more concentrated in terms of flavor. (Typically, the darker the saffron, the stronger the flavor and aroma.) Of course, you get what you pay for, and this is especially true when it comes to saffron. :) Whereas only a pinch of Spanish saffron might suffice for a particular recipe, you might need several scoops of Algerian saffron just to get the same effect. (Algerian saffron is one of the least expensive kinds of saffron.) So, it's usually a good idea to season to taste when it comes to saffron.
When I created this particular recipe, I used saffron that'd been stored in an unmarked plastic bag, so I'm not sure exactly what cultivar it was. Since it wasn't very strong & I had to use a whole tablespoonful of the stuff to achieve the necessary potency, one thing I do know is that it definitely wasn't Spanish saffron. :) I did actually have Spanish saffron in my cupboards & don't ask me why I didn't use it at the time -- I think I was just trying to use up the other stuff first ;) -- but this is why I've put an asterisk next to the amount of saffron in the above ingredients list. I estimate that a half tablespoonful of high-quality saffron will probably do the trick, but again, it depends on what kind of saffron you'll be using. There are also different grades of saffron within each cultivar, so again, the safest bet is to season to taste. :)
Friday, February 18, 2011
0 Recipe #241: Greek Chicken, Made with Feta, Olives, Oregano, & Roasted Lemons

After a long & busy day, I'm not really in the mood to write much exposition tonight. So, all I'll say about this recipe is that it turned out really well, was flavorful & tasty, and got the "thumbs up" from Erik. :)

Greek Chicken, Made with Feta, Olives, Oregano, & Roasted Lemons
Ingredients:
1 large lemon, sliced crosswise into 1/4"-thick rounds
1 Tbsp. fresh Italian flat-leaf parsley, tightly packed & very finely minced
1 c. yellow onion (about 1/2 large onion), peeled & sliced into 1/4"-thick crescent slivers
1 Tbsp. garlic, peeled & finely minced (about 2 large cloves)
1 large fresh bay leaf
1/8 c. Kalamata olives, pitted & halved (about 8-9 olives)
1/8 c. Greek olives, pitted & halved (about 8 olives)
1/4 c. nonfat feta cheese, crumbled
1/2 c. grape tomatoes (about 1/4 carton of 1 dry pint of grape tomatoes)
1/2 Tbsp. capers
Directions: Remove chicken from fridge 30-45 minutes before you plan to start cooking, so that it reaches room temperature before adding them to the pan, to ensure even cooking. (This will take about 15-30 minutes.) Set aside. Place lemon slices on an aluminium-foil covered tray (for easy cleanup), in a single layer, spacing them evenly apart. With a pastry brush, lightly coat lemon slices on both sides with 1 Tbsp. olive oil & season with salt & pepper. Roast them for 20-25 minutes in a 400°F preheated oven, or until the lemon slices begin to brown around the edges. Flip over slices half way through cooking (at about the 10 minute mark), so that they cook evenly on both sides.
Meanwhile, steam spinach: In a medium-sized sauce pot, bring 1 c. water to a rolling boil, add spinach, cover with a lid, & steam until gently wilted (spinach should still retain its bright green color), about 2-3 minutes on high heat. Remove from heat & then let cool for a few minutes. Then drain & squeeze out excess liquid by cupping your hands together, with the spinach in the center, & press. (This method is honestly much more effective than using a colander or a sieve. You can extract a lot more moisture this way.) Place drained spinach into a small bowl & set aside.
Next, place rinsed, defatted chicken breasts onto a clean, non-porous surface, & cut into 2" wide strips. Cover with plastic wrap & tenderize, pounding with the bumpy, textured end of a meat mallet until 1/8" thick. Discard plastic wrap & set aside. Place breadcrumbs & all fresh herbs into a medium-sized bowl & thoroughly combine. Dip each piece of chicken into the bowl, thoroughly coating both sides. Shake off excess & lay onto a plate. Repeat this process until all chicken pieces have been breaded. Set aside.
Sauté onion, garlic & bay leaf in olive oil in a large (12-13") sauté pan on low heat until tender, about 5 minutes. Stir occasionally. Deglaze with white wine & then with 1/4 c. chicken broth a few minutes later (after the wine cooks down a bit), reducing liquid until there's only a thin layer on the bottom of the pan before adding chicken. Transfer breaded chicken pieces from the plate into the pan, spacing pieces far enough apart so as not to crowd the pan. Cook chicken for about 2-3 minutes per side, or until chicken is no longer pink, its juices run clear, & its breaded exterior has turned golden brown on both sides. While chicken is cooking, add the remaining chicken broth, a 1/4 c. at a time, to prevent chicken from burning or sticking to the bottom of the pan, allowing each addition to be fully absorbed before adding the next. Watch the pan carefully as tenderized chicken doesn't take very long to cook through & brown. After you've flipped the chicken over to cook on the other side, add the olives, feta, tomatoes, capers, & roasted lemons to the pan & continue to cook for the remaining 2-3 minutes. Feta should melt a bit. When ready, remove from heat & discard bay leaf. Divide into equal portions. Transfer to plates, & garnish with additional feta & parsley, if desired. Serve immediately, with couscous, orzo, or rice.