
Sunday, May 29, 2011
0 Recipe #271: Spicy Turkey Burgers with Roasted Red Pepper Salsa & Sweet Pickle Relish


As you might have noticed, the last two recipes were for roasted red pepper salsa and sweet (or savory) pickle relish. Of course, that wasn't coincidental. ;) These recipes were posted in anticipation of this one -- i.e., spicy turkey burgers with all the trimmings. :-D
Turkey burgers are a quick and super-easy meal, one that seems to have been destined for busy weeknights or weekend BBQs. Unlike roasted (i.e., Thanksgiving Day style) turkey or turkey deli meat, ground turkey is fairly neutral tasting, and so, picks up the flavor of whatever else is added to it. Really, one could say that it's the tabula rasa of ground meats. ;)
As a person who's not wild about turkey (pun intended ;) ) to begin with, I must say that I was initially a bit skeptical about whether or not I'd actually like turkey burgers. In fact, the idea of eating turkey burgers had never even crossed my mind until a friend asked me if I had any turkey-based recipes.
The (Twitter) conversation went something like this:
@cyberpenguin (i.e., moi):
If any of you have any recipe requests or would like me to custom-create a recipe for you, let me know. I could use some inspiration. :)
@fiftypullups (i.e., Brett, the aforementioned friend, a.k.a. @TRIPHX):
@cyberpenguin Anything turkey burger-based? #mynewestaddiction
@cyberpenguin:
@fiftypullups: Not yet. :) Not a huge turkey fan here, but am willing 2 b open-minded+give it a 2nd chance in another format on ur behalf. ;)
And later, after making the turkey burgers, I wrote elsewhere, "I'll be damned, turkey burgers actually taste good. (Sampled a bit.) AND, they taste NOTHING like turkey. Huge bonus in my book. :)"
So, as you can see, what initially began as a friendly gesture to help out a pal turned into a revelation. :) So thank you, Brett, for suggesting the idea. Just goes to prove that you never know if you like something until you try it, eh?! One of the bonuses of keeping an open mind. :)

Spicy Turkey Burgers with Roasted Red Pepper Salsa & Sweet Pickle Relish
Burger Ingredients:
1 tsp. ground ginger
1/2 tsp. salt, or to taste
Accompaniments:
4 whole wheat, multi-grain, or sesame hamburger buns, halved and toasted (if desired)
thinly sliced red onions, sliced crosswise into 1/4"-thick rounds (1 onion slice per burger)
sliced tomatoes (1 tomato slice per burger)
lettuce (1 large leaf per burger)
thinly sliced avocado (1-3 small slices per burger)
Directions: Make the pickle relish and the roasted red pepper salsa in advance, preferably several days ahead of time. (Click on links for the recipes.)
Yield: Makes 4 burgers.
Chef's Notes: So why use 1.3 lbs and not 1 lb. of ground turkey? Well, first, a lot of ground turkey comes packaged in 1.3 lb. amounts, instead of 1 lb. Furthermore, 1.3 lbs. is the perfect amount to fill the patty maker four times for four decent-sized burgers, whereas 1 lb. divided into four portions just isn't quite enough meat to make a satisfying burger that's just the right size for the eyeballs and the stomach. :) Yeah, I know that a typical serving of meat should be about 4 oz., but do we really need to split hairs over an extra 0.075 lb. (or a little over 1 oz.) per person?! ;) I think not. :-D Of course, if you'd rather use 1 lb., you'll have to play with the seasonings a bit to determine their proper amounts. (That's a 1.3:1 ratio, so if you want to be precise about it, scale the recipe accordingly, i.e., by dividing the ingredient amounts by 0.76923076923076923076923076923077. Hahaha. OK, to make things easier, you can round that figure to 0.75, and multiple the amounts by 3/4. Fractions are immeasurably easier to use when modifying serving sizes or the number of servings. Either that, or you'll have some extra spicy burgers. LOL.
I'll usually make burgers on our George Foreman indoor electric (tabletop) grill, which eliminates a lot of hassle, and makes the burger extra healthy, because it drains off all of the excess fat. This type of grill is also rather convenient if you don't happen to have a traditional outdoor grill or just feel like making burgers indoors for a change. ;)
Saturday, May 28, 2011
0 Recipe #270: Roasted Red Pepper Salsa

Here's another condiment that will spice up any number of entrées. In addition to using it for traditional Mexican fare, it makes a great topping for hamburgers and hot dogs. Substitute it for ketchup, for an exciting and much healthier (!) alternative.

Roasted Red Pepper Salsa
Ingredients:
6 large whole red bell peppers (makes about 3 c. roasted red peppers)
1 fresh whole jalapeño pepper
2 large garlic cloves, unpeeled (makes about 1 Tbsp. roasted)
1/4 c. fresh cilantro, finely chopped
1 Tbsp. ground cumin
Directions: Place whole red bell peppers, unpeeled onion half, whole jalapeño pepper, and whole unpeeled garlic cloves onto a large (12" x 17") aluminium foil-covered baking tray (for easy cleanup). Roast tray of vegetables on the top rack of a 600°F preheated oven (i.e., the "broil" setting) for 25-30 minutes, or until lightly charred/blackened (but not grey/burnt). Every 7 1/2 minutes or so, carefully open the oven, pull out rack, and rotate the vegetables a quarter-turn using heat-proof tongs, and then return to oven. You'll end up doing this procedure a total of 4 times, so that all four sides of the peppers become evenly roasted.
Please note that the garlic should be carefully checked after the first 7 1/2 minutes, to make sure it hasn't burned. Using heat-proof tongs, remove the garlic from the oven as soon as it's roasted, about 10-15 minutes or so, and place onto a heat-proof plate. Also, check on the jalapeño at the 15 minute mark, and remove when fully roasted and then transfer to the same heat-proof plate. Allow garlic and jalapeño to fully cool before handling. (The smaller items obviously tend to roast -- and also burn! -- faster, so it's important to be vigilant about checking them in the first 7-15 minutes of roasting.)
While the vegetables are roasting, prepare your other ingredients: First, finely chop the cilantro and set aside. Then squeeze the lime juice into a food processor. Then, transfer the vinegar along with all of the remaining spices into the food processor.
The garlic and the jalapeño should be cool by now: Peel the garlic, then remove the pepper stem and scrape out the ribs and seeds if you prefer less heat. Place both into the food processor, and set aside.
When the roasted red bell peppers and onion half are done, carefully pull the tray out of the oven. Using heat-proof tongs, transfer the tray to a heat-proof (i.e., silicone) surface and let stand for 10 minutes. When peppers have completely cooled, pick them up using the heat-proof tongs, and hold them over the sink, one at a time. Remove the stems, & then drain the liquid into the sink. Then place peppers back onto the tray & peel off the skin. (The skin should peel off fairly easily.) Slice open each pepper and scrape out the seeds with a paring knife. (If some of the seeds are still sticking to the peppers, wash them off under running water; that usually does the trick.)
Peel onion half and transfer into the food processor. Pulse ingredients a few times until evenly diced. Do not completely pulverize (until smooth); instead, pulse until just combined to leave ingredients a little bit chunky. Next, place cooled peppers into the food processor, and pulse until evenly diced but still chunky.
Either serve immediately at room temperature or chill and remove just before serving.
Yield: 3 c. salsa.
0 Recipe #269: Sweet or Savory Pickle Relish
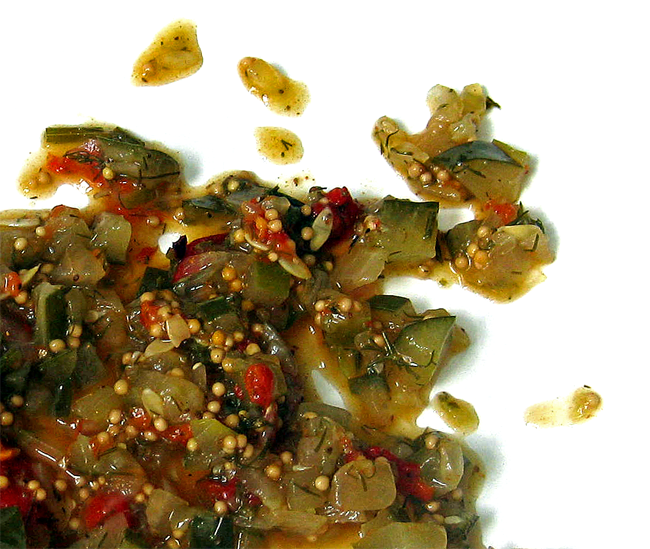
As promised, here's another recipe that's great for barbecues and picnics. Of course, it's traditionally (and most commonly) used as a condiment for hot dogs and hamburgers, but also tastes really good on many other types of grilled foods. Try it on chicken kebabs, or anything else that suits your fancy.
Since some people prefer sweet relish and some prefer the savory version, I've included ingredients to make both. To make the savory kind, all you have to do is omit the honey. Pretty easy and straightforward, eh?!
(When it came to hot dogs, I grew up accustomed to eating mostly savory accompaniments like mustard, sauerkraut, and garlic dill pickles, but then much later developed a taste for sweet relish. My dad also likes sweet relish, so it was probably my dormant sweet-tooth gene coming to the fore. LOL. Like father, like daughter. ;) Erik and many other family members don't care for the sweet kind, so it's good to have both varieties on hand.)
At any rate, no matter which kind of relish you prefer -- the sweet or the savory kind, consider that a lot of the bottled kinds contain lots of preservatives and chemicals, as well as a great deal of sodium and refined sugar (often HFCS), of course none of which are healthy. So, instead of putting all of that garbage into your system, make this healthy version instead. Your body will surely thank you -- for feeding it well, and for the care and respect you've shown it. :) Remember that however you treat your body, it will pay you back in kind. ;)
Even though the prospect of making your own pickle relish might, at first, seem time-consuming or daunting, it's actually a very straightforward and easy process, as you'll see very shortly when you check out the below recipe. :)
I've also taken a few shortcuts that depart from traditional pickling methods, which saves not only time but also your health. :)

Sweet or Savory Pickle Relish
Ingredients:
2 c. water
1 c. white distilled vinegar
3 Tbsp. honey (leave out if making the savory version)
2 Tbsp. mustard seeds
1 tsp. celery seeds
3 c. cucumbers, unpeeled and finely diced (about 1 extra-large cucumber)
1 c. white onion, peeled and finely diced (about 1/2 large onion)
1/4 c. fresh dill (fronds only), very finely minced
1/4 c. roasted red bell pepper, finely diced (if roasting yourself, use about 1/2 large red pepper*)
1 tsp. kosher salt
Directions: In a large nonreactive pot, bring water, vinegar, honey, mustard seeds, and celery seeds to a rolling boil (on high heat). Reduce heat to low and simmer, cooking until liquid's volume has been reduced by half and reaches a syrupy consistency. Bring back to a boil, add cucumbers and onion, and simmer for about 10 minutes, stirring frequently. Remove from heat. Add dill, allowing it to cook in the residual heat. (This is done to preserve the dill flavor; cooking it with the cucumbers and onions weakens the strength of the herb considerably.)
Allow to cool completely, for at least 1 hour (or longer). After relish has cooled, mix in roasted red peppers, turmeric, and salt. Using a slotted spoon, place relish into a Mason jar or a canning jar. Add enough brine to the jar to make the relish moist, but not enough to make it soupy. Brine should be no more than 1" below the top of the jar (to allow enough space for fermentation to take place.) Tightly seal jar and place into the refrigerator and allow it to mature for at least a week before consuming. (Pickle relish will last a few months in the refrigerator. However, I'd recommend consuming it within a few weeks to maximize its pro-biotic health benefits.)
Yield: 1 qt.
Alternate Preparation Ideas: If you like your relish to have some heat, add a few flakes of crushed red chili peppers. Or, for added interest, toss some zucchini &/or yellow squash into the mix.
Chef's Notes: *To roast your own red bell peppers, please see these instructions.
Instead of going through the usual laborious process of soaking the vegetables in an unholy amount of pickling salt for 4+ hours, I've taken some short-cuts, which will also ensure that your heart doesn't cry in protest from all that salt. ;) Instead, the salt is used as a flavoring agent; the vinegar and salt will indeed pickle the cucumbers all the same, except the net effect will be far less sodium for you. It's an all-around win-win situation. :)
Also, there's no soaking the relish in a hot water bath, or placing the hot relish into hot glass jars. There's really no reason for all of that fuss. That's why it's easier to let the relish cool, and then just add it to a room-temperature glass jar. Takes a lot less time too. :)

Friday, May 27, 2011
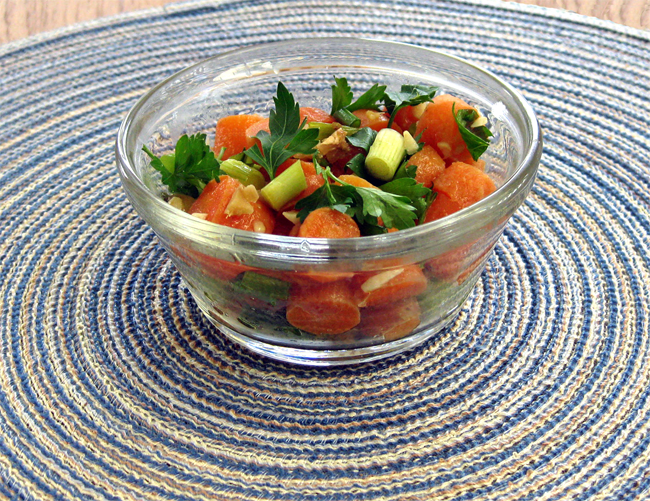
0 Recipe #268: Avocado & Tomato Salad

Another easy, no-cook dish, one that would certainly be appropriate to bring to a picnic or a barbecue. :)

Avocado & Tomato Salad
Salad Ingredients:
1 c. ripe Haas avocado, peeled, pitted, and diced into 3/4" cubes (about 1 Haas avocado)
2 c. ripe grape tomatoes, halved
1/2 c. red onion, peeled and diced (about 1/4 large onion)
1/4 c. scallions, sliced crosswise into 1/4" thick rounds (about 2 large scallions)
3 Tbsp. fresh dill (fronds only), densely packed and finely minced
2 Tbsp. fresh Italian flat-leaf parsley, densely packed and finely minced
Vinaigrette Ingredients:
1/4 tsp. dried oregano leaves
Directions: Place all of the salad ingredients into a large, nonreactive (i.e., non-metal) bowl. In a blender, pulse together the dressing ingredients. Pour dressing over the salad. Cover (with plastic wrap) and refrigerate for at least 30 minute to allow the flavors to meld. Serve and enjoy!
Yield: 4 servings.
Chef's Notes: If you're not planning to serve the salad right away, don't cut the tomatoes and the avocados right away, and also wait until 30 minutes before serving to add the dressing. Tomatoes and avocados have a tendency to spoil &/or soften too much in the fridge. Plus, the tomatoes' acids also tend to unfavorably react with the other ingredients in the salad. The lime juice might keep the avocado from browning/oxidizing, but it's not enough to keep it from softening.
0 'Tis the Season For Eating Outdoors: Bring on the Picnics and BBQs!

 'Tis the season for office picnics and parties, backyard barbecues, mountain hikes and park visits, and other types of outdoor social gatherings. The weather's getting hotter, and of course that means people will be heading outside for some spring (and very soon summer!) food and fun. (Yay!) And with Memorial Day just around the corner, many of you will no doubt either be hosting or attending barbecue parties in someone's backyard. As a result, many of you will also no doubt be in search of some easy-to-make dishes to bring to these gatherings. :)
So, to help you out in this regard, I'll be posting some outdoor party-appropriate selections over the next few weeks.

I hope the next few recipes will make your upcoming spring and summer parties even more enjoyable! Hope you all have a great time at your outdoor gatherings!
Happy Cooking,
Corey
Tuesday, May 24, 2011
0 Recipe #267: Fennel-Potato Salad

Yes, it was time to use up the rest of fennel from the last recipe. ;)
Instead of eating those fattening potato salads bathed in thick, congealed globs of mayonnaise, try this recipe for a lighter, healthier, and very tasty alternative. Even those of you who wouldn't normally like potato salad might even like this version. :-D
Incidentally, this recipe has only a very small amount of dairy in it, and at that, it's Greek yoghurt, which apparently doesn't seem to bother lactose-intolerant individuals as much or even at all, primarily because it contains a lot less lactose than regular yoghurt &/or many other milk-based products. Also, here's also no actual mayo in this dish, so that should make my mom very happy as well. ;) (We didn't grow up eating mayo.)
Another cool twist is that fennel is used instead of celery, for a crisper and much more refreshing taste. After all, fennel and potatoes go together like Ginger Rogers and Fred Astaire. :)
So, get ready for some fennel-potato salad to waltz off your plate and then gleefully cha-cha-cha right into your stomach. :-D

Fennel-Potato Salad
Ingredients:
8 c. water
1/2 tsp. table salt (for seasoning the water)
2 lbs. Yukon Gold or red-skinned potatoes*, unpeeled & well-scrubbed (about 6-7 small potatoes, 2 cubic inches)
2 large hard-boiled eggs,** peeled (make in advance)
2 Tbsp. Dijon mustard
1/4 c. nonfat plain Greek yoghurt
1/2 Tbsp. extra virgin olive oil
2 Tbsp. freshly squeezed lemon juice
1/4 c. fresh dill (fronds only), finely chopped
2 Tbsp. fresh Italian flat-leaf parsley, finely chopped
1/2 tsp. fennel seeds
1/2 tsp. coarsely ground black pepper
1/2 c. fennel bulb, diced
1/2 c. red onion, peeled and chopped (about 1/2 small onion)
1/4 c. cornichons, finely diced (these are the sour mini pickles, not the sweet kind, i.e., gherkins)
1/3 c. scallions, (white and green parts), sliced crosswise into 1/4" rounds (about 2 large scallions)
1 Tbsp. capers, drained, soaked in 1/4 c. water for 10 minutes, and then drained again
Directions: Bring 8 c. lightly salted water to a rolling boil in a large (4-6 qt.) pot. Then gingerly place the potatoes into the pot of boiling water. Reduce heat to medium-low, cover tightly with lid, and simmer for 15-20 minutes, or until the potatoes are almost tender when pierced with a knife. Drain into a heat-proof colander, then transfer potatoes back into the pot, and let them cool for at least 15 minutes. Set aside.
Meanwhile, prepare the dressing: Add hard-boiled eggs, Dijon mustard, Greek yoghurt, olive oil, and lemon juice to a blender (or food processor), cover, and pulse until smooth and emulsified. (Or, if you prefer a chunkier consistency, mash the hard-boiled eggs into oblivion in a large bowl, and then whisk together the Dijon mustard, Greek yoghurt, olive oil, and lemon juice.) Next, pour dressing into large bowl, and whisk in dill, parsley, fennel seeds, and black pepper. Next, add the fennel, red onion, cornichons, scallions, and capers, and gently combine. Set aside. This will allow the solid ingredients some time to marinate in the dressing while you're waiting for the potatoes to cool.
When the potatoes are cool enough to handle but still warm, dice them into small, rough chunks while they're still in the pot. Then transfer the potatoes into the large bowl containing the dressing. Toss well, cover, and refrigerate for a few hours to allow the flavors to meld. Serve cold or at room temperature.
Yield: 6-8 servings.
Chef's Notes: *I like to leave the potato peels intact when adding the potatoes to the salad -- for added color, flavor, texture, and nutrients -- but whether or not you'd like to do this is, of course, up to you.
**Here's how to make the most tender, creamy, and delicious hard-boiled eggs you'll ever have: My grandmother taught my mother this technique, who in turn, taught me, and so now I'm passing it onto you. :) It's super easy to do: First, bring a pot of boiling water to a rolling boil. Then place the eggs into the pot and quickly cover the pot with a tightly fitting lid. Turn off the heat, and allow the pot to sit on the stove burner for at least 25-30 minutes before draining the water and peeling the eggs. (And just in case you're wondering, yes, the water is, in fact, actually hot enough at this stage to cook the eggs all the way through.) Enjoy!
No additional salt is needed for this recipe. The pickles and the capers provide sufficient salt. :)
To make this recipe vegan, just omit the eggs and Greek yoghurt. :) Not sure it'll taste the same, but maybe you can try using an egg substitute and cook it into the same consistency as the hard-boiled egg before blending it with the liquid ingredients. You could also try using silken tofu as a replacement for the Greek yoghurt. Please note, I haven't actually tried making it this way before, so vegans, you've been duly warned. ;)
Saturday, May 21, 2011
0 Recipe #266: Insalata Caprese con Finocchio e Olive (Caprisian Salad with Fennel & Olives)

Insalata caprese, as you might be able to tell from its namesake, is originally from the island of Capri, located in the Campania region of Italy. Traditional-style insalata caprese consists merely of tomato and fresh mozzarella slices, (usually stacked in an alternating fashion), which have been seasoned with a little salt and pepper and garnished with lots of fresh basil leaves.
As many of you are no doubt already aware, the American version of this dish often calls for balsamic vinaigrette. For some unknown reason, many chefs are prone to using way too much balsamic vinegar in their preparations of this dish and the effect is bitey and completely overpowering. (Who knows, maybe it's because they aren't tasting their own food before it leaves their kitchen. ;) ) So, if you're going to do the balsamic thing, take it easy. You can always add more later, but adding to much is going to make it flat-out inedible. ;)
Of course, the purist form of the dish in its original unadorned incarnation provides a much more delicate flavor than the American version, allowing the basic ingredients themselves to shine through. The salt and pepper really help to bring out the flavor of the other ingredients, and frankly, there are times when simple is the way to go. However, if you've had enough of the original Italian version &/or the mouth-puckeringly tart American version (LOL), and are looking for a dish with a bit more excitement as well as flavor complexity and depth, then try this version instead. :-D
I believe that if an acidic component is going to be added to this dish, it should be much milder, i.e., serving as an accent versus a gigantic mallet that beats a person over the head. ;) This is why, in my own version of insalata caprese, which is completely different from either the American or the traditional Italian versions, I've used a combination of freshly squeezed lemon juice and apple cider vinegar, which, unlike balsamic vinegar or distilled white or red (wine) vinegar, is a bit more subtle.
My own twist on insalata caprese is anything but traditional, and turns this dish on its head in a new and unexpected way. Nonetheless, all of the flavors meld together flawlessly. You'd have thought they were always supposed to be combined in such a fashion. :-D
This dish contains some of my favorite ingredients. The fennel and cucumbers, in particular, are cool and crisp and complement the other ingredients marvelously, giving the salad a wonderfully refreshing taste. The multiply layers of flavor work together seamlessly and add enough interest and complexity without overdoing it. Plus, all of its bright and cheery colors are pleasing to the eye; and more importantly, its taste is pleasing to the stomach. ;) It's definitely an enhancement of the original template.
Also, aside from being an original creation, I think it's also a unique one, as I've not seen anyone else create a dish like this before. :) I love it dabbling and diving into the unknown, creating one-of-a-kind dishes that've never been done before. It's really satisfying to find out you're the first one to think of something truly original. :) And with each original dish I create comes a newly acquired piece of knowledge. Regardless of one's level of expertise or experience, I believe that a chef should always be creating, exploring, and learning new things. It's sort of like being a "culinary pioneer." :-D It's rather fun and exciting stuff!
Serve this dish as a first course (like the Italians do, i.e., as an antipasto), a side dish, or even as a main course. If you do decide to serve it as an entrée, just add some crusty/rustic Italian sourdough bread et le voilà, you've got a complete meal. :)
And the best thing about this dish? It's tremendously quick and easy to make, because there's no cooking required! It's just basically chopping up vegetables & letting it marinate. Nothing to it! :-D
This salad is especially cool and refreshing on a hot and humid day, especially when you're feeling bludgeoned by the heat, and just want to make a quick, no-brainer dinner. :) And with the rather toasty temperatures we've been having lately here in DC, it's the perfect thing to serve. As one of my friends aptly put it, there's "no need for an oven on a hot night." Good point. And tonight's hot weather certainly called for something light and revitalizing. :)

Insalata Caprese con Finocchio e Olive (Caprisian Salad with Fennel & Olives)
Salad Ingredients:
1 c. fennel (bulb only), diced crosswise into 1" long pieces (about 1/2 fennel bulb)
2 c. ripe grape tomatoes, halved (1 dry pint)
1/2 c. cucumber, unpeeled, scored with a fork lengthwise, sliced crosswise into 1/4" thick rounds, and then quartered (about 1/4 large cucumber)
1/2 c. red onion, halved & thinly sliced into crescent slivers (about 1/2 small red onion)
1 c. fresh, whole "ciliegine" (i.e., "cherry-sized") mozarella balls, drained (8 oz. container packed in water)
1/2 c. Kalamata olives, pitted and halved lengthwise
1 Tbsp. capers, soaked in 1/4 c. water for 10 minutes and then drained
1/2 c. fresh basil leaves, julienned & densely packed
 |
| Ciliegine mozarella balls can be found in most general supermarkets. (Ciliegine means "little cherries" in Italian.) |
Directions: Pour all vinaigrette ingredients in a blender (or a food processor fitted with a metal blade) and pulse until emulsified. Pour into a glass dressing bottle (or creut) with a tightly sealed lid and shake vigorously to combine. Place diced fennel into a large bowl, pour dressing on top, and toss together. Then cover bowl and place into the refrigerator, allowing the fennel to marinate for at least a half hour. When ready, remove bowl from the refrigerator. Add remaining salad ingredients, except for the basil, which will become soggy and limp if added too soon. Toss, cover, and then return to refrigerator once more. Refrigerate for at least an hour in order for the flavors to meld. Add basil just before serving and toss together. Serve and enjoy!
Chef's Notes: It's really crucial to marinate the fennel separately, as this helps it to lose its strong licorice overtones, and instead transform into a much more complementary flavor with respect to the other salad ingredients. If you marinate everything together, the dressing will be spread too thin and the fennel won't be able to adequately soak up the dressing. So, this is why the fennel should be marinated by itself first. :)
Also, it's really important to choose high quality olive oil for this recipe. Since you won't be cooking with it, the flavor of the olive oil will be a lot more noticeable. :) So don't skimp; this is not the time to cut corners. The olive oil you chose should have a pronounced flavor. This is why extra virgin olive oil is the perfect choice. For this particular dish, I used high-quality Spanish olive oil, which is now being imported to other countries like Italy, which is typically known for its olive oil. (In fact, Spain now produces over 50% of the world's olive oil.) So, in other words, you know it's got to be the good stuff. :) If any of you are curious to check out the exact type of olive oil I used, it's the picudo variety of Aceiterapia's olive oil. This type of olive oil has a marked olive flavor. It's slightly spicy and nutty-tasting with a little bit of bite. These flavors are balanced out by its smooth and buttery finish, and so, it goes well with pastas, seafood (especially mild, white fleshed fish), and salads like insalata caprese. :-D
This dish doesn't need any additional salt; there's already enough salt in the capers, olives, and mozzarella. :)
To make this dish vegan, simply substitute imitation cheese (like soy cheese, etc.) for the mozzarella, or omit the mozzarella altogether.
Alternate Preparation Ideas: This recipe could easily be converted into a cold pasta salad recipe. Just add small pasta shapes like elbow macaroni, penne, trotolle, farfalle (bowtie pasta), rotini, cavatelli, conchiglie (shells), etc.
Tuesday, May 17, 2011
0 Recipe #265: Ginger-Garlic Baby Carrots
Here's a simple and tasty side dish for those evenings when you still want to eat something healthy & delicious but don't feel like making a whole lot of effort. :)
Ginger-Garlic Baby Carrots
Ingredients:
1 Tbsp. fresh garlic, peeled and finely minced (about 2 large cloves)
1/2 Tbsp. fresh ginger, peeled and finely minced (about 1/2" piece)
1/4 tsp. salt
1 Tbsp. extra virgin olive oil
1 large fresh bay leaf
2 c. baby carrots, sliced crosswise into 1/4" rounds
1 c. low-sodium organic vegetable broth
1/4 c. scallions, sliced crosswise into 1/4” rounds
1-2 Tbsp. fresh Italian flat-leaf parsley, roughly chopped
Directions: Mash garlic, ginger, and salt together into a smooth paste using a mortar & pestle. Then, in a large (12-13") sauté pan, heat olive oil on medium-high heat until glistening. Then, reduce heat to low, add garlic-ginger paste and bay leaf and sauté for 5 minutes, or until garlic no longer smells raw. Deglaze with vegetable broth, add carrots, cover with lid, and simmer for 20 minutes, or until water has almost completely evaporated. Remove from heat and allow to cool. Add scallions and mix thoroughly. Garnish with parsley and serve.
Yield: 3-4 servings (as a side dish).
Monday, May 9, 2011
2 Recipe #264: Kale-Potato-Leek Soup

Instead of throwing away the stems and center ribs left over from the kale chips recipe or the green parts of leeks, try this recipe as a way to use up the parts you'd typically discard. Don't be too concerned about the flavor of the soup. It'll still taste good. :-D Everything's puréed in the blender anyhow, so you probably won't even notice the difference. ;)
I made this recipe for my parents the last time I was home. They really enjoyed it and I hope you will too. :-D

Kale-Potato-Leek Soup
Ingredients:
1 Tbsp. extra virgin olive oil
2 c. leeks, green parts
1 Tbsp. garlic, peeled & finely minced (about 2 large cloves)
1 large fresh bay leaf
1/4 c. dry sherry
4 c. water
1 lb. potatoes, peeled and diced (makes about 3 c. diced potatoes)
3 c. kale stems and center "ribs" (left over from kale chips recipe)
1/4 c. fresh dill, finely minced and densely packed
2 Tbsp. fresh Italian flat-leaf parsley, roughly chopped and densely packed
1 Tbsp. fresh thyme leaves, densely packed
1/2 Tbsp. fresh rosemary leaves, finely minced and densely packed
1/2 Tbsp. fresh rosemary leaves, roughly chopped and densely packed
1/4 tsp. salt, or to taste
1/8 tsp. ground black pepper, or to taste
Directions: In a large sauce pot, sauté leeks, garlic, and bay leaf in olive oil on low heat for 5 minutes. Deglaze with sherry, reducing liquid's volume by half. Add water and bring to a boil. Then reduce heat to low, add kale stems, potatoes, and water, cover with lid, and simmer for 25-30 minutes, or until potatoes are tender and easily pierceable with a fork. Then add fresh herbs, cover again, and simmer for 5 more minutes. Remove from heat and allow to cool for 10-15 minutes. Discard bay leaf. When almost completely cooled, transfer to blender in batches and purée until smooth. Soup can be served hot or cold. If necessary, reheat soup. Serve immediately and enjoy!
Yield: Serves 4. (Makes 8 c.)
