
Tuesday, August 24, 2010
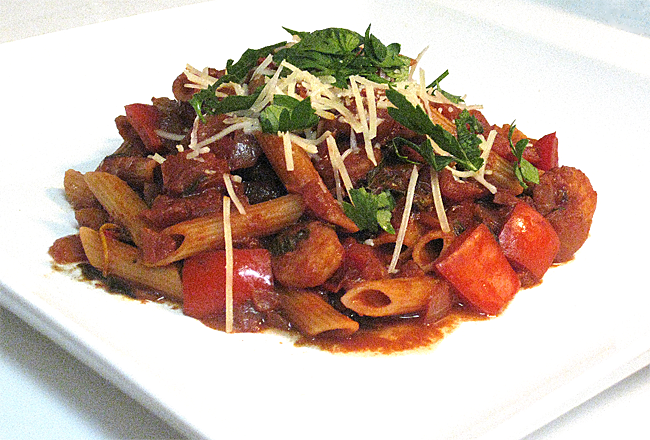
3 Recipe #166: Penne all'Arrabbiata con Gamberetti (Penne in Arrabbiata Sauce with Shrimp)


After mentioning arrabbiata sauce in a previous post, I was then inspired to create a recipe for it. :)
Arrabbiata sauce is traditionally served over penne, although other types of pasta -- like spaghetti, capellini, linguine, or shells, etc. -- could, of course, be substituted. It is also most commonly served with shrimp, although I've also seen it prepared with other types of seafood like calamari, scallops, clams, or mussels.
Although basil & marjoram aren't traditional additions, I've nonetheless added them to the recipe because the flavor of these fresh herbs complements the dish quite nicely.
And now for a word or two about wine: It's perfectly fine to add more than the requisite 1-2 cups of wine when deglazing the sauce. I'm actually quite liberal with it, sometimes using up to a half bottle! Honestly, it makes the sauce taste really good -- I'd say even better :) -- so if you like your sauce to be bold & spicy, then go for it. It really infuses the dish with an amazing flavor. Plus, adding more wine to this dish doesn't really overpower the other flavors at all or make it too strong, so don't be concerned too much about the exact amount of wine that you add.
Also, make sure you use a decent red, preferably a good-quality Italian red. In other words, no screw tops! ;) The wine doesn't have to be fabulously extravagant. Usually a $15-30 bottle of wine will do. I used the varietal Morellino di Scansano, from the Mantellassi vineyard, a Tuscan red from the village of Scansano, located in the coastal region of Maremma. It'll run you about $30 or so. There are also $18 versions of this particular varietal as well, if you'd rather spend a bit less.
Also, arrabbiata sauce, on its own, has some other, quite wonderful uses as well. It makes a great pizza sauce (with or without the shrimp), or can be used as a substitute for cocktail sauce for shrimp cocktails.
Penne all'Arrabbiata con Gamberetti (Penne in Arrabbiata Sauce with Shrimp)
Ingredients:
1 Tbsp. extra virgin olive oil
1 Tbsp. garlic, peeled & finely minced (about 2 large cloves)
1 c. yellow onion, peeled & diced (about 1/2 large onion)
1 large fresh bay leaf
1 c. red bell pepper, diced (about 1/2 - 3/4 large pepper)
1 1/2 c. fresh, vine-ripened tomatoes, including juice (about 2 medium-sized tomatoes)
4 Tbsp. (1/4 c.) tomato paste
1 Tbsp. fresh marjoram leaves, roughly chopped
1 tsp. crushed dried red chili pepper flakes (about 1 medium-sized chile de arbol)
1/8 tsp. ground black pepper
1/4 tsp. salt
1-2 c. Italian red wine (vino rosso)
1/2 lb. (8 oz.) raw fresh shrimp (or if unavailable, use pre-cooked), washed, peeled, & deveined
8-10 c. water
4 servings (2 c.) dry, uncooked Barilla Plus penne
3 Tbsp. fresh basil, julienned or torn into small strips
1 tsp. freshly squeezed lemon juice
1-2 Tbsp. Parmigiano-Reggiano
1/2 Tbsp. fresh parsley, coarsely chopped
Directions: Heat olive oil in large sauté pan. Add onions & sauté on low heat until translucent for about 5 minutes. Add garlic, bay leaf, & red pepper, and cook for about another minute. (This way, the garlic & red pepper won't burn from overcooking.) Next, add the tomatoes & tomato paste, marjoram, red pepper flakes, salt, & pepper. Quickly stir to combine & then turn up the heat to medium, cooking down the juice until it's reduced by half. Stir in the wine to deglaze the pan & reduce until all of the vegetables have sufficiently softened & there's only a thin layer of liquid on the bottom of the pan. (If you find that the ingredients are sticking to the bottom of the pan, then feel free to add more wine as necessary.) If you are using raw shrimp, wait until there's about 2 minutes left of cooking time, and then add them into the pan. When shrimp turns a bright white & coral color, they are ready. If you're using pre-cooked shrimp instead (if you live in a land-locked area, sometimes it's hard to find in the local supermarket), add them in the last 10 seconds of cooking, so they warm but don't cook through. (It's important not to overcook them or they'll be tough, overly chewy, & dry as heck!)
While sauce is reducing, bring lightly salted water, (seasoned with a drop of olive oil), to a rolling boil in a large pot. Cook pasta according to package directions, until al dente. (Barilla Plus penne takes about 11 minutes.) When finished, drain pasta, shock with cold water, & then add to pan. (By this point, the sauce should be of a thick consistency but still pourable.) Add in basil & lemon juice, stir well, & immediately remove from heat. Discard bay leaf & top with Parmigiano-Reggiano & fresh parsley, and serve. Serve with a salad or sautéed/steamed vegetables, &/or homemade, piping hot, toasted garlic bread, straight from the oven. Mangia!
Yield: 4 servings.
Variations: If you like, you can also add ground cayenne pepper &/or thyme. Or, add celery at the same time you add the onion, to give the dish even more flavor. Also, another idea is to oven-roast the red peppers (pepperone arrostito) before adding them to the sauce. This adds extra dimension to the dish, imparting it with a rustic flavor. If you use roasted peppers, be sure to sauté them for less time when adding them to the sauce. I'd recommend adding them in at the same time you add the shrimp.
Chef's Notes: If you are crushing your own chiles de arbol, I strongly recommend wearing latex or rubber gloves. I'll admit that I got a bit cocky while I was cooking this dish earlier this evening & thought I didn't need to use them. After all, I thought, I was only touching an uncracked whole dried chile into a mortar & grinding it with a pestle. So, why do I need gloves? What I didn't consider was that, first, a dried pepper doesn't have to be cracked for the capsaicin to permeate the skin, and second, that the dust created by the crushing process would travel. Yes, as I discovered, it most surely does. ;) And here I was thinking I was being careful all the while when I then reflexively scratched my ear. Oops. I had to pour a thimbleful size of milk, followed by an ice cube, into my ear to quash the fire. I can honestly say that I've never done that before. ;) And even then, it still burned for HOURS! Also, a word to the wise: Hopping in the shower doesn't seem to do the trick either. ;) Believe me, I tried that too. I had to wait until my skin finally absorbed the capsaicin. Needless to say, it was NOT fun. So, people, I'm telling you, wear gloves! Better to be safe than sorry. :-D
Monday, August 23, 2010
0 Update: Email Links Fixed + New Public Facebook Page
A reader recently asked me if I received her recent email, which was sent via the email form on this blog. It was then that I realized that none of these email links were working on any of my blogs (Cooking with Corey, See Corey Run, Rock It! Running Company, Underage Knitter, etc.). So I'd like to thank the reader who let me know about this issue, which has since been resolved. (I've received the test messages I sent via all my blogs' email links and have since confirmed that they all work now.) So feel free to send me messages if you like, because now I will actually receive them. :) Also, I'd like to extend my apologies to those of you who sent me emails via my blogs in the past & wondered why I never responded to them. Now you know.
The other big change is that, after much consideration, I've decided to switch over to a public Facebook page for all public & business-related exchanges and revert my Facebook account back to private usage. Since Facebook doesn't allow simultaneous personal and public/business-related accounts, it seemed that the best alternative was to set up the aforementioned structure.
With over 2500+ Facebook friends & about 50 new friend requests a week, content management was becoming a bit unwieldy. I was honestly feeling a bit overwhelmed by the daily mass influx of Facebook email, status updates, newsfeeds, application/group/page/event invites, friend requests, etc. So, understandably, I just had to scale back the account to already-established, solid connections, which include both longstanding IRL & online friends (i.e., especially fellow blogger pals & runners I've met through Twitter and DailyMile, as well as acquaintances who have regularly interacted with me on Facebook over a significant length of time). So, long-standing friends & acquaintances, please rest assured; there will be no change in our status.
I hope that people will understand & not take these changes personally, as I do enjoy interacting with runners, both online & in-person. People are welcome to interact with me on Twitter (@cyberpenguin) and DailyMile.
Details regarding the switchover can be found below:
Corey L. Irwin I've just converted over to a public Facebook page, http://www.facebook.com/pages/Corey-Irwin/141320305904294?ref=ts -- People who don't know me very well but would like to stay connected can friend me there instead. My current Facebook account will be used primarily for people with whom I've established long-standing personal connections. So, please don't take any unfriending personally. Thanks!
This page will contain updates/articles from all my blogs, plus pertinent information from the @coachpenguin & @rockitrunning Twitter news feeds, both of which contain original content not found in the aforementioned blogs.
Tuesday, August 17, 2010
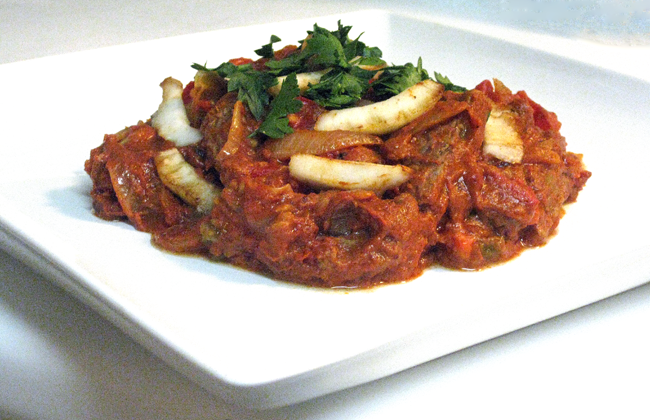
2 Recipe #165: Keralan-Style Hot & Spicy Chili Beef Stir-Fry
Coconuts are ubiquitous throughout Keralan cuisine, and this dish is no exception. Traditionally, both coconut oil and coconut slices are used for this recipe.
Although coconut oil has gotten a bad rap in the past because it's high in saturated fats, that reputation is largely undeserved. Coconut has significant nutritional value: It's surprisingly lower in fat than several other types of nuts & oils, is rich in fiber & vitamin B9 (i.e., folate/folic acid), and has a low glycemic load. Coconut is actually used by athletes for performance enhancement reasons because its fat content is easily converted into energy and it doesn't lead to the accumulation of fat in the heart & arteries. It's also purported to bolster the immune system against viral and bacterial infections; and some also believe that it is an effective aid in losing weight -- how's that for irony?! -- although both of these effects have yet to verified by scientific studies. There are many other benefits, which you can read about here.
In India, Keralan-Style Chili Beef Stir-Fry has hundreds of variations that vary from region to region. It also goes by several names: Some people call it "Erachi Ularthiyathu," while others call it "Erachi Olathiyathu." (The basic translation = sautéed beef or beef stir-fry.) I've also seen it referred to it as Nadan-Style Beef Curry.
Whatever name it's called, this dish is, of course, a particular favorite of Keralans (i.e., residents of the South-Indian state of Kerala). While it can be served as a main course, it's often served as a snack for visiting friends & relatives, & is typically served with toddy, a potent alcoholic beverage made from the fermented sap of a coconut tree. Toddy is knock-your-socks-off strong, & the point of serving it with the chili beef is to help take the edge off the spiciness of this dish. :) I guess the logic there is to counter one overpowering thing with another. ;) I don't know if the two actually cancel each other out, since I've never had toddy before, but I've lowered the heat index of this recipe considerably from its more traditional incarnation (i.e., "blast-your-head-off" hot!), so that second step probably won't be necessary. ;)
Although I love hot & spicy dishes, I decided to spare you all from the experience of having to make a mad dash to the refrigerator, in search of a beverage to put out the flame fest. ;) That's why I purposely made this recipe more amenable to the average American/Western tolerance for piquancy.
However, if you're like me & enjoy pumping up the heat, feel free to add more chili peppers, or just choose a more potent variety. Serrano peppers are a tad bit hotter, & would be a nice choice. Next in line (in terms of heat) would be cayenne, aji, or tabasco peppers. Or, if you really want to fan the flames, try Scotch bonnet or habañero chili peppers.
On that note, you might find it useful to know the following: I've found that creamy drinks like almond or soy (or skim) milk, (mango) lassi, etc., usually work best to quell the fires of super-spicy dishes. Guess it's better than falling off your chair after drinking too much toddy. :)
Conversely, if you can't hack the heat & would like to lower the flame factor even further, substitute an Anaheim or poblano pepper for the jalapeño pepper. Or, just leave out the chilis altogether, if you'd rather not set your mouths afire. ;)
1 tsp. coriander seeds
1/2 tsp. black mustard seeds
1/2 tsp. cumin seeds
1/4 tsp. cardamom seeds
3 Tbsp. shallot (about 1 large shallot)
1 Tbsp. jalapeño pepper, finely minced
1/2 c. fresh coconut meat, sliced into thin slivers
6-10 fresh curry leaves
1 Tbsp. distilled white (wine) vinegar
1/2 c. coconut juice (reserved from the same fresh coconut listed above)
2 c. tomatoes, diced (about 3-4 medium-sized tomatoes)
1 Tbsp. cilantro or parsley leaves, coarsely chopped
Directions: Dry roast all of the dried spices -- coriander seeds, black mustard seeds, cumin seeds, cardamom seeds, & fennel seeds -- in a large (12-13") sauté pan covered with a splatter screen for about 30 seconds on medium heat, or until black mustard seeds pop & splutter. (Spices should begin to darken & give off their aroma, but be careful not to burn them.) Remove from heat, let cool, & transfer spices to a food processor. (You can also grind the spices separately in a coffee grinder before adding them to the food processor.) Then add ginger, garlic, salt, black peppercorns, chile de arbol, amchur (dried mango) powder, garam masala, cinnamon, & clove, & pulse until finely ground. Next, add nonfat Greek yoghurt, lime juice, & tomato paste & pulse until smooth.
Optional step: Transfer marinade to a large resealable Ziploc/plastic bag, add beef slices, seal bag, & marinate in the refrigerator for at least 1 hour. Then remove Ziploc bag from refrigerator, remove beef, shake off excess sauce, & transfer to the same sauté pan. (I didn't marinate the beef beforehand; I just tossed the sauce into the pan after browning the beef, although the traditional preparation is to marinate the beef first. The reason I did it this way was because I didn't want the marinade to brown or burn in the process of browning the beef, which is more of a likelihood for tomato-based marinades.)
In the same sauté pan, brown beef & 1/2 Tbsp. olive oil on medium heat. Add onions, shallots, jalapeño, coconut slices, & remaining 1/2 Tbsp. olive oil & continue to cook until vegetables are soft (and the raw smell of the garlic, onions, shallots, & ginger disappears.) Add coconut slices & sauté until it becomes a pale golden brown. Next, add curry leaves & then deglaze with vinegar & coconut juice. Add tomatoes & (remaining) tomato-ginger-garlic marinade/sauce & reduce liquid to about 1/2 of its original volume. Continue to cook until mixture thickens into a gravy-like consistency; stir continually to uniformly coat beef with sauce. Remove from heat. Garnish with cilantro (or parsley) and serve hot with basmati rice, an Indian flatbread (like naan, chapati, roti, poori, paratha, pathiri, papadum, appam, dosas, etc.), idli, or as a starter accompanied by cold beverages.
Yield: 2-3 servings as a main dish, or 4-6 as an appetizer.
Monday, August 16, 2010
0 Recipe #164: Fettuccine in a Spicy White Sauce
This recipe is for all the spicy food lovers out there.... Next time you think about making arrabiata sauce as the usual go-to pasta dish, try this recipe instead. It's just as spicy & flavorful, but is a refreshing alternative to other spicy (pasta) dishes. It goes nicely over seafood, or can stand alone in its own right.

Fettuccine in a Spicy White Sauce
Ingredients:
1/2 Tbsp. extra virgin olive oil
2 Tbsp. scallions, thinly sliced crosswise into small rounds (about 2 small scallions)
1/2 Tbsp. jalapeño pepper, seeded, ribbed, & finely minced (about 1/2 small jalapeño pepper)
1 large fresh bay leaf
2 Tbsp. fresh basil leaves, roughly chopped & tightly packed
1 Tbsp. fresh marjoram leaves, roughly chopped & tightly packed
1 Tbsp. fresh oregano leaves, roughly chopped & tightly packed
1/2 Tbsp. fresh thyme leaves, tightly packed
1 Tbsp. tomato paste
1/3 c. (Monterey) Pepper Jack cheese, shredded & melted, mixed through
1/4 c. freshly shredded Parmegiano-Regiano cheese, sprinkled on top
1 tsp. unsalted butter
1/8 tsp. ground black pepper, or to taste
1 Tbsp. pignoli/pine nuts, lightly toasted
Directions: In a large (12-13") sauté pan, sauté scallions & jalapeño pepper in olive oil on low heat until soft, about 4-5 minutes. Stir occasionally.
After vegetables have adequately softened, deglaze the pan with white wine, adding 1/2 c. at a time, making sure that each addition is absorbed before adding more. While deglazing, add bay leaf and all fresh spices. Quickly stir in fettuccine & tomato paste and continue to cook, being careful not to burn pasta. Add cheese & butter, stirring until they've melted. Remove from heat, season with salt & pepper, stir in lemon juice & peperoncini, & sprinkle with pignoli/pine nuts. If desired, garnish with additional, diced jalapeño pepper (i.e., remaining 1/2 pepper) & additional basil. Serve.
Sunday, August 15, 2010
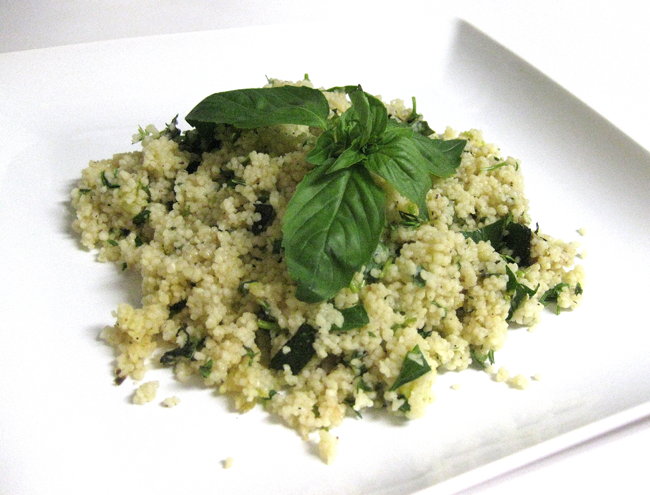
0 Recipe #163: Couscous with Zucchini & Fresh Herbs

A quick and easy side dish that's perfect for dinner!

Couscous with Zucchini & Fresh Herbs
Ingredients:
1/2 Tbsp. extra virgin olive oil
1/2 c. zucchini, diced into 1/2" cubes
1 tsp. garlic, peeled & finely minced
1/2 c. couscous
1 c. water
1 Tbsp. fresh chervil
1 Tbsp. fresh parsley
1 tsp. fresh marjoram leaves, tightly packed
1/2 tsp. fresh oregano leaves, tightly packed
1/2 tsp. fresh thyme
1/2 Tbsp. fresh basil leaves, tightly packed
salt, to taste
pepper, to taste
1/2 Tbsp. freshly squeezed lemon juice
freshly shredded Parmigiano-Regiano or Asiago
1/2 Tbsp. pignoli/pine nuts
Yield: Serves 1-2 as a main course, or 3-4 as a side dish.
Variations: Yellow squash, sliced mushrooms &/or black olives would be a nice addition to this recipe. If you are adding these ingredients, be sure to add squash & mushrooms at the same time you cook the zucchini. Olives should be added at the same time as the fresh spices.
To make this recipe vegan, simply omit cheese or substitute with a vegan imitation cheese (like "soy cheese") that approximates the flavor of a sharp, salty cheese like Parmigiano-Regiano or Asiago.
Saturday, August 14, 2010
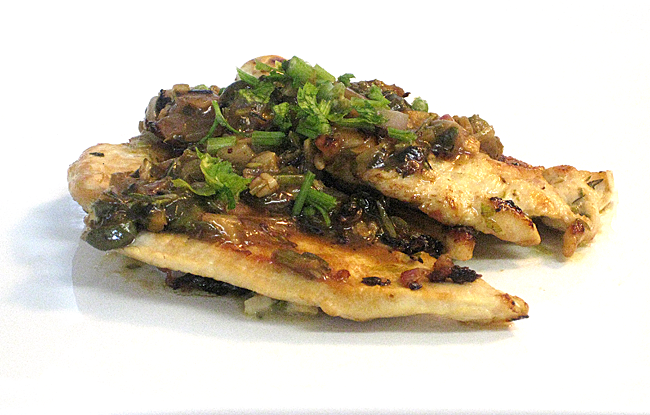
0 Recipe #162: Chicken with Lemon-Caper Sauce (Pollo con Salsa di Capperi e Limone)
A simple but elegant preparation, this dish is light, tangy, & extremely flavorful! White wine, lemon, shallots, fresh herbs, & a dab of butter.... These ingredients can make almost anything taste good. :)
This recipe is also quick & easy to make: It can be completed in less than 30 minutes! It's a dish that hits all the right notes, particularly for those who want a healthy, tasty meal, but don't have all night to spend cooking it. :)
This recipe's particular style of caper sauce originated in Sicily. Capers grow wild all over the Mediterranean, & so, not surprisingly, are a common ingredient in this region's cuisine. The caper berries that we commonly recognize in dishes are actually the unripened flower buds of this plant, which have since been dried in the sun & pickled in vinegar, wine, or brine. Capers prepared in this form are naturally rather salty, so that should explain why the below recipe doesn't require any additional salt. :)
Chicken with Lemon-Caper Sauce (Pollo con Salsa di Capperi e Limone)
Ingredients:
8 oz. skinless, boneless chicken breasts, well-rinsed, defatted & patted dry
1 Tbsp. extra virgin olive oil
1 Tbsp. freshly squeezed lemon juice
1/2 c. semi-dry (i.e., demisec/abboccato) white wine (I used Orvieto.)
1/2 Tbsp. unsalted butter
1/2 Tbsp. unbleached, all-purpose flour
3 Tbsp. shallots, peeled & finely diced (about 1 large shallot)
1 Tbsp. fresh garlic, peeled & finely minced (about 2 large cloves)
1/2 Tbsp. distilled white wine (or champagne) vinegar
1 Tbsp. fresh Italian flat leaf parsley, finely minced
1 tsp. fresh thyme leaves
1/2 tsp. fresh oregano leaves, finely minced
1/8 tsp. coarsely ground black pepper
1 Tbsp. large capers, drained, rinsed, & chopped
1 tsp. lemon zest (optional)
Directions: After washing, defatting, & drying chicken cutlets, lay them onto a non-porous (i.e., silicone) cutting board or other smooth, clean surface. Cover chicken with plastic wrap, and tenderize by pounding flat with the bumpy (i.e., waffle-patterned) side of meat mallet to a uniform thickness of about 1/4". After chicken has been tenderized, cut each piece crosswise into halves (or thirds, if you prefer).
In a large 12-13" nonstick sauté pan, sauté chicken in 1/2 Tbsp. olive oil on medium-low heat until golden brown & slightly crispy around the edges (but still moist & tender on the inside), about 2-3 minutes per side. (Tenderized chicken cooks much faster because it's thinner & has more exposed surface area after it's been tenderized.) With about a minute of cooking to go, squeeze the lemon juice over the chicken. Transfer to two plates & set aside. Keep chicken warm by covering with foil or using some other method (i.e., a chafing dish, warm/heated plates, etc.).
Reduce heat to low. In the same pan, melt butter & stir in flour to form a light & frothy paste (i.e., a "roux"). Add remaining 1/2 Tbsp. olive oil & sauté shallots for 3 minutes, stirring occasionally. Then add garlic & cook for an additional 2 minutes, until tender. (Shallots should be soft and the garlic should be on the verge of turning a light golden brown.) Then deglaze pan with wine & vinegar, scraping off the fond from the bottom of the pan as the liquid evaporates. Quickly stir in thyme, oregano, parsley, & ground black pepper, & reduce the sauce to about 1/2 of its original volume, continuing to stir & simmer until thickened. In the final 30 seconds of cooking, add capers & lemon zest (if using), & then remove from heat. (This will basically just heat the capers through without drying them out.) Transfer to plates & pour sauce over each serving of chicken. Garnish each portion with additional fresh chopped parsley & lemon slices, & serve.
Yield: 2 servings.
Variations: Caper sauce can also be served over pasta, steak (i.e., filet mignon), fish (red snapper, halibut, cod, sole, tuna, etc.), or other seafood like shrimp or scallops; it can even be served as a dressing for salads. Alternatively, to further enhance the flavor & preparation of this dish, you could also serve this dish atop a bed of salad, pasta, basmati rice, or fresh grilled/steamed vegetables (i.e., asparagus, green beans, spinach, potatoes, etc.).
For the caper sauce itself, other possible additions include sliced, cured black olives (i.e., Kalamata, Gaeta, etc.), mushrooms, &/or artichokes. To make Tuscan-style caper sauce, just add 1 Tbsp. minced & deboned anchovies and a handful of chopped cornichons (i.e., mini, sour pickled gherkins).
Alternate garnishes include watercress, basil, or mint. You could also season this dish with a pinch of nutmeg, or, if you're serving it with pasta, sprinkle it with some freshly shredded Parmigiano-Reggiano or Asiago cheese.
Tuesday, August 10, 2010
2 Recipe #161: Moules Provençales (Mussels Provençal)
When I was in Prague last year, there was this Belgian place, called Les Moules, that'd been highly recommended to us by both the concierge at our hotel and by several other people. If you don't happen to know French, les moules = mussels. So, this place obviously specialized in mussels. :) And, if a restaurant focuses solely on one type of food, & that's pretty much all they make, that's usually a pretty good sign that it's going to be good, or at least, it better be good if they're going to live up to their name! ;)
During our trip, we'd already sampled Czech cuisine several times, which tends to be very heavy (meat & potatoes type of dishes) & in many ways, is very similar to German food, but that night, were in the mood for something a little bit lighter. We'd been walking through the old quarter, down Pařížská třída (Paris Avenue) -- there are some really nice, high-end shops and upscale restaurants along this route (!) -- and had decided to find Les Moules on a complete whim; we'd heard a lot of good things about this place and had been wanting to try it. Since it was a spur of the moment decision, we'd forgotten to bring the exact address with us and so, only had a general inkling of the location. We'd walked around for a bit, and then, when we stopped trying so hard to find it, thankfully bumped right into it. :)
Anyhow, our steadfast attempts to find the place were worth it. My dining companion and I had a fabulous meal there, accompanied by some Belgian-style pomme frites (i.e., salted, thick-cut fries served with a mayo-based sauce) and some delicious Belgian beer brewed by Trappist monks. Yum, yum, yum! :-D (See, that's evidence that I do indulge from time to time. ;) )
I'd had mussels provençal (moules provencales or moules a la provençal) many times before, but this was certainly one of the more memorable outings. So, as an homage to this visit, I thought I'd try my hand at making them at home. I'd made mussels marinara before, which is very similar -- basically the Italian version of this dish ;) -- and had also made other types of tomato-based dishes featuring mussels -- i.e., a pescetarian version of paella and a delicious Svensk fisksoppa (Swedish Fish Chowder), etc. So, sure, why not. :) (At some point, I'll probably post both of those recipes too. They are both really tasty!)

Moules Provençales (Mussels Provençal)
This dish is a traditional favorite of both the French and the Belgians. It's quick & easy to make, but oh-so-delicious! An important consideration when cooking mussels is to cook them quickly. If cooked properly, they should take only about 5 minutes. Any longer than that, and they'll be as tough & rubbery as a rubber chicken. :-D Also, they need to be steamed. Of course, the temperature of steam can be very hot, so be careful not to burn your hands. When lifting the lid, the use of silicone mitts that fully cover your hands & wrists is highly recommended. ;)
Ingredients:
1 Tbsp. extra virgin olive oil
1 1/2 c. yellow onion, peeled & diced (about 1 small onion)
2 Tbsp. garlic, peeled & minced (about 4 large cloves)
1 fresh large bay leaf
2 c. good white wine (added 1 c. at a time) (I used Gewürztraminer)
2 c. vine-ripened tomatoes, diced (about 4 small tomatoes)
2 Tbsp. fresh Italian flat leaf parsley, finely minced & tightly packed
2 Tbsp. fresh oregano, finely minced & tightly packed
2 Tbsp. fresh basil, roughly torn into small pieces & tightly packed
1 Tbsp. fresh marjoram, finely minced & tightly packed
1/2 tsp. saffron
1/2 tsp. salt
1/8 tsp. ground black pepper
1/8 tsp. red chili pepper flakes
1 tsp. lemon zest (the zest of about 1/2 lemon) (optional)
2 lbs. fresh (black) mussels, debearded, scrubbed, & rinsed (about 33 mussels)
Directions: In a large pot, sauté onions in olive oil on low heat until translucent, about 5 minutes. After the first 4 minutes, add the garlic & bay leaf & cook for one more minute. Deglaze pan with 1 c. wine and reduce liquid to about half its original volume. Then add tomatoes and cook for about another 2-3 minutes. Add bay leaf, parsley, oregano, basil, marjoram, saffron, salt, black pepper, red chili pepper flakes, & lemon zest, if using. Next, add remaining cup of wine & turn up heat to medium-high. Add mussels & quickly cover with a tight-fitting lid. Allow mussels to steam for exactly 5 minutes. While wearing silicone mitts that fully cover your hands & wrists, carefully uncover the pot, standing a good distance away from the rising steam. Discard any unopened mussels. Using a slotted spoon, scoop the rest out with the surrounding tomato-herb mixture & place into deep bowls. Pour equal amounts of broth over the top of each bowl, garnish with with basil sprigs, & serve immediately.
If you like, serve with a side of baked french fries or a slice of toasted French bread. :)
Mussels provençal can also be served over linguine or fettuccine, which, of course, is a typical preparation for mussels marinara as well. If you choose this option, be sure to adjust the number of servings accordingly, to accommodate the number of diners, since a smaller amount of mussels will be needed for each serving of pasta. This dish will be much more filling with the pasta, so unless you're planning to serve an army, I highly recommend that you cut the recipe. ;)
Yield: 2-3 servings as a main course & 4-6 servings as an appetizer.
Chef's Notes: Unlike other types of seafood, mussels typically remain alive until they are cooked. Should any mussels open while you're preparing them for cooking, just tap them with the blunt edge of a knife. This will make them "wake up" & then close back up.
0 It's Your Turn to Vote: Help Me Decide the Fate of These Food Photos :)
I made a newly created chicken recipe last night, which was supposed to be my next recipe installment. However, I just didn't like the way the photos I looked. They just weren't up to my increasingly picky standards. (If you look at the photos on this blog, you'll see there's been a general progression in terms of photo quality. As they say, practice makes perfect. Even though I originally said I wasn't going to worry so much about photo composition, I'm slowly starting to change my mind. :) )
True, the photos were crisp & clear, but photos also need to be attractive. ;) So, where did that leave me? Do I need to remake the dish to get a better photo? Do I say, "Aw, the heck with it," skip the photo(s) altogether but still post the recipe? Or do I grin and bear it & post the photo(s) anyhow?
Thanks so much for your input! Your feedback truly helps to make this blog better. :-D
-C

Saturday, August 7, 2010
0 And the Winners of the Blog Contest Are.....

The "Cooking with Corey" blog contest is now officially over. I'm now going to pick the winning names out of a hat. Good luck to all of the entrants!
Drum roll, please.......
And the winners are:
(1) @Mark_thetrigeek
(2) @JodyHarvey
(3) Frank M. (from Facebook)
Congratulations to all of the winners & thanks to all of the entrants for participating in the contest! Your support for this blog has been amazing, and lots of your ideas & suggestions have been the inspiration for several of my recipe creations. :) So thank you for that as well!
Winners, here's how to collect your prizes:
--First, please contact me to specify which prize you'd like. If you like, you can also email me in Facebook, or DM me in Twitter. Contact me any way you choose, but just let me know soon so I can award you your prize. :-D
--Second, however you choose to contact me, please specify your email address so we can either: (1) Set up a time & date for your cooking lesson (if you live in the local Greater DC area), (2) Discuss what we'll be doing for your web advertisement on my blog, or, (3) Have you select fifteen dollars worth of kitchen products (cookbooks, kitchenware, gourmet groceries, etc.) of your choice from my Amazon store. For the last option, I'll also need a mailing address as well. :)
0 "What Does It Mean to be a G.F.W.A.?"
Like, duh. :)
Thursday, August 5, 2010
0 Recipe #160: Carrot Curry (Gadjar Kari)
This South Indian-inspired recipe is a tasty, nutritious treat!

Carrot Curry (Gadjar Kari)
1 Tbsp. jalapeño pepper, minced (about 1/2 jalapeño pepper)
1/2 c. baby carrots, sliced crosswise into 1/4" thick rounds (about 15 baby carrots)
3-4 c. water (or more, as needed)
2 Tbsp. tomato paste
1 Tbsp. honey, or to taste (optional)
1/2 tsp. ground coriander
1/2 tsp. ground cinnamon
1/4 tsp. ground clove
1/8 tsp. ground black pepper
1/8 tsp. ground mace
1/8 tsp. ground turmeric
1/8 tsp. ground cardamom
1/4 c. fresh cilantro, finely minced
1/4 c. nonfat plain Greek yoghurt
1 tsp. freshly squeezed lemon juice
Directions: Using a mortar & pestle or a food processor, pulverize the garlic, ginger, & salt until it forms a smooth paste. If you choose to use the food processor, transfer ingredients to a small bowl & set aside. In a large sauté pan, dry roast black mustard seeds, cumin seeds, curry leaves, & cashews in coconut oil on medium-high heat, covering ingredients with a splatter screen, to shield you from the hot, spluttering ingredients. Cook until seeds start to crackle & pop. Be carefully not to burn cashews. Remove from heat & carefully & quickly lift screen to add onions & jalapeños, once again immediately covering them with the screen. Place pan back on burner & sauté onions & jalapeños on medium-low heat until onions are soft & translucent, about 5 minutes. Remove screen & set it aside. Stir in the ginger-garlic paste & cook for another 30 seconds or so. Turn heat back up to medium-high. Immediately add carrots & 1 c. of water, cooking until water has almost completely evaporated. Then add red pepper, tomatoes, tomato paste, honey (if using), the rest of the dried spices & another 1 c. water & once again reduce liquid. Continue to add more water as necessary, a cup at a time, making sure to reduce each addition of water has almost completely evaporated before adding the next cup. Cook until carrots are soft & tender (but still slightly firm), about another 20-30 minutes. In the final minute of cooking, add the cilantro. Remove from heat & rapidly stir in Greek yoghurt & lemon juice until well combined. Serve immediately, on a bed of (saffrron) basmati rice &/or with freshly baked naan.
Yield: Serves 2-3.
Chef's Notes: If you prefer, you can also shred the carrots in a food processor, using the appropriated fitted, metal blade. The carrots will also cook a lot faster this way (i.e., increased surface area = faster cooking), so if you choose this option, be sure to reduce their cooking time. Personally, I prefer the texture of the sliced carrots in this particular dish, but of course, the way in which you chop them up is up to you.
Instead of dry roasting the cashews with the seeds & curry leaves, another option is to lightly toast the cashews in the toaster oven before adding them to the pan; if you do this, be sure to add them only after the tomatoes have been added, to prevent them from burning.
You'll note that the picture above is garnished with a sprig of celery leaves. In Indian cuisine, this is often referred to as a "celery curl." Celery curl is sometimes used as a garnish. Celery stalks, on the other hand, are almost never used in traditional Indian dishes.
Variations: If you like your curry with even more heat, add 1 dried red chile de arbol, cracked in half. You could also add 1/4 c. unsweetened shredded coconut to this dish, either in addition to the cashews or as a substitute the cashews or in addition to them. If you're going to use both, I recommend cutting the amount of cashews in half, to keep the number of fat calories of this dish within healthy parameters.
Wednesday, August 4, 2010
0 Recipe #159: Huevos Rancheros

"It takes real huevos to put that many jalapeños in our huevos rancheros without any advance warning." ;)
"If you don't like my huevos rancheros recipe, I might have to kick you in the huevos." ;)
OK, someone please stop me from making any more cheeky jokes about huevos. Er, perhaps "cheeky" is not an entirely appropriate choice of words to describe it. ;) Let me rephrase. Haha. If you're completely clueless about the above not-so-subtle references, then forget I ever mentioned it. Perhaps it's better to stay in the dark on that one. ;) Anyhow, now that you've probably completely lost your appetite for breakfast, I will now stop making unseemly jokes so you can temporarily regain it. :)
Huevos rancheros (or "ranch style" eggs) are considered to be one of the quintessential Mexican breakfasts. It was thusly named because it was often served for brunch on rural farms, or ranchos. :) The popularity of this dish now extends well beyond its country of origin.
After you eat this meal, you'll probably be set for the entire day. :) And, not only is it very filling and satisfying to eat, it's also got all your nutritional essentials too: protein, carbs, fiber, etc. It's breakfast, lunch, & dinner all rolled into one. :)
As promised earlier, here's the recipe for huevos rancheros. They are typically eaten for breakfast or brunch, although we had them for dinner tonight. :) Without further delay, I give you...

1/4 c. yellow (or red) onion, finely diced
1 tsp. garlic, peeled & finely minced (about 1 large clove)
1 Tbsp. jalapeño pepper, stemmed, ribbed, seeded (if you prefer less heat), & minced (about 1/2 jalapeño)
2 Tbsp. tomato paste
1 pinch (1/16 tsp.) ground cayenne pepper
1 pinch (1/16 tsp.) ground black pepper
1 pinch (1/16 tsp.) salt
1 tsp. freshly squeezed lime juice
Using a heat-proof (i.e., silicone) pastry brush, brush both sides of a tortilla with ¼ tsp. olive oil, evenly distributing it in a thin layer, and then place into a large (12-13”) nonstick sauté pan on high heat, flipping the tortilla over every 10 seconds or so, several times, to create pockets of air bubbles in the tortilla. Turn heat down to medium-high heat and then re-add the tortilla, cooking on one side until golden brown, about 30 seconds. (While tortilla is cooking, bubbles should start to form. This is normal.) Transfer to a plate covered with a paper towel (to soak up any excess oil). Lift up the tortilla using a spatula and place it back into the pan, browned side up. Sprinkle 1 Tbsp. cheese on top, and turn heat down to low. The residual heat in the pan should melt the cheese and brown the tortilla. Cook tortilla just until the cheese starts to melt, about 2 minutes. Then, crack an egg into the pan, beside the tortilla and continue to cook. If desired, flip egg and make it over-easy. (If you're going to make the egg sunny side up, then cover pan with a lid, which helps to quickly steam the egg, so it's not undercooked. You can also poach the egg if you prefer.) Then lift egg up with a spatula and place on top of the tortilla. Remove from heat and transfer to a plate. Top with ranchero sauce, and, if desired, a few slices of avocado (or guacamole), a dollop of sour cream, and some baked corn tortilla strips. Repeat process with remaining tortillas. Serve immediately.
Tip: To speed up the cooking process, use 2 pans, one for each set of tortillas. They'll also be considerably warmer if cooked in this way. You can also enclose each completed serving in foil or place in the oven to keep warm.
If you are serving this recipe for two, I'd recommend making this dish in batches of 2. Eat the first batch, and then return to the kitchen to make the remaining, second batch.
Yield: Makes 4 servings. (Serves 2-4).
Chef's Notes: Sautéing the tortillas with less oil means that you save an extra step, since there's no need to spend time wiping them off with a paper towel. This way, there's just enough oil to add flavor and still make them nice and crispy. If you'd like to reduce the amount of oil in this recipe even further, the tortillas can also be baked in the oven (at 350°F for about 20-25 minutes) instead. Or, alternatively, tortillas can be placed between two paper towels and microwaved for about 15 seconds (to soften them), before they are topped with a fried egg, ranchero sauce, & all the rest of the trimmings.
Also, some people like to crack the egg on top of the tortilla (i.e., on top of the melted cheese) while it's cooking and then, when the egg white is about half way set, flip the whole thing over to cook the egg over-easy. I've found this to be a very tricky and messy endeavor (i.e., the cracked egg often slides right off the tortilla and then when the tortilla is flipped, the melted cheese tends to stick to the bottom of the pan, etc.). This is exactly why I like to cook the egg separately, i.e., beside the tortilla, & then transfer it on top. The transferred egg will still stick to the cheese, so really, what's the difference? Answer: Less mess. That's the difference. :)
Variations: Traditional cheese selections for huevos rancheros include queso fresco, queso añejo, or queso blanco. (For an extensive guide to Mexican cheeses, please see this link.) If unavailable, the closest commercial substitutes would be mild feta cheese, Parmesan cheese, or Monterey Jack, respectively. Alternative choices include sharp cheddar, mozarella, or farmer's cheese. (I listed Pepper Jack in the above recipe instead of the more traditionally used cheeses because it's more commonly available here in the States.) Or, if you like, you can also use a blend of cheeses.
Red (&/or green) bell peppers, a mix of orange, yellow, and red tomatoes, sun-dried tomatoes (i.e., the kind that's not packed in oil), scallions, chives, basil, &/or black olives would also make good additions to this dish.
If preferred, salsa verde could also be substituted for the ranchero sauce.
Some people also like to add a dash of cinnamon to this dish. I didn't add it to the recipe, but of course, you're welcome to try it if you like.
0 Recipe #158: Refried Beans (Vegetarian Version)
This dish is going to be the accompaniment to tonight's dinner, huevos rancheros, which will be made very shortly. :-D

Refried Beans (Vegetarian Version)
This recipe is quick & super easy to make! Refried beans, or frijoles refritos, is a dish that goes well with many different Mexican foods: It makes a great side for steak or chicken fajitas, quesadillas, pupusas, empanadas, etc., and of course, huevos racheros. :) It can also be served alongside Mexican rice.
Ingredients:
1 Tbsp. extra virgin olive oil
2/3 c. yellow onion, finely minced
1 tsp. garlic, peeled & finely minced (about 1/2 large clove)
1 15.5 oz. can of pinto beans, (including liquid), mashed with a fork or potato masher
1 tsp. dried epazote leaves
1/8 tsp. salt, or to taste
1/4 tsp. cumin
1/4 tsp. ground coriander
1/4 tsp. dried oregano leaves
small handful of shredded Añejo cheese (or Parmesan) (optional)
small handful of Totopos (optional)
Directions: Sauté onions in olive oil on low heat until translucent, about 5 minutes. With a minute left to go, add garlic so that it's softened but not browned. Next, turn up heat to medium low & add mashed pinto beans & also any remaining liquid from the can. (This will help keep the beans moist & prevent them from burning.) Add all spices, stir thoroughly, & cook for about 2-3 more minutes, or until heated through. If necessary, add a bit of water to pan during cooking if liquid from can starts to evaporate too quickly. Remove from heat, transfer to a serving dish or evenly distribute onto plates. Top with Añejo (or Parmesan) cheese &/or totopos (small tortilla triangles), if desired. Serve & enjoy!
Yield: Serves 4.
Variations: I know it's rather untraditional, but refried beans taste really good with fresh, diced vine-ripened tomatoes in them. Also, you could add a dash of cinnamon, which would probably work as well.
2 Cooking Oils: Which One is Best?!

Well, here's my philosophy on butter. Sometimes, I use a tiny bit of butter for flavoring. Butter is a whole food, unlike margarine, which is filled with chemicals. I'd rather use whole foods here, because I refuse to post recipes laden with transfats, refined sugar, HFCS, etc. These are unnatural, processed foods. And, as far as I'm concerned, if butter is used sparingly, in moderation, it really does enhance the flavor of a dish. You'll notice that I only use a bit of butter, not 3 Tbsp. of butter for cooking an 8 oz. chicken breast or an omelette. :)

What a lot of people don't realize is that certain oils -- particularly vegetable & canola oil, & yes, even certain olive oils (except, of course, for extra virgin!) -- are processed in different methods, depending upon the company/brand. And some are healthier methods than others. The bottom line: Oil processing methods matter. Here's why:
Typically, vegetable & canola oil will spoil faster in their native form. This is why companies use chemical additives. All for the sake of convenience. But the problem is that these methods lead to higher levels of inflammation in the body, which cause or contribute to all sorts of problems --coronary heart disease, stroke, cancer, osteoporosis, macular degeneration, sleep apnea, arthritis, Parkinson's, & Alzheimers. And that's just for starters. There's a proven correlation between inflammation & insulin resistance, high triglycerides, allergies, slow healing, & infection. All really lousy things that you don't want to have. I don't know about you, but I'd rather eat healthfully & stack the odds in my favor. :-D

More specifically, these oils are treated with NaOH -- a corrosive base used to burn clogged sink & drain pipes, N3PO4 -- a corrosive acid used commercially for degreasing windows, & bleaching clays -- to remove color molecules that produce rancidity & thus, bad odor. These oils are deodorized at frying temperates (200-245°C). The solvent is extracted, but what remains isn't really all that healthy for you.
The ingredients these solvents remove actually have major health benefits. Before processsing, these oils contain things like phytosterols -- which protect cardiovascular & immune systems, lecithin -- which emulsifies oils & makes them easier to digest, chlorophyll -- a source of essential mineral magnesium that aids muscle, heart, nerve, & insulin function, and antioxidants like vitamin E & carotene -- which naturally keep oils fresh & neutralize free radicals.
Additionally, up to 1% of oil molecules are damaged during processing. That might not seem like a whole heck of a lot, but for a 32 oz. bottle, that's 900 grams. A 32 oz. bottle contains 6.02 x 10²³ molecules, which works out to be a very large number. That's 602,000,000,000,000,000,000,000, or 602 billion trillion molecules, to be exact. That number's so high, it's hard to even grasp how large that is. ;) If 1% is damaged, that means there are 3-6 billion trillion damaged molecules. The body contains 100 trillion cells. You do the math. ;) Or, if not, let me break it down for you: Each cell could obtain 3-6 billion damaged toxic molecules from ONE bottle of oil. Each Tbsp = 100 million toxic molecules per cell per day. In a lifetime averaging 1 Tbsp. processed oil per day (a very conservative estimate by most standards!), that works out to be a 32 oz. bottle every 2 months, and 6 bottles per year over, let's say, about 50 years. The finally tally? That's 300 bottles over a lifetime, or 1.8 trillion damaged molecules wreaking havoc in your body. And that's only counting 50 years of one's life, which is a much shorter span than the average life expectancy in industrialized, highly developed countries. That's simply staggering!

So, what to do about this? It's really very simple. Make smarter choices. In supermarkets, all cooking oils, except for extra olive virgin oil have been processed. So, choose oils made with "health," rather than "shelf," in mind. That means unrefined oils pressed from organically grown seeds & nuts. Look for mechanically, cold pressed oils (i.e., expeller-pressed) in dark glass bottles. If your using an oil with high Omega-3 value -- flaxseed oil, canola oil, walnut oil, etc. -- then refrigerate it, to prolong its "life expectancy" & freshness. Moderate animal protein intake (0-1 serving per day), and if you do eat red meat, eat grass-fed beef. Consume more vegetable protein (beans, nuts, seeds, soy, whole grains, etc.), eat fish 1-3 x/week, & eat N3-enriched eggs & egg whites.
Here are some other tips: Use marinades when grilling. Limit your mercury intake, i.e., predatory fish like swordfish, shark, tilefish, & king mackerel. Purchase organic whenever possible & reduce or eliminate food allergens (dairy, wheat, nuts, eggs, etc.), if you're sensitive to them. Eliminate excess sugar intake -- lots of calories & oxidative stress there -- and avoid overeating whenever possible, which also creates oxidative stress on the body as well.
Maintaining a healthy weight is also another way to keep inflammation in check. So get up & get moving!
Tuesday, August 3, 2010
0 Recipe #157: Goat Cheese, Mushroom, & Tomato Omelette with Fresh Chervil & Chives
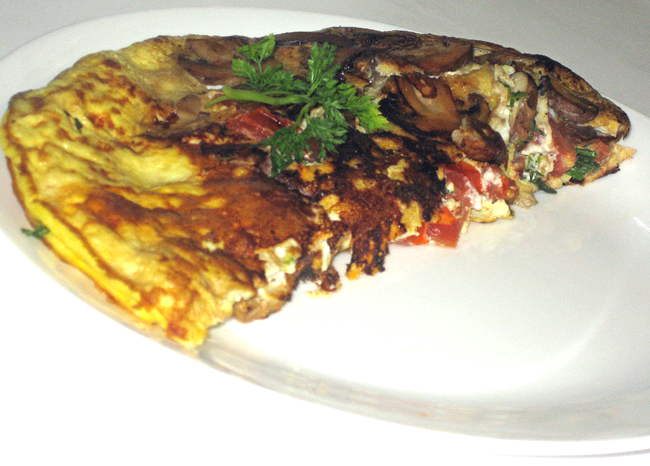
I've categorized this dish as a "breakfast food," although you can also serve it for lunch or dinner. That's what I did. :)
Goat Cheese, Mushroom, & Tomato Omelette with Fresh Chervil & Chives
Ingredients:
1 Tbsp. unsalted butter
1 heaping c. fresh mushrooms (about 3-4 large mushrooms)
1/4 tsp. salt, or to taste
1/8 tsp. black pepper, or to taste (I added an extra pinch, about 1/16 Tbsp., to this amount)
3 eggs, beaten
2 Tbsp. nonfat milk (or you could use 1 Tbsp. light nondairy creamer + 1 Tbsp. nonfat milk)
1/2 c. vine-ripened tomatoes, diced into 1/2" cubes (about 1/2 large tomato)
1 1/2 Tbsp. plain (unflavored) goat cheese, softened (i.e., at room temperature)
1/2 Tbsp. fresh thyme leaves
1 Tbsp. fresh chives, chopped into small pieces
1 Tbsp. fresh chervil, finely minced
Directions: Melt butter in a large (12-13"), nonstick sauté pan on medium high heat. Sauté mushrooms until soft & lightly browned around the edges, about 3-5 minutes. Season with salt & pepper. (The salt will help cook the mushrooms faster.) In the last 2 minutes of cooking the mushrooms, add the tomatoes & continue to cook. (This will help remove a lot of the moisture from the tomatoes before you add the eggs.)
In a small bowl, beat milk into the egg mixture, & quickly pour into the pan. Turn down the heat to medium & continue to cook until the egg mixture starts to congeal. Add goat cheese & continue to cook until light golden brown. With about a minute left of cooking, add fresh thyme, chives, & chervil, dispersing them evenly across the omelette. (It's best to add these spices towards the very end, particularly the chervil, which helps to preserve its flavor when added this way.)
Carefully lift up one side of the omelette with a spatula to see if it's done. When ready, fold omelette over so that the edges meet & form a half circle, and continue to cook for another 30-60 seconds or so. Transfer to a plate, garnish with a sprig of chervil and serve.
Yield: Serves 1-2 as a main course, depending on how hungry you are. :)
Variations: You could also try adding asparagus to this recipe, which is an ingredient frequently combined with chervil and eggs. Alternatively, green &/or red peppers, capers, basil, &/or tarragon would also work well with this recipe.