
Sunday, October 31, 2010
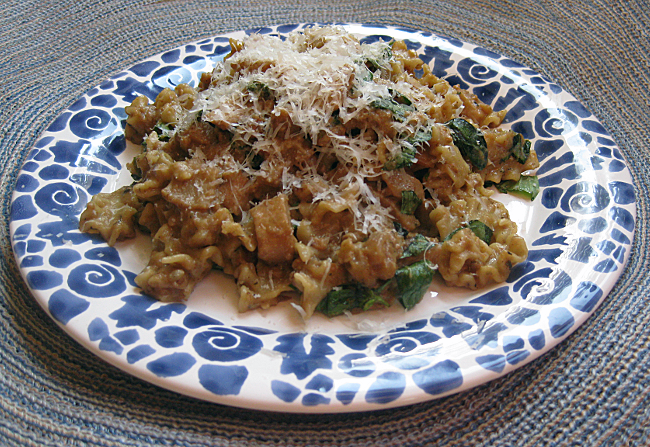
0 Recipe #189: Pumpkin-Pesto Ravioli


 |
| The ravioli is actually orange-colored, for Halloween of course, although you wouldn't know it from looking at the photo. ;) |

 Again, like the agnolotti recipe on this blog, this pasta is made from scratch & is going to take some time to prepare. Plus, if you're like me & don't happen to own a pasta press or ravioli stamp (yet!), you'll need to factor in the additional time it'll take to do almost everything completely by hand. ;) (Due to the time commitment fresh pasta-making requires, I currently don't make fresh pasta often enough to justify the purchase, although I might reconsider since I'll probably be posting more fresh pasta recipes in future. ;) ) Regardless, you'll probably want to save this recipe for the weekend & either get a few helping hands, invest in a few pasta-making tools (like a pasta press & a dual-purpose ravioli cutter & sealer, which simultaneously cuts & seals the ravioli in a single rotary motion), or hire a sous chef & an army of staff, so you can eat your meal before the sun sets. :)
 While you don't need a pasta press or ravioli stamp to make the ravioli, these handy, time-saving tools certainly help the ravioli-making process to go a whole lot faster. The press will also ensure that the pasta is of uniform thickness. However, if you don't possess these tools, it's still possible to make great tasting (and great looking!) ravioli. As long as you have a rolling pin, a round 3"-diameter glass, & a clean flat surface in which to work, you're good to go. With a good eye and steady, strong hands, you'll be able to properly position the rolling pin and apply the correct amount of pressure with each rolling motion, to create beautiful, evenly rolled-out dough. See?! You don't always need fancy tools to get the job done. :-D
As I've stated before, the payout of making your own fresh pasta is huge. When it's good, nothing compares to freshly-made pasta. And please, no substituting wonton-wrappers as a substitute for fresh ravioli. This is homemade Italian pasta we're making here. :)
Happy Halloween!
-C

Pumpkin-Pesto Ravioli
Dough Ingredients:
1 c. semolina flour
1 egg
1 Tbsp. water
1 Tbsp. extra virgin olive oil
1 Tbsp. tomato paste, from a tube (for color)
1/4 tsp. salt, or to taste
1/4 c. fresh "pie" pumpkin (also called "sugar" or "sugar pie" pumpkin), first halved, then deseeded (reserve seeds), de-pulped, & diced, with rinds removed
1/2 c. water (for boiling pumpkin)
1/4 c. freshly shredded Asiago (or if unavailable, use Parmigiano-Reggiano)
1/4 Tbsp. freshly grated lemon zest
1/16 tsp. (1 pinch) ground nutmeg
2 1/4 tsp. fresh parsley, finely chopped
salt & pepper, to taste
Sauce Ingredients:
1/2 T. olive oil (optional)
1/2 Tbsp. garlic, peeled & finely minced (about 1 small clove)
1/4 c. pesto (see recipe)
salt, to taste
ground black pepper, to taste
1/8 c. freshly shredded Asiago (or if unavailable, use Parmigiano-Reggiano)

While the dough is setting, make the filling: Cook fresh pumpkin in 1/2 c. boiling water until tender (but not mushy). Transfer both the pumpkin & its liquid to a food processor (or blender) & purée until smooth & creamy. Let cool. In a separate bowl, mix together ricotta, Asiago, lemon zest, nutmeg, parsley, salt, & pepper. Transfer cooled pumpkin to bowl & thoroughly combine. Set aside. (Refrigerate if necessary, i.e., if you should finish making the filling before the hour is up.)
After an hour has passed, prepare the ravioli dough: Again, lightly oil hands before handling the dough. Remove doughball, & roll out onto floured surface with a rolling pin. Be sure to generously flour both the dough ball & the rolling pin, to keep them from sticking to each other. Roll out dough until it's approximately 1/8" thick or less and has a smooth, flat, & even consistency.

To make the ravioli, take a short, stemless glass (i.e., best for applying direct pressure without glass breakage!) & gently press it into the dough sheet, twisting it back & forth into the dough until it cuts through it. Transfer each cut-out to a large sheet of wax paper, which has been spread out onto a flat, clean surface. Repeat procedure, removing remaining scraps of dough & reforming them into another dough sheet each time until you've used up all of the dough. Make 24 cut-outs in all. If you roll out the dough very thinly and strategically position the glass for each cut-out, you shouldn't have any difficulty working with the re-worked dough and eking out 24 cut-outs. If necessary, oil the dough again to make it more pliable. Also be sure to lightly oil the cut-outs every few minutes (by oiling your palms & gently pressing down on the cutouts) while you're working the rest of the dough to make sure they don't dry out. (Covering them with a cloth/paper towel or another sheet of wax paper doesn't seek to work. Believe me, I've tried that technique already. ;) They somehow still manage to dry out. Don't use water either, which will only make the dough harder to lift from the wax paper when it's time to assemble the ravioli. I'm telling you from experience, oil tends to work best. )
Spoon out small dollops of filling into the center of each pasta cut-out. Next, dip your index (i.e., pointer) finger in water and trace it around the circumference of one of the circle cut-outs. Then place a dry cut-out directly on top, quickly sealing the outer edges by pressing down with your fingers in a repeated motion, pressing them in a circular fashion around the ravioli. Be sure to press out any air bubbles as you seal the edges. Repeat the process until all of the remaining circle cut-outs have been used. If you like, you can press the tines of a fork (or a round ravioli stamp) around the sealed edges of your ravioli to create pinked edges. Allow pasta to set for another 5-10 minutes, while you bring a large pot of lightly salted water (that's been seasoned with a drop of olive oil) to a rolling boil. The water should take about 8 minutes or so to come to a rolling boil. (Or, if you don't plan to cook the pasta right away, you can freeze it for future use. Some people like to freeze the pasta first for a few hours so that it hardens a bit before cooking. I personally think this step is unnecessary for the most part, as the whole point is use the pasta when it's super-fresh & soft.)
If you're planning to cook the pasta right away, drop the pasta into the pot of boiling, seasoned water, & cook until al dente, about 10-12 minutes or so. Normally, fresh pasta cooks very quickly, but in this case, I've found that since the ravioli are very large, they take a bit longer to cook. It all depends upon how thinly you've rolled out the dough. Use your best judgment, and watch the pot carefully, checking on the ravioli every few minutes. Remove from heat, drain, & set aside, reserving about a 1/2 c. of the pasta water.
Next, make the sauce: Heat the olive oil & butter in a large (12-13") sauté pan on low heat. Add the shallot & garlic & cook until tender & lightly browned, about 5 minutes. Next add pecans & pumpkin seeds & cook for about 30-60 seconds more, until lightly browned. Deglaze with sherry & pasta water, quickly adding the sage leaves & cooking them until tender. Reduce liquid in the pan by at least 1/2 or 3/4 of its original amount. Next, add ravioli and cook until firm & light golden brown. Stir occasionally to prevent pasta from sticking to pan & also to keep the smaller ingredients from burning. In the last few seconds stir in the pesto and then quickly remove from heat. Season with salt & pepper, to taste. Stir throughly to evenly disperse ingredients. Carefully transfer to plates, being sure to scoop out any remaining sauce from the pan, & immediately top with freshly shredded Asiago. Serve & enjoy. Mangia!
Chef's Notes: In my opinion, "pie" pumpkins are one of the best kinds of edible pumpkins to use for cooking & baking. They are small & smooth (read, "not thready" like generic, field pumpkins used for carving Jack O'Lanterns!). I used a 3 lb. pumpkin, puréed the whole thing, & then just refrigerated the remainder for other seasonal recipes. In other words, you'll be seeing more pumpkin recipes on this blog. :-D After all, I have to use up the left-over pumpkin purée while it's still fresh. ;-)
Also, here's a helpful tip for preparing the pumpkin: It's easiest to first halve the pumpkin with a large, sharp knife, remove the pulp & seeds, & then slice it into medium-sized wedges before slicing off the rind. Do not use a vegetable peeler: It will take forever. ;)
Although unshelled pumpkin seeds appear in the above photo for artistic effect, this recipe actually calls for the shelled kind, which have a much better taste & texture for this particular dish. To save time, be sure to use pre-packaged, shelled pumpkin seeds for the sauce, since it'll take an eternity to shell the pumpkin seeds from the fresh pumpkin. (Sure, I like doing a lot of cooking from scratch, but shelling pumpkin seeds, one at a time -- without the aid of some kind of machine to automate the process -- is just plain masochistic!) Of course, you can still save the unshelled pumpkin seeds & toast them as a snack for later. That's what I did. Yum, yum! :)
I'd also recommend prepping the various components in advance -- particularly the dough, which can be frozen, & the pesto. The filling can also be made ahead of time, & will keep for a day or two. This will save you a lot of prep time for when it's time to cook the meal.
Wednesday, October 27, 2010
0 Recipe #188: Pecan Encrusted Haddock on a Bed of Wilted Spinach, with Grilled Seasonal Vegetables

After the vegetarian overkill of the past few days, we all needed a break from the concept of "vegetables as the main attraction." ;) My mother & I, in particular, were clamoring for something different. Seafood sounded really good to us, so while she was out going to an appointment & running errands earlier today, I made a trip to the market to pick up some fish for tonight's dinner. The lady at the counter said that the haddock was really excellent, so I decided to give it a try. Now, normally, I don't care much for haddock, or rather, the way haddock's usually prepared ;) -- nor does my mother -- but the haddock looked so fresh & beautiful, and the fish lady seemed genuinely enthused about it that I just had to try it. My mom's bought fish from them many times before, so I had confidence in the quality of their seafood. Also, the people at the counter are generally very knowledgeable about the fish they sell, so I tend to ask for their personal recommendations before making my selections. They know what's fresh & in season, & it's usually wisest to take their advice. :)
Well, I was glad that I did, because tonight's meal got rave reviews from my parents & grandmother. My mother said she'd never tasted haddock prepared as well as this, ever. So, that was quite satisfying to hear. :) (And of course the freshness & quality of the fish probably had something to do with that too.)
Just a few words about total prep time: The prep for this meal takes a while, so this recipe is probably best saved for the weekends. Either that, or you'll have to hire a sous chef. :) I started at noon with the vegetable prep & cooking, which was a massive task, & kept working on it until well past 3:30 pm, until I was finally ready to start cooking the fish around 6 pm. (And, I'm a relatively fast chopper too!) I didn't finish the whole production until 6:30 pm! Of course, by then we were more than ready to eat. :)
In truth, I had to complete other unrelated, pressing tasks from about 4 to 5 pm, so that added an hour to the total time. Even so, cooking solo, it still probably took me about 5 hours to prepare tonight's meal. That's not exactly a small set of tasks, even if you're a lightening-fast chopper. This was also my first time making this recipe, so I probably could've timed the various vegetable dishes a little bit better. Of course, you get the benefit of my recently acquired wisdom, as I've reordered their prep/cooking.
Both of my parents were out of the house for most of the day, but towards the end of the kitchen prep, they thankfully pitched in on a few tasks like crushing the pecans, starting the timer for the fish, & setting the table, etc. So that made things go a lot faster. Thanks, Mom & Dad! Also, hunger is an excellent motivator. ;)
So, if you're going to make this recipe, start early in the day, & try to get some of the family members to help out with the veggie chopping & other easily accomplishable tasks. :) If you delegate, you'll be finished faster and the veggies won't get cold & then need to be reheated just before dinner. ;) Also, you'll have more time to enjoy the cooking process. :-D

Pecan Encrusted Haddock on a Bed of Wilted Spinach, with Grilled Seasonal Vegetables
Grilled Vegetable Ingredients:
2 Tbsp. extra virgin olive oil
1 1/2 c. baby red potatoes, scrubbed & halved (about 11 baby potatoes)
2 c. Dutch yellow baby potatoes, scrubbed & halved (about 9 baby potatoes)
16 baby green-top carrots (4 carrots per person)
2 c. yellow squash, halved length wise & then crosswise into 1/4" half-moon slivers (about 1 medium-sized squash)
4 Tbsp. freshly squeezed lemon juice
1/2 tsp. kosher salt
1/4 tsp. ground black pepper
Sauce Ingredients:
1/2 Tbsp. extra virgin olive oil
2 Tbsp. fresh garlic, peeled & finely minced (about 4 large cloves)
2 Tbsp. scallions (about 2 large scallions)
1 large, fresh bay leaf
2 Tbsp. dry white wine (i.e., Chardonnay)
1/2 c. fresh Italian flat leaf parsley, roughly chopped
2 Tbsp. fresh oregano, roughly chopped
3 Tbsp. fresh thyme leaves
2 Tbsp. fresh rosemary leaves
1/2 c. water
1 Tbsp. unsalted butter
Wilted Spinach Ingredients:
8 c. raw baby spinach, densely packed
2 c. water (for wilting spinach)
1 tsp. extra virgin olive oil
1/4 c. shallots, peeled & finely minced (about 2 medium-sized shallots)
2 c. mushrooms, thinly sliced (about 4 large mushrooms)
1/4 c. dry sherry
2 Tbsp. freshly squeezed lemon juice
1/8 tsp. salt
1/8 tsp. ground black pepper
Fish Ingredients:
1 lb. haddock fillet, purchased as 2 long, wide, 1/2 lb. pieces with skins intact
4 Tbsp. dry white wine (i.e., Chardonnay) (2 Tbsp. white wine per fillet side)
2 Tbsp. freshly squeezed lemon juice (1 Tbsp. lemon juice per fillet side)
1 c. pecans, crushed (with the flat, smooth end of a meat mallet) & lightly toasted
Directions: Evenly spread pecans onto a clean, smooth, non-porous surface (preferably a non-breakable, silicone cutting board) & cover with plastic wrap. Use the flat, smooth side of a meat mallet to pound the pecans into uniform little pieces. Pecans should only be crushed, not pulverized into oblivion. ;) Toast them on an aluminum foil-covered baking tray in the oven at 350°F until light golden brown. Watch carefully as nuts tend to toast very quickly, & you don't want to end up with charred cinders. ;) Let cool slightly, transfer to a small bowl, & then set aside.
In a large, square grill pan, sauté baby potatoes & carrots on both sides in 1 Tbsp. olive oil on medium heat until tender & grill marks appear. Pour 3 Tbsp. freshly squeezed lemon juice over top, & season with salt & pepper. Carrots will cook faster, so you'll be removing them long before before the potatoes. Next, add squash, which cooks even faster than the carrots, pouring the remaining 1 Tbsp. olive oil & 1 Tbsp. lemon juice on top. Grill squash on both sides. Be sure to watch the vegetables carefully, so they don't burn or blacken too much. Flip veggies with tongs. (A large spatula will work, but it's not as effective for exact vegetable placement, which helps to ensure even grilling.) You'll probably have to cook the vegetables in batches, but don't worry, there'll be sufficient olive oil in the pan to cook both the vegetables and the fish. :) When vegetables are ready, remove from heat & transfer them to separate serving plates by vegetable category.
While vegetables are cooking, make the sauce: In a medium-sized sauce pot, sauté garlic, scallions, & bay leaf in olive oil on low heat until tender. Deglaze with white wine. Add all of the fresh herbs (parsley, oregano, thyme, & rosemary), followed soon after by the water, butter, salt, & pepper. Watch sauce carefully to make sure it doesn't burn while you're flipping the vegetables. ;) Reduce liquid by about half (or more), remove from heat, & set aside. Let cool slightly & then discard bay leaf.
In a large (12-13") sauté pan, gently wilt raw baby spinach in 2 c. water on low heat. Drain spinach using a sieve, transfer to a large bowl, & set aside. In the same sauté pan, sauté shallots in 1 tsp. olive oil on medium-low heat until tender. Then add mushrooms & continue to cook until they start to turn slightly golden brown around the edges. Deglaze with sherry & lemon juice. Reduce liquid until it's only a thin layer on the bottom of the pan. Remove from heat, transfer to the bowl that contains the spinach, season with salt & pepper, & gently combine.
Next, place the fish fillets on a plate & pour 2 Tbsp. wine & 1 Tbsp. lemon juice onto the upwards-facing side. Using a large spatula, transfer 1 fish fillet to the same grill pan you used (above) for the grilled vegetables, flipping fish onto the side you just marinated with wine & lemon juice. Grill haddock fillets, one at a time, for 4 minutes per side. Be sure to repeat the same marination procedure (i.e., 2 Tbsp. wine + 1 Tbsp. lemon juice) for the other side of the fish fillets before you flip it again. This way the fish will be adequately infused with the wine & lemon flavors. (If you do the reverse, the wine & lemon juice will just sit on top on the fish while you cook the plain side of the fish in olive oil, versus actually cooking into the fish. It will reek strongly of alcohol too. Gives the expression "drink like a fish" a new meaning, eh? LOL.)
When fish starts to turn a light golden brown, check the fish with a knife or fork to test if it's done. The flesh should be soft & easily flake from the fish skin. Let cool slightly. Evenly spread toasted pecans onto a clean, nonporous surface board (i.e., silicone cutting board) & then, using both hands, gently roll each fillet in toasted pecans. Cover your hands first with latex/rubber gloves if you don't want them to get fishy.
Meal Assembly: Divide up spinach, fish fillets, & each group of grilled vegetables into 4 even portions. Place similar kinds of vegetables in groups around the circumference of each plate, according to personal preference. Place each bed of spinach in the center, adding the fish on top. Top each portion of fish with sauce. For additional artistic flair, garnish each plate with edible flowers (i.e., I used pre-packaged culinary orchids) & parsley sprigs, if desired.
Yield: 4 servings.
Chef's Notes: It's much easier to cook each fish fillet whole & then divide into equal portions after you've finished cooking them. The skin will soften & be immeasurably much easier to slice into. (Keeping the skin on during cooking will help keep the fish moist.) Remove the whole fish fillets from the grill pan, using 2 spatulas if necessary, transfer to a nonporous cutting surface, & then use a sharp knife to cut each fillet in two.
Tuesday, October 26, 2010
0 Recipe #187: Eggplant & Multi-Colored Bell Pepper Tian with Fresh Basil & Sun-dried Tomatoes

Here's an easy healthy recipe that's perfect for weeknight dinners!

Homemade Tomato Sauce (4 c. + 7 T + 1 7/8 tsp. per layer, or 4 c. + almost 7 Tbsp. per layer):
6 c. vine-ripened tomatoes (including juice), diced & drained (about 6 medium sized tomatoes)
6 Tbsp. tomato paste
1 c. sun-dried tomatoes, (i.e., the kind that's not packed in oil), julienned & tightly packed
1 c. fresh basil, julienned & tightly packed
2 Tbsp. fresh garlic, peeled & finely minced
1/2 c. fresh Italian flat leaf parsley, roughly chopped & tightly packed
2 tsp. dried oregano leaves
2 tsp. dried thyme leaves
1 tsp. ground marjoram
1/4 tsp. crushed red chili pepper flakes
1/2 tsp. ground black pepper, or to taste
1/4 tsp. salt, or to taste
Tian Ingredients:
extra virgin olive oil (for coating bottom of Pyrex glass baking dish)
6 c. Chinese eggplant, sliced crosswise into 1/4" rounds (about 2 very long eggplants) (3 c. per layer)
3 c. red bell pepper, diced (about 2-2 1/2 large peppers)
3 c. orange bell pepper, diced (about 2-2 1/2 large peppers)
2 c. part-skim (lowfat) mozarella cheese, shredded
2 c. Asiago cheese, shredded
Directions: Add all sauce ingredients in a large bowl & thoroughly combine. Set aside. Mix together mozarella & Asiago in a large bowl & set aside. Generously brush (or spray) the bottom of a Pyrex glass baking dish with olive oil, using a pastry brush. Layer eggplant on the bottom of the baking dish, followed by about 4 c. + (almost) 7 Tbsp. tomato sauce, 3 c. red bell pepper, 2 c. cheese mixture. Repeat this sequence, except in the 2nd layer, use 3 c. orange bell pepper. Cover top of baking dish with aluminum foil, with the shiny side facing towards the food. Bake at 375°F in a preheated oven for about 45-50 minutes. From a safe distance, open oven, slide out rack holding casserole dish (using silicone mitts or grippers), & carefully peel back foil using heat-proof tongs, watching for escaping steam. Remove foil, slide rack back into the oven, and cook casserole, uncovered, for 10-15 more minutes, or until vegetables have become tender & the cheese topping has turned golden brown. (It should also be bubbly.) About 5-10 minutes into cooking, test casserole with a knife or fork; if the tip of the knife/fork goes in with little resistance, it's done. Let cool slightly before serving.
Yield: Makes approximately 12 square portions, about 3" square inches each.
Sunday, October 24, 2010
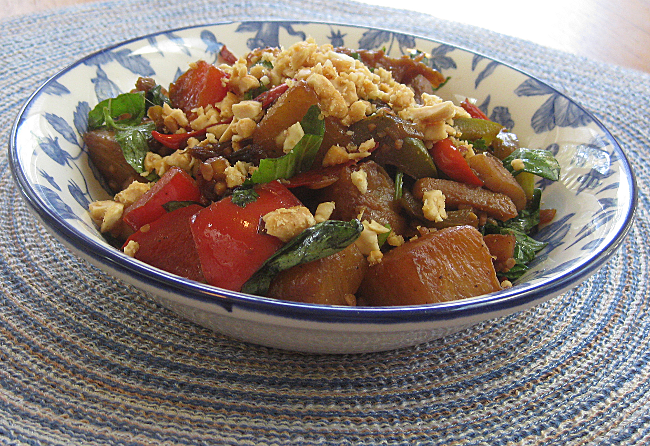
2 Recipe #186: Thai Vegetable Stir-Fry
 |
| This dish can be served as an entrée or as a side dish. It's up to you. :) |
As you may've noticed all of the recipes from this week have been vegetarian. This is not coincidental. Due to my fun trip to Grand Mart, in which I got a bit carried away in the exotic produce aisle, I had to continually use up the stockpile of fruit & veg, lest it go to waste. :) Of course, I couldn't wait too long to cook with it, so I've been on a vegetarian cooking spree.
Also, I'm currently in my hometown, (bull)dog-sitting for my parents. It was a last minute request as one of their usual dog-sitters suddenly had to bow out. So, I had no choice but to bring all those bags of perishable groceries home with me (so they wouldn't spoil) & try to find room in my mom's already crowded fridge. Hence, the 5 zillion vegetarian recipes. :)
Plus, right now my mom has hardly any meat or fish in her fridge except for maybe hot dogs. And one can't really create any decent (i.e., palatable!) recipes with those. ;)
I haven't really felt the urge to go to the grocery store after my multiple trips to Grand Mart, so I'm just trying to be creative with a combination of what I brought with me on my trip & what's already in my mom's fridge & kitchen cupboards.
Of course, by this point, I'm a bit sick of eating nothing but vegetables, day after day. I'm going to have to eat some meat or some seafood soon before I lose it, just for some variety. ;) I just can't (or rather won't) subsist on tofu, protein-rich grains & legumes, and cheese alone. That being said, the meals I cook are mostly comprised of vegetarian foods, so our household is still a very healthy one.
I only eat red meat on a rare occasion, & am much more likely to make dishes with fish or chicken. I know turkey's leaner than chicken, but it also tends to be drier, & is not something that I really enjoying eating. I'll eat it, but it has to be heavily masked with mustard or some other topping in order for me to get it down. This is also why Erik & I frequently go out for Chinese food on Thanksgiving Day, that is, when we're not travelling to see relatives for the holidays. :) It's either that, or I buy a turkey drumstick for Erik upon request, so he doesn't feel deprived of the taste of turkey on Thanksgiving. In fact, I actually made a turkey once for Thanksgiving (at Erik's request) & it wasn't half bad after it was soaked in brined, seasoned, & filled with stuffing, but it was a rather huge ordeal. I got up really early to start the prep & by the time the whole thing was over, I was wiped out. I barely stayed awake to eat the turkey. ;) Erik actually helped me make it since he knew I wasn't really into the idea. Perhaps he felt slightly guilty about the request; I have no idea. ;) Also, I grew up eating chicken on Thanksgiving because no one else in my family really liked turkey either. ;) I don't care if people think we're nuts; hey, everyone has their own Thanksgiving Day dinner traditions.
Anyhow, this'll be the last vegetarian recipe for the week, as I need a break from cooking. I'll only be here a few more days, so maybe we can just go out for dinner instead. :) The cook's had it for the moment. ;) I'm hanging up my apron for now, although over the next few days I might be posting a few more recipes that I've already cooked & written up; they are just waiting to be posted....
Thai Vegetable Stir-Fry
Ingredients:
1 Tbsp. sesame seed oil
2 Tbsp. fresh ginger, peeled & julienned into thin matchsticks (about 1" piece)
1/2 c. yellow onions, peeled & diced (about 1/2 small onion)
1 Tbsp. fresh garlic, peeled & finely minced (about 2 large cloves)
1/4 c. scallions, sliced crosswise into 1/4" thick rounds (about 2 large scallions)
4 pieces fresh lemongrass, cut crosswise into 3" pieces with sheaths unfurled (about 1 stalk)
1 c. Thai eggplant, sliced crosswise into rounds (about 3 small eggplants)
1 c. Indian eggplant, sliced crosswise into rounds (about 2 medium-sized eggplants)
2-3 small green Thai chilies, stemmed, seeded, de-ribbed, & halved
2-3 small red Thai chilies, stemmed, seeded, de-ribbed, & halved
1 1/4 c. yellow bell peppers (about 3/4 medium-sized pepper)
2 c. oyster mushrooms, diced
1 1/2 c. nonfat (or if unavailable, lowfat) silken tofu, diced
1/8 tsp. salt, or to taste
1/8 tsp. ground black pepper, or to taste
1/4 c. fresh basil, julienned & tightly packed
1 Tbsp. sesame seeds
Directions: In a large wok, saute ginger, onions, garlic, scallions, & lemongrass in sesame seed oil on low-heat for 5 minutes. Add Thai & Indian eggplant slices & cook until tender. Then add green & red Thai chilies, yellow pepper, mushrooms, & tofu, cooking until tender. Occasionally stir ingredients to combine. Season with salt & pepper, from a distance above the pan to ensure even distribution, & then stir once more. When vegetables are ready -- they should be tender & maintain their color but still be slightly firm -- remove from heat. Divide into equal portions. Garnish with basil, sprinkle with sesame seeds, & serve.
Yield: 3-4 servings as a main course; 6-8 as a side dish.
Saturday, October 23, 2010
0 Recipe #185: Mafalda in a Mushroom-Walnut Gorgonzola Sauce
As you can see from the previous Gorgonzola and mushroom recipe, it's about time to use up the remaining quantities of those ingredients while they're still fresh. :)
Gorgonzola and mushrooms just go together. They are really versatile in their own right, but together, there are so many different things you can do with them. This recipe, like all of the recipes on this blog, is another original creation, which I created on the fly.
As for the process of recipe creation, I find it's best to just go for it and create, sometimes experimenting with new combos and other times doing a new take on an old classic. Very much like running, it's important to know what you can do on any given day. :) And for me, that also means that I've got to be in the right state of mind in order to create a recipe that I'll want to post here. Usually, it's best not to press one's luck when one is overly tired or cranky. ;) Those are the nights I make simple, favorite meals that don't take much preparation. ;) Also, those meals don't typically make it to the recipe blog; then again, a boiled egg, a simple salad, and fresh fruit for dessert really don't need a recipe. :)
The below recipe was made for tonight's dinner. Thankfully, it was an "on" night for the creative juices. ;)
Mafalda in a Mushroom-Walnut Gorgonzola Sauce
Ingredients:
1 c. dry, uncooked mafalda pasta
4 c. water, lightly salted and seasoning with a drop of extra virgin olive oil
2 Tbsp. shallots, peeled and finely minced (about 1 medium-sized shallot)
1 Tbsp. garlic, peeled and finely minced (about 1 large clove)
1 large, fresh bay leaf
1/4 c. (unsalted) walnuts, crushed
1 c. mushrooms (oyster, shiitake, cremini, "Baby Bella," etc.)
1 Tbsp. dry sherry
1 c. skim milk
1/2 c. ripe Gorgonzola cheese, softened (picante or mild)
1/4 tsp. ground oregano
1/4 tsp. ground thyme
1/8 tsp. ground marjoram
1/4 tsp. salt, or to taste
1/8 tsp. ground white pepper, or to taste
1 Tbsp. unbleached, all-purpose flour
1/8 tsp. ground nutmeg
1/4 c. fresh basil leaves, julienned and tightly packed
1 Tbsp. freshly squeezed lemon juice (optional)
2 Tbsp. Asiago or Parmigiano-Reggiano cheese, freshly shredded
Directions: Turn heat on to high. Bring water to a rolling boil, about 8 minutes. Add pasta and cook until al dente, about 8 more minutes (i.e., just follow package instructions). When ready, drain in a sieve or colander and set aside.
While pasta is cooking, make the sauce: In a large (12-13") nonstick sauté pan, sauté shallots, garlic, and bay leaf for 3 minutes on medium heat. Next, toss in crushed walnuts, and cook another 2 minutes. Add mushrooms and cook yet another 2 minutes. Turn down heat to medium-low and add sherry, followed shortly thereafter (i.e., about 30 seconds or so) by the milk and Gorgonzola, stirring occasionally to combine. Season with oregano, thyme, marjoram, salt, and pepper. Sprinkle flour on top, distributing it evenly across the pan, and thoroughly combine. Reduce liquid by about half and remove from heat. Mix in mafalda, nutmeg, basil, and lemon juice, if using, and toss. Discard bay leaf. Sprinkle each portion with Asiago or Parmigiano-Reggiano cheese and serve.
Yield: 2 servings.
0 Recipe #184: Pineapple-Ginger Stir-Fry
Yeah, I know. This dish probably sounds odd to those of you who aren't accustomed to the flavors of Thai food, which frequently combines sweet & savory flavors together. But hey, if you like Sweet & Sour Chicken or duck sauce on your Chinese food, you might actually like this dish. :) It's fun to be adventurous, so why not give it a try? :)
I've been in the mood to make Asian food lately, so expect a few more dishes from various Asian cuisines -- Thai, Vietnamese, Malaysian, Cambodian, Indonesian, Japanese, Chinese, Korean, etc. I'm trying to expand the breadth & depth of this recipe blog, with lots of recipes from all around the globe. Hopefully, you'll find it fun & maybe learn a bit about international cuisines & cultures too.... So, pack your virtual suitcases; we're going to take a trip around the world. :)

Pineapple-Ginger Stir-Fry
Ingredients:
1 Tbsp. sesame seed oil
1 Tbsp. ginger, peeled & julienned into 1/8" thick matchsticks (about 1" piece)
1/4 c. shallots, peeled & finely minced (about 1 large shallot)
2 c. fresh pineapple, diced
3/4 c. green bell pepper (about 1/2 large pepper)
3/4 c. red bell pepper (about 1/2 large pepper)
1 Tbsp. fresh, small Thai red chilies, stemmed, seeded, de-ribbed, & julienned (quartered) into 1/8" thick strips (about 5 chilies)
1 Tbsp. fresh garlic, peeled & finely minced (about 1 large clove)
1 tsp. salt
1 tsp. ground black pepper
2 Tbsp. soy sauce
1 Tbsp. pineapple juice (fresh, i.e., reserved from a fresh pineapple, or canned)
1/4 c. scallions, sliced crosswise into 1/4" rounds (about 2 large scallions)
1 Tbsp. freshly squeezed lime juice
1/4 c. fresh basil, julienned & loosely packed
1 Tbsp. fresh cilantro, roughly chopped & loosely packed
2 Tbsp. unsalted roasted peanuts, crushed
Directions: In a large wok, saute ginger & shallots in sesame oil for about 1-2 minutes on high heat. Add pineapple, green & red bell pepper, Thai chilis, & garlic, stirring occasionally. Season with salt & pepper from high above, for even distribution. As soon as the fruit & vegetables become tender, stir in the soy sauce & pineapple juice. With about a minute of cooking to go, add the scallions. Remove from heat. Stir in lime juice & throughly combine. Garnish with basil, cilantro, & basil, mixing everything together thoroughly, & transfer to plates. Sprinkle peanuts on top of each portion & serve.
Yield: 3-4 servings.
Thursday, October 21, 2010
0 Recipe #183: Grilled Eggplant, Orange Bell Pepper, & Oyster Mushroom Panini with Melted Gorgonzola

This recipe was tonight's dinner. :)
Since I recently noticed that there weren't any sandwich recipes on this blog, today was the day I decided to rectify that. ;) Of course, a lot of sandwiches probably don't even require a recipe, but this one is a little bit more involved, so, if it's your first time making panini, it's probably advisable to follow the recipe instead of just skimming over the ingredients. :)
Even with a reduced fat recipe, panini can be surprisingly filling. And so, a little goes a long way....

Sunday, October 17, 2010
0 Recipe #182: Stir-fried Chinese Eggplant in a Spicy-Sweet Garlic Sauce
 |
| Oops, I forgot to add the sesame seeds for the sake of the recipe photo, but you get the general idea. :) |
 Anyhow, City Lights makes this wonderful Szechuan-style dish consisting of sautéed Chinese eggplant, garlic, basil, & this amazingly tasty, sticky, sweet, & spicy sauce. The eggplants caramelize during the cooking process and all of the flavors meld together to give the diner an eating experience of absolute perfection. :)
It's particularly wonderful on a bed of steamed rice, and usually ends up being just one of the many dishes we order when we go there to dine as a group. We usually eat it as a side dish, although you could certainly eat it as a main course if you added a protein source -- like tofu or chicken, etc. -- to it.
Now, of course, after experiencing such culinary excellence firsthand, I was inspired to recreate such heavenly perfection in my own kitchen. :) Making restaurant-quality Chinese food in one's own home, especially a recipe that exactly mirrors the dish one has just eaten in a restaurant, can actually be quite challenging. However, as they say, where there's a will, there's a way. :) And if at first you don't succeed, then try, try again. :) After all, practice does make perfect, and all the rest of those tired-but-true clichés. ;)
 I have to say that this version comes fairly close to the original, as I remember it, but maybe I should stop by City Lights sometime soon & refresh my memory, just to make sure. ;)
I'm dedicating this recipe to the various family & friends who've dined with us at City Lights on many an occasion, and also happen to love this place as much as we do. :) Since take-out or delivery from this restaurant isn't a viable option for many of them (for various reasons), they'll now be able to recreate & enjoy one of their favorite dishes at home. :-D And now, so will everyone else who ever wanted to try making a recipe like this, but didn't know where to find an authentic, restaurant-quality recipe, that is, until now. :)
Cheers,
-C

Stir-fried Chinese Eggplant in a Spicy-Sweet Garlic Sauce
Ingredients:
2 Tbsp. sesame seed oil
2 Tbsp. fresh garlic, peeled and finely minced (about 4 large cloves)
1 Tbsp. fresh ginger, peeled and finely minced (about 1" piece)
1/4 c. whole scallions, sliced into thin rounds (about 2 large scallions)
2 Tbsp. soy sauce
2 Tbsp. dry sherry
1 Tbsp. Chinese red rice wine vinegar (or if unavailable, can substitute white rice wine vinegar)
1 long/large (or 2 medium) Chinese eggplant, sliced lengthwise into 1/4" x 3" strips (about 11-12 oz.)
 1/4 tsp. cornstarch (or arrowroot)
1 Tbsp. tomato paste
Directions: In a large wok, sauté garlic, ginger, & scallions in sesame seed oil for 2 minutes on medium-high heat. Next, add soy sauce, sherry, & (red) rice wine vinegar to deglaze, stirring on occasion. While sauce is reducing, stir in eggplant slices and cook until light golden brown. Stir often, so as not to let the eggplant burn or stick to the bottom of the pan. Quickly combine cold water & corn starch in a small bowl & then pour into the wok. Stir in hoisin sauce & tomato paste, and season with red chili pepper flakes (or chili garlic sauce), black pepper, & salt, cooking until sauce mixture is thick & viscous. (If necessary, add more water while eggplant & sauce mixture are cooking). Add in the basil during the last minute of cooking. Remove from heat & sprinkle with sesame seeds. Serve on a bed of jasmine or sticky rice.
Yield: Serves 2 as a side dish, or 1 as a main course.
Chef's Notes: It's really important to do the above steps in rapid succession, as the ingredients are cooked on high heat but should never be allowed to burn or stick to the pan. It's important to be vigilant & aware during all phases of the cooking process, particularly after the eggplant is added. Pay close attention to the texture of the eggplant, which will be ready when it's become soft and caramelized. Also, be sure to keep close tabs on the amount of liquid left in the pan. The sauce shouldn't be watery, but neither should it solidify in the pan. ;) Aim for a happy medium: The goal is to produce a thick & flavorful sauce that flows and yet, still sticks to the eggplant. Ahhhh, sweet & spicy perfection. :)
Variations: If serving as an entrée, simply add tofu &/or chicken. Or, to add more vegetables, try green or red bell peppers &/or mushrooms. Any of these choices would complement this dish quite nicely. Please keep in mind that, since the spicy-sweet garlic sauce in this recipe is rather bold and spicy, any other ingredients you plan to add should be basic and mild. :) The sauce is meant to take center stage, and come to think of it, could also be used in other dishes as well. You could try it over steamed broccoli or green beans, or with sautéed/steamed tofu, chicken, or beef.
Saturday, October 16, 2010
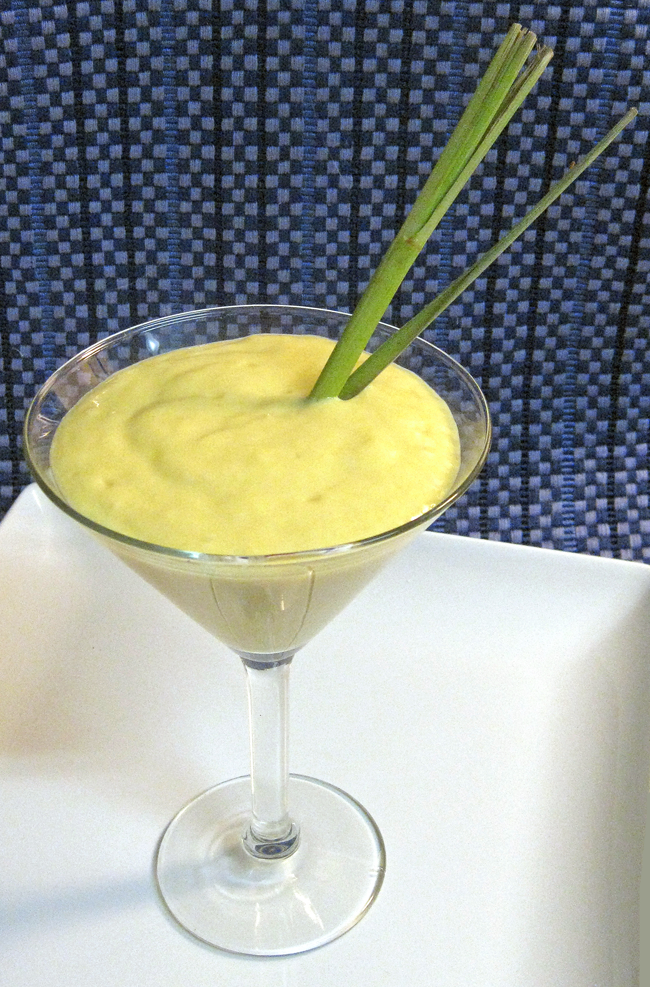
2 Recipe #181: "Pity the Fool!" Mango-Lime Fool :-D
You could say that this sweet treat might very well be Mr. T's dessert of choice. LOL.
OK, I'll admit it: I just couldn't resist adding the infamous Mr. T. catchphrase to the title of this recipe post. The opportunity was just too perfect to pass up. In fact, one could say that I created this recipe expressly for the purpose of using the catchphrase in the recipe title. ;) What can I say, I'm a fool for Mr. T. catch phrases. :)
If you think about it, the name "fool" is a rather odd word to describe a dessert. Really, why such a foolish name for it? ;)
 For those who might not already be aware, this dessert is actually a British concoction that originated sometime in 1590–1600. Of course, the idea of a fool as a dessert is not exactly the first denotation that comes to mind. :) As defined by Merriam-Webster & Dictionary.com, a "fool," n., is:
1. a silly or stupid person lacking in judgment, sense, or prudence.
2. a professional jester or retainer formerly kept in royal or noble households to provide amusement and casual entertainment, commonly dressed in motley attire with cap, bells, and bauble: the court fool.
3. one who has been tricked, duped, or deceived into appearing or acting silly or stupid: to make a fool of someone.
4. a harmlessly deranged person or one lacking in common powers of understanding.
5. one with a marked propensity or fondness for something; an ardent enthusiast who cannot resist an opportunity to indulge an enthusiasm (usually prec. by a present participle): dancing fool. fool for candy.
6. a weak-minded or idiotic person.
7. [British cookery] a cold dessert of puréed, scalded, or stewed, crushed fruit mixed with whipped cream or custard: gooseberry fool.
Notice that it's the very last definition listed. And that just confirms the place this dessert typically holds in the American collective unconscious, if it's really even there at all. ;) Admittedly, a fool is not a very common or well-known dessert here in the States, although one might see it crop up from time to time in some of the more cosmopolitan cookbooks or websites. Frankly, I really don't see what all the fuss is about. It's not even that complicated to make. In fact, it's basically the equivalent of a fruit smoothie served in a foo-foo-shi-shi dessert glass. ;) And sometimes it's made with bits of stewed or cut-up fresh fruit for added interest.
In this particular version, I've added a bit of Thai flare to this classic British dessert. As most of you probably already know, lemongrass is commonly used in a lot of Southeast Asian cooking (for both sweet & savory dishes), and this recipe is no exception. Lemongrass has a subtle flavor that goes very nicely with the other ingredients in this dish. And, since mango & lime are fairly tart, they need to be balanced out with sweet & mellow flavors. Hence, the lemongrass, and lots of yoghurt & honey. :)
Ingredients:
2 c. ripe, fresh mango, sliced (about 2 large mangoes)
1/4 c. freshly squeezed lime juice (juice of about 2 large limes)
zest of 1 fresh lime (optional)
2 tsp. pure vanilla extract
3/8 c. honey
1 tsp. lemongrass powder
2 c. nonfat plain Greek yoghurt
Directions: Add mango slices, lime juice & zest, vanilla, honey, & lemongrass powder to a food processor. Process until the mixture forms a smooth purée. Next, add yoghurt and pulse until just combined, so as to maintain the fluffiness & lightness of the whipped mixture. Spoon into 4 tall cups or glasses & chill for 1-2 hours. Just before serving, decorate each glass with fresh, sliced mango, & an assortment of garnishes: lime peel curl, mint leaves, a cut lemongrass stalk, &/or ladyfinger cookies.
Yield: Serves 4-6.
Thursday, October 14, 2010
Recipe #180: Licorice Spice Herbal Tea

Yes, another tea recipe. :) This one's made with real licorice root, vanilla bean, aniseed, and star anise, among other ingredients. I was really pleased with the way it turned out and hope you will enjoy it as well.
Please note that while aniseed, Chinese star anise, and licorice root all have a similar taste, they are not the same thing. Botanically speaking, they are from entirely different plants (and plant families). All of these spices do, however, contain antehole, the aromatic, naturally occurring compound that primarily contributes to the "licorice" flavor of these spices.
Before you make this recipe, I'd like to issue a word of caution about star anise consumption: Some of you who follow me on Twitter may recall that I'd tweeted earlier in the week about the FDA's warning about drinking teas brewed with star anise, which was issued back in 2003. From the way the FDA has worded the advisory, it appears that they're mainly referring to loose and pre-packaged tea bags. However, it's still a bit unclear (to me at least) as to whether or not the FDA has any potential issues with the way whole star anise is being packaged, labelled, and sold. This remains to be seen, as this information isn't really clarified in the advisory.

Part of the confusion is that there's more than one type of star anise. While commonly available Chinese star anise (Illicium verum) is not toxic, Japanese star anise (Illicium anisatum), which contains sikimitoxin, is. The FDA's primary concern is that some companies might actually be selling teas made with Japanese star anise, or a combination of the two types. Apparently, once star anise has been dried and processed, it's virtually impossible to distinguish between the two varieties just by looking at them. This is clearly an issue with the way star anise is being packaged and sold.
 The final outcome is that, since the FDA has thus far been unable to determine (from the medical reports) which variety led to the illnesses that'd affected 40 people, of which 15 were infants, they'd issued an interim, blanket advisory on the consumption of all teas brewed with star-anise, which particularly advised against giving this type of tea to infants.
I have a sneaking suspicion that the people who became ill from drinking tea brewed with star anise were probably consuming the Japanese variety. :) For the record, I've been a long-time drinker of my own homemade tea brewed with whole-spice Chinese star anise, and have never once gotten sick from consumption of the Chinese variety nor personally experienced any of the symptoms or problems reported to the FDA. That being said, I'm mentioning the aforementioned advisory as both a heads-up and a legal disclaimer. :) This way, you can come to an informed decision as to whether or not you'd like to try the below recipe.
 Obviously, if a person consumes teas made from prepackaged tea bags, it's basically impossible to distinguish if the tea contains Chinese or Japanese star anise. However, this recipe clearly uses whole Chinese star anise and not the preprocessed star anise tea or the commercially sold powdered version of this spice. When I buy star anise for cooking, whether online or in a grocery store, I make a point of checking labels and only buying the whole form of the spice. This way, I feel like I at least have a modicum of control over the ingredients I'm purchasing and using. To my knowledge, I've only ever bought the Chinese variety. It's also a comfort to know that the FDA is, in fact, monitoring star anise imports entering the US from other countries to ensure that the Japanese variety isn't being labeled for use as food.
One other, final advisory: Despite some of the positive health properties of licorice, consuming large amounts of glycyrrhizic acid (a compound found in licorice) can lead to hypokalemia and large increases in blood pressure, so please don't over do it with your licorice tea consumption. Also, if you have high blood pressure, you'll probably want to refrain from eating foods with glycyrrhizic acid in general.
Anyhow, I hope that the above warnings didn't scare you too much. That wasn't my intent. :) If you take special care to make sure you're using the Chinese variety of star anise and moderate your glycyrrhizic acid consumption, the above warnings will hopefully not apply. And now onto the recipe!
Licorice Spice Herbal Tea
Ingredients:
1 gallon (16 c.) water
4 whole Ceylon cinnamon sticks, 3" inch pieces
1 large whole vanilla bean, split open with a knife & scooped out with a knife/spoon to remove essence
1/8 c. (2 Tbsp.) cut licorice root
1 Tbsp. anise seeds
2 Tbsp. whole Chinese star anise
1/2 Tbsp. cut sarsaparilla
Directions: Bring the water to a rolling boil in a large pot, about 8 minutes. Add all spices, turn off heat, and allow to seep on stovetop for 15-20 minutes. Remove from heat, strain to remove whole herbs and spices, and then pour into a tea pot or other heat proof pitcher/container. (If it's easier, use heat-proof tongs first to remove the larger pieces -- vanilla bean, Chinese star anise, cinnamon bark, etc. -- before straining.) Pour into tea cups and serve. Tea can be served either hot or cold (as an herbal iced tea).
What I like to do is make a big batch of this tea, let it cool, & then transfer to a tall pitcher with a lid. That way, I can always heat it up when I'm in the mood for a hot cup of tea. Or, if you'd prefer it cold, just add ice cubes to the pitcher and serve. Be sure to make the ice cubes from the tea mixture itself, you won't dilute the flavor of the tea. A pretty nifty trick, eh?! :)
Also, use a fresh orange when making the orange zest. The commercially sold dried orange peel is bitter, and won't taste very good in this tea recipe. So, be sure to use the fresh stuff!
Friday, October 8, 2010
1 Discovering New & Unusual Foods in Uncommon Places....
 |
| You could spend an entire day exploring this place! |
 |
| Chinese black rice. |
After this stop, I also trekked to Trader Joe's, an Indian market, & a Persian market, to pick up some of the remaining odds and ends on my shopping list. I wasn't able to find everything on the list, and so, ended up ordering the rest of the items from Amazon.com. ;) The free-shipping deal we get from Amazon.com makes these purchases rather irresistible. :)
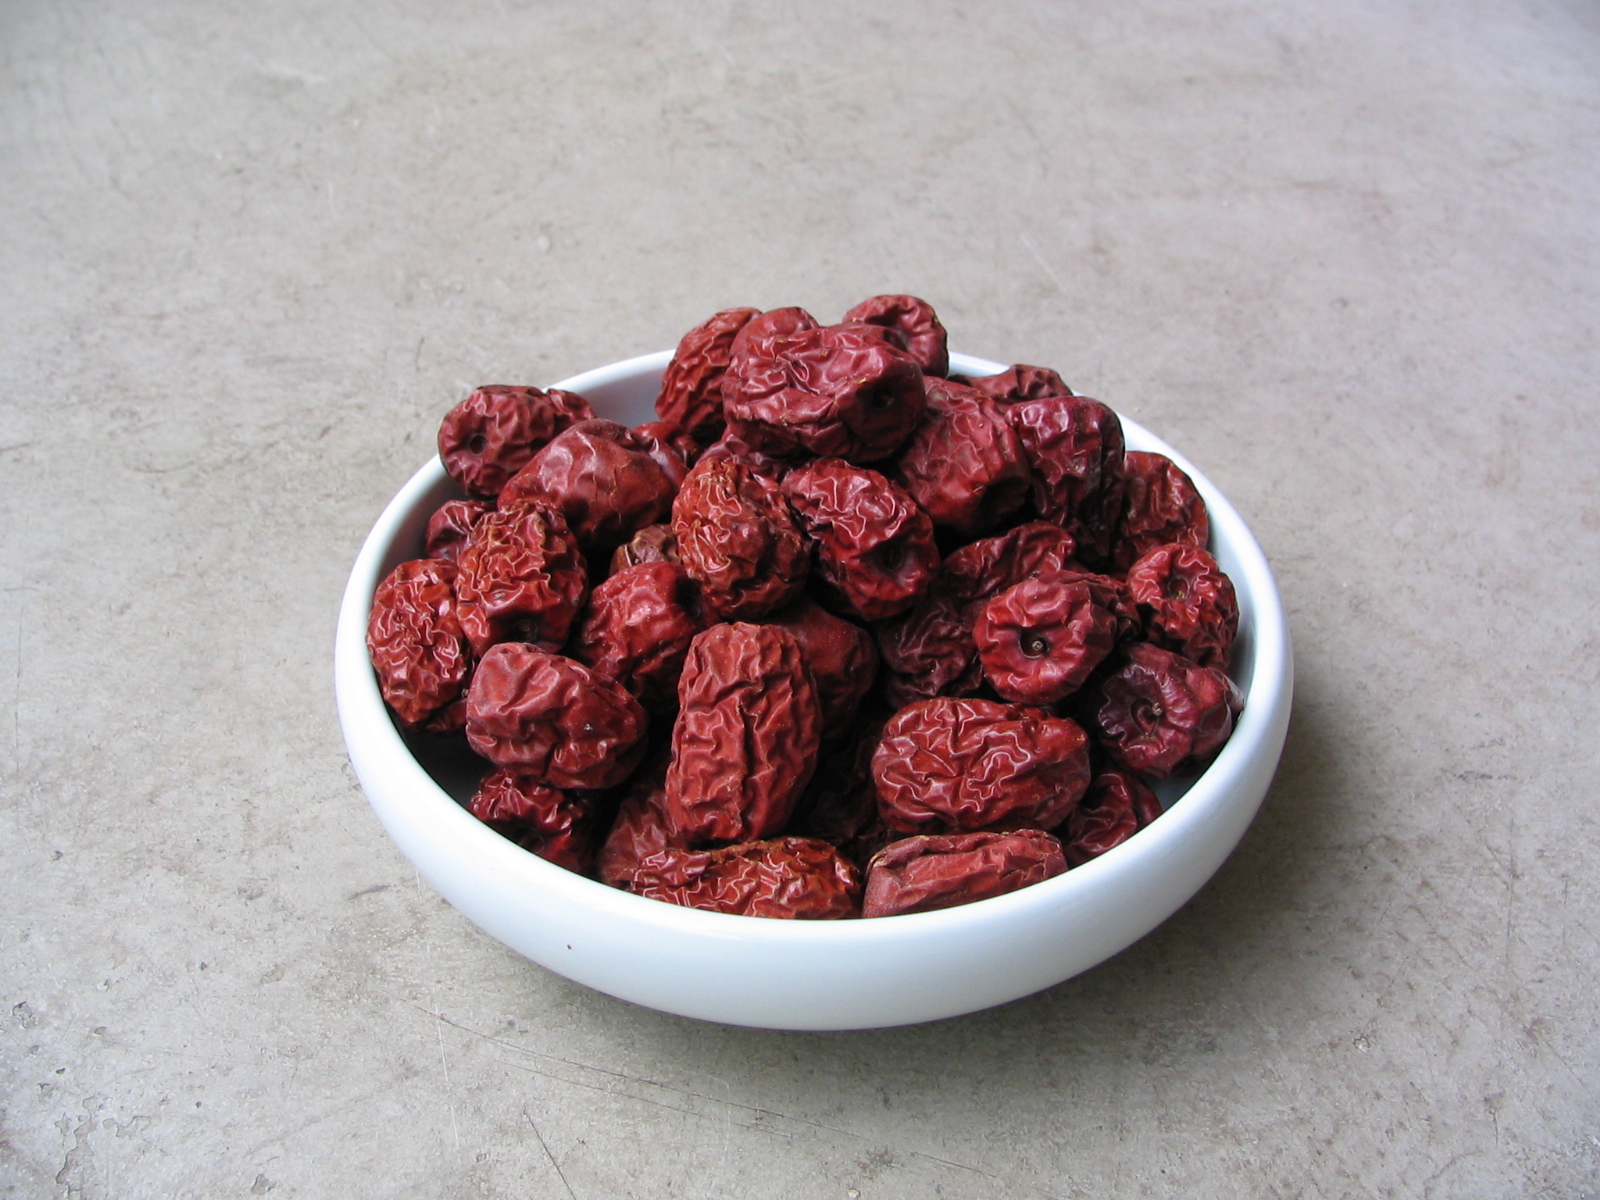 |
| A bowl of dried jujubes. |
So, to prove my point, witness the below list of items that I purchased yesterday:
--dried jujube fruits (used in Korean cooking)
--chow mein noodles (OK, these noodles are admittedly not that exotic, but it's an ingredient used in some of my more unusual recipe creations. :) )
--whole red Szechuan peppers (a common ingredient in Chinese Five-Spice Powder)
--black rice (high in antioxidants & vitamin E)
--a block of seedless tamarind pulp (used for many Indian & Southeast Asian dishes)
--black mustard seeds (used frequently in Indian cuisine)
--dried whole Chinese star anise (another ingredient in Chinese Five-Spice Powder)
--a 3 lb. bag of coarsely ground sea salt (OK, maybe sea salt's not that unusual, but the bulk purchase probably is. ;) )
--unsweetened dried blueberries* (for teas, trail mixes, & hot breakfast cereals like Oatmeal, etc.)
--freeze-dried strawberries* (for trail mixes)
--dried Californian apricots* (They are soooo much tastier than the Turkish kind!)
 |
| Cut licorice root. |
--cut licorice root (for making herbal teas)
--whole licorice sticks (again, for teas & other uses, etc.)
--cut sarsaparilla root (Yep, you guessed it again. It'll be used primarily to make teas & other beverages. :) As you may or may not know, sarsaparilla's one of the main ingredients in root beer.)
--whole whole, dried allspice berries (for teas & cooking)
--white í seeds
--whole dried rose buds & petals (for teas, aromatic rices, etc.)
(*Trader Joe's has a fantastic selection of dried fruits made without refined sugar.)
So, there it is. To be honest, I probably could've saved a lot of driving around (not to mention time & gas money!) after the Grand Mart trip if I'd only have gone to Amazon.com first. I guess I didn't think it'd be as hard as it was to find (what I thought would be) some of the more common ingredients like whole allspice berries or vanilla beans. Sheesh! However, the shopping trip was a fun & interesting adventure, so that in itself made the excursion worthwhile.
Well, now that my pantries are well-stocked with all sorts of fun ingredients, be on the lookout for more unusual and one-of-a-kind recipes. :)
Happy Cooking!
-C