
Friday, January 28, 2011
0 Recipe #237: Salmon Tikka Masala


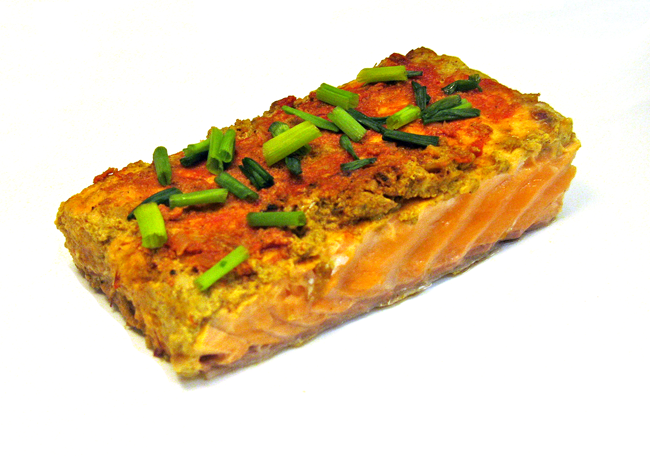
I created this recipe because I was in search of a new & exciting way to prepare salmon, versus falling back on the usual & more predictable choices like soy-mustard marinades and teriyaki-style, pineapple-honey-ginger glazes. It's nice to change things up every once in a while!
I've made this dish for several different people & all of them have told me that they really liked it, even including some of the ones who've said that they aren't really into Indian food. :)

Salmon Tikka Masala
Ingedrients
1 Tbsp. fresh ginger, peeled & finely minced
1 Tbsp. fresh garlic, peeled & finely minced
1/2 tsp. salt
1/4 c. shallots, peeled & finely minced (2 medium-sized shallots)
1/8 tsp. red chili powder (Indian-style, not Mexican!)
2 tsp. amchur (mango powder) (if unavailable, substitute about 2 Tbsp. lemon juice)
1/4 tsp. ground turmeric
1 1/2 tsp. ground coriander
1/2 tsp. ground cinnamon
1/2 tsp. ground cardamom
1/8 tsp. ground cloves
2 tsp. ground cumin
1/8 tsp. ground black pepper
1/2 c. nonfat, plain Greek yoghurt
2 tsp. tomato paste (optional)
10-12 fresh curry leaves, julienned
4 tsp. saffron threads, soaked in 1/4 c. warmed (but not boiling!) nonfat/skim milk for 10 minutes
1 lb. salmon fillet, cleaned, washed off, & patted dry (Leave bottom skin on fish!)
1 Tbsp. extra virgin olive oil
2 Tbsp. cilantro or chives (for garnish) (1/2 Tbsp. per person)
Directions: The following steps can done up to a day in advance: Using a medium-sized mortar & pestle, mash together ginger, garlic, & salt until pulverized. Add shallots & repeat process. Next, mix in red chili powder, amchur, turmeric, coriander, cardamom, cloves, cumin, & black pepper until combined into a thick, uniform paste. Transfer contents into a large mixing bowl. Fold in yoghurt, tomato paste (if using), & the saffron threads that've been soaked in warm milk. Whisk together until well combined. Place salmon into a resealable Ziploc/plastic bag & then pour contents of mixing bowl into bag & tightly seal. Gently massage yoghurt-spice mixture into fish from outside of bag, then place bag into refrigerator, & allow salmon to marinate overnight, or for at least 3-4 hours before grilling.
Next, cook the salmon: About 10-15 minutes before cooking, remove the salmon from the refrigerator & set it aside, so that it can reach room temperature before it's cooked, which ensures even heat distribution during cooking. Heat oil in a large (11"), square, nonstick grill pan with a ridged/grooved bottom. When oil is hot, place whole fillet onto grill pan. (Leave fish whole as it's easier to maneuver in the pan when it's a single, large piece.) Pour some of the marinade on top of fish, using a heat-proof pastry brush for even distribution; as fish cooks, continue to coat fish with remaining marinade.
For 1"-thick fillet, grill for about 4-5 minutes per side on medium heat. (Salmon generally requires 4-6 minutes total grilling time per 1/2 inch of thickness, i.e., 2-3 minutes per side. If fillets are greater than 1"-thick, cook them 5 minutes per side over direct heat & then remove them from the heat, & place on a cool burner to allow them to finish cooking. Fish will continue to cook in the pan even after it's been removed from the heat source, just at a lower intensity, which is the desired goal. This allows a thicker fish to cook all the way through without overcooking.)
To test for doneness, place a knife into the flesh of the salmon & pry it open to see how pink the flesh is on the inside. (I personally like mine to be a medium pink color; tender, but not too fleshy.) When the salmon flesh flakes with a knife or fork, it's done. Be sure to remove the salmon just as it reaches the flaking point, or it will begin to dry and toughen. Perfectly done salmon is moist, tender, & flaky. When fish is done, cut into 4 equal pieces, transfer to plates, & serve with vegetables, (saffron) rice, & the chutney of your choice.
Yield: 4 (4 oz.) servings.
Chef's Notes: If you're lucky enough to have access to an outdoor grill, use that instead of the grill pan, & just skip the olive oil. (The yoghurt is moist enough for the outdoor grill, but the grill pan, even a nonstick one, needs a bit of extra help to keep the fish from sticking to it.) For outdoor grilling, set a timer to help you to keep tabs on the fish (!) & then check it to see whether it needs a few more minutes. After the initial 8-10 minutes of grilling, it's probably a good idea to stand near the grill & then watch & wait, checking the salmon each time with your knife. That way, you're less likely to overcook it from neglect or forgetfulness, while you're preparing the other dishes for dinner. :)
Monday, January 24, 2011
0 Recipe #236: Mushroom Rice Pilaf with Fresh Herbs
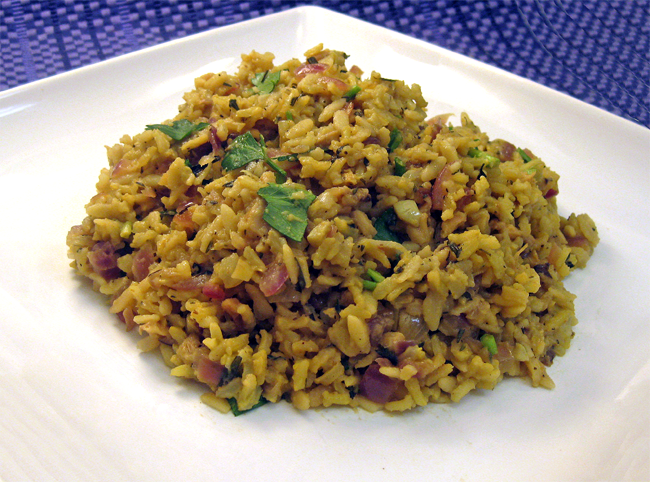
Mushroom rice pilaf is the perfect side dish to accompany fish, chicken, beef, or lamb. If you've ever had Near East Wild Mushroom & Herb Rice Pilaf, this dish tastes somewhat similar, but it's much more vibrant, since it's made with fresh herbs, shallots, onions, & garlic. :) Plus, it has sherry in it, which enhances the flavor of this dish even more. The boxed stuff is decent, but why use a mix when the fresh stuff tastes so much better?! :-D
Mushroom Rice Pilaf with Fresh Herbs
Ingredients:
1/2 Tbsp. extra virgin olive oil
1/2 c. dry, uncooked orzo pasta
1/2 c. sherry (or dry vermouth, if unavailable)
1/2 c. dried, sliced shiitake mushrooms, broken into 1/4" thick pieces
2 Tbsp. fresh, Italian flat-leaf parsley, roughly chopped (for garnish)
1 Tbsp. fresh thyme leaves, densely packed
1 Tbsp. fresh rosemary leaves, very finely minced & densely packed
1 Tbsp. fresh marjoram leaves, very finely minced & densely packed
1/2 Tbsp. fresh oregano leaves, very finely minced & densely packed
1 tsp. fresh tarragon leaves, very finely minced & densely packed
4 c. water (or for even more flavor, use low-sodium chicken or vegetable stock)
1 tsp. unsalted butter (optional)
1/8 tsp. ground turmeric
Directions: In a large (12-13"), nonstick sauté pan, sauté onions, shallots, garlic, & bay leaf in olive oil on low heat until translucent but not browned, about 3 minutes. Stir frequently. Season with a small pinch of salt to help evaporate moisture faster, sprinkling from high above to ensure a more even distribution. (Don't add all of it into the pan now; you'll be using the remainder of the salt later on in the cooking process.) Turn up heat to medium, & mix in dry, uncooked rice & orzo, stirring continually for about 1-2 minutes. Watch pan carefully so rice & orzo mixture doesn't brown or burn. (This step is particularly important, as it cooks off the starchy coating of the rice & orzo & prevents the grains from getting sticky and mushy when the liquid ingredients are added. The rice & orzo mixture should be slightly crispy, but not browned.) Deglaze with sherry, stirring constantly, adding a 1/4 c. at a time, until liquid is absorbed. While sherry is reducing, add dried mushrooms & all fresh herbs minus the fresh basil, (which will be used later for garnish). After sherry has mostly evaporated, use a liquid measuring cup to incorporate water or stock, adding only one cup at a time, stirring constantly. Allow each cup to be absorbed before adding the next. Each addition should be only just enough to cover the rice & orzo mixture. Next add butter (if using), & season with turmeric, black pepper, & remaining salt. Reduce heat to low again & simmer, uncovered, until rice & orzo are al dente, about 20-25 minutes. Test to see if it's ready by pinching a rice grain; if only 2 or less beads remain, the rice is done. Rice should be creamy but still firm. (Most of the water should be absorbed by this point.) When ready, remove from heat & let rest for 5-10 minutes. Then stir in lemon juice, mixing thoroughly to evenly distribute ingredients. Fluff pilaf lightly with fork before serving & garnish each portion with fresh basil. Serve immediately.
Yield: 4-6 servings.
Saturday, January 22, 2011
0 Recipe #235: Tomato-Carrot Soup with Parsnips & Fresh Herbs

It's winter & that means soup! :) Invigorating & packed with flavor, this soup is one of my favorites thus far. And, it manages to deliver a great deal of taste without adding pounds. So, what makes this soup so full-bodied & rich, even though there's isn't a drop of cream, butter, or any other milk-based products? Well, lots of things. :)
And that, to a large degree, has to do with the very precise measurements chosen for each ingredient of this recipe. And, as is the case with most recipes, what hasn't been added is just as important as what has. :-D
For example, this recipe calls for dill & tarragon, two herbs commonly acknowledged as a marvelous match made in heaven. :) This herb pairing is found in all sorts of dishes, particularly those of American and European origins. Fresh tarragon gives food a fresh, vibrant taste, but since it's so strong, it needs to be used sparingly. Fresh dill, on the other hand, is not nearly as intense when used in comparable amounts, & so, can be used much more liberally. This flavor pairing tends to complement root vegetables (i.e., beets, carrots, potatoes, parsnips, etc.), many of which you'll not so surprisingly find in this soup recipe. :)
The foundation of this soup is a mirepoix, a common triad of vegetables typically consisting of onions, carrots, & celery. This forms a solid soup base that anchors all of the other flavors.
Next to consider are the leeks & garlic: Leeks have a much subtler flavor element than garlic, & are thus, added in greater quantity. Both build upon the existing soup base, balancing each other out as well as rounding out the other existing flavors in the soup & adding another layer of complexity to the flavor "canvas." Yes, cooking is kind of like painting in this respect. :) Each layer must be applied with respect to the one before it. Each component part must be carefully considered in conjunction with how it fits into the whole.
There's also another consideration: Some of the stronger flavors (i.e., parsnips, tarragon, onion, etc.) will lose some of their strength as they simmer. Even so, some strong flavors like the rosemary & garlic, etc., will still remain rather pronounced, even after prolonged simmering, so they'll still need to be balanced out with mellower ingredients.
So far at this point in the recipe's development," we have the makings of either a rustic American, French, Italian, German, or Russian soup. ;) At this early stage, the template has yet to be fully defined.
With the addition of tomato paste, Tuscan Blue rosemary (i.e., a much milder form of rosemary than the more common, "pine needle" variety that most people are accustomed to seeing in the grocery store), & basil -- all of which are typically Italianate in nature & even more so, when combined together -- it might appear as if this soup has now headed in an obviously Italian direction. However, that's not the case. (Surprise, surprise. :) ) You'll notice we haven't yet added cannellini beans or fennel to seal the deal just yet. ;)
While these flavors might work together in their own sphere of existence, they become something entirely different when added to the existing soup elements. To some, these "Italian" flavors -- especially the basil -- might seem unusual or incongruous next to the tarragon & dill. However, it's the basil, quite ironically, that really pulls all of the different flavor components together like a giant lynch pin. Basil, like tarragon (& to some extent, dill), is a cool, refreshing flavor. However, unlike tarragon, basil provides a crisp, clean flavor without konking a person over the head with it. ;)
So what's the trick to getting this unorthodox combination to work? The secret is to add the basil in its uncooked form, but only after the soup has been removed from its heat source. After the soup has cooled for a few minutes, it's then puréed in the blender along with the rest of the ingredients.
While cooking basil might very well release its essence, it also changes its flavor & pungency. You see, basil tends to become slightly bitter if cooked for too long. That might very well be fine for a tomato sauce or an Italian soup, but it won't work very well for savory soups that require lighter & crisper flavors to balance out any potential "sharpness" or intensity. Cooked basil is just too overwhelming in this case. Sure, lemon juice may brighten the flavor of soups, salads, & pastas, but it's not a fix-all. ;)
The reasoning for the above method is simple: This way, the crisp cool flavors of the fresh basil can remain intact & can then bring out the crisper notes of these other herbs. Simply put, the object for the above method is to lighten & brighten the flavor of the soup.
This is the exactly same reason a Malbec is used. Unlike the sharp, oaky flavors of Cabernet, Merlot, or Syrah/Shiraz, Malbec is one of the crisper, more balanced French red wine varietals. When added to a complex soup like this, it's a pairing that really works wondrously well. Malbec grapes require more time in the sun (they need the extra heat to mature), and this, in turn, produces wine that is rich, dark, dense, juicy, full-bodied, & vibrant. It's a clean-tasting wine that's well-structured but smooth. Just perfect for a soup that already has a lot going on. :)
The specific wine I chose, Altos Las Hormigas Malbec 2007, was produced by an Argentine vineyard, as are many Malbecs these days. Argentina, and in particular the region around Mendoza, (where this specific wine is from), is making a name for itself as the source of some of the finest Malbecs ever made. The terrain is ideally suited for Malbec, allowing for the production of complex wines that rival those of Napa or Bordeaux.
This dry, velvety, & midweight wine, even with all its richness, is actually one of the lighter Malbecs. While it contains ample tannins, they are surprisingly polished & well submerged. The predominant flavors of red & black berries are layered with peppery & plum notes, & a hint of spice.
The bottom line is this: It's a decent, affordable wine that complements the soup, both as an ingredient and as a beverage to serve with the meal. :) If you don't want to take my word for it, you can check out its many favorable reviews: It was rated 89 (out of 100) points by The Wine Advocate and 88 (out of 100) points by The Wine Spectator, & was also recommended by the wine critics at The WSJ. And the beauty of it all: It cost me only a mere $11. :-D (It goes to show that, if you pay attention, you can get some decent wines without breaking the bank.)
All in all, it's a very gratifying experience when all of the elements of a recipe merge together so seamlessly like this that it's almost like the recipe magically created itself. :)
And now you have some insight into various types of considerations that go into the recipe-writing process. ;) It's part "science & logic," and part "soul & senses." ;)

Tomato-Carrot Soup with Parsnips & Fresh Herbs
Ingredients:
1 Tbsp. extra virgin olive oil
2 large, fresh bay leaves
1 c. yellow onion, peeled & sliced into 1/4" thick crescent-shaped slivers (about 1/2 small onion)
1 c. leeks (white parts only), sliced crosswise into 3/8" thick rounds (about 1 small whole leek)
1 Tbsp. garlic, peeled & very finely minced (about 2 large cloves)
1/2 c. Malbec (i.e., French red wine varietal)
8 c. water
1/2 c. tomato paste
1/2 tsp. salt, or to taste
1/2 tsp. ground black pepper, or to taste
1/2 c. fresh dill, very finely minced & densely packed
1 Tbsp. fresh tarragon leaves, very finely minced & densely packed
1 Tbsp. fresh Tuscan Blue rosemary leaves, very finely minced & densely packed
1/4 c. fresh cilantro, very finely minced & densely packed
1/2 c. fresh basil leaves, julienned (don't cook, add to blender with soup ingreds & pulse)
2 Tbsp. freshly squeezed lemon juice
a few basil leaves, julienned (for garnish)
Directions: Heat olive oil in a large (8-10 qt.) stock pot on medium heat. Then, when oil is hot, turn down heat to low & quickly add bay leaves, onion, leeks, garlic, carrots, parsnips, & celery, and sauté until soft and translucent, about 5 minutes. Deglaze with Malbec, stirring occasionally, & cook until liquid's volume has been reduced by half. Add 8 c. water to pot, turn up heat to high, & allow water to reach a full, rolling boil. Then reduce heat to low, add all remaining ingredients except for the basil, and simmer, covered, for 20-25 minutes, or until flavors have melded. Remove from heat & let cool for 15-20 minutes. Discard bay leaves. Add lemon juice & stir. Transfer to a blender, in small batches, and purée each batch for about 2-3 minutes, or until smooth. If necessary, reheat before serving. When ready to serve, pour soup into bowls & garnish with a few shreds of basil leaves.
Yield: 4-6 servings. (Makes about 10 c. or 80 fl. oz.)
Chef's Notes: Soup will keep in the refrigerator for a few days or it can be frozen indefinitely, although it's probably best if used within 6 months to a year.
It's very important that you use a mild-mannered Malbec for this recipe. If for some reason, you're unable to get a hold of a Malbec that fits this description, make sure that whatever substitute you choose is a subtle-tasting red wine that's not predominated by oaky flavors. In other words, NO Cabernets, Shiraz/Syrahs, Chiantis, or Merlots! Yes, I know this is going to be a great challenge, as many vineyards these days seem to go overboard with the oak, but trust me, finding the right wine to complement your soup is really worth the effort. :)
Monday, January 17, 2011
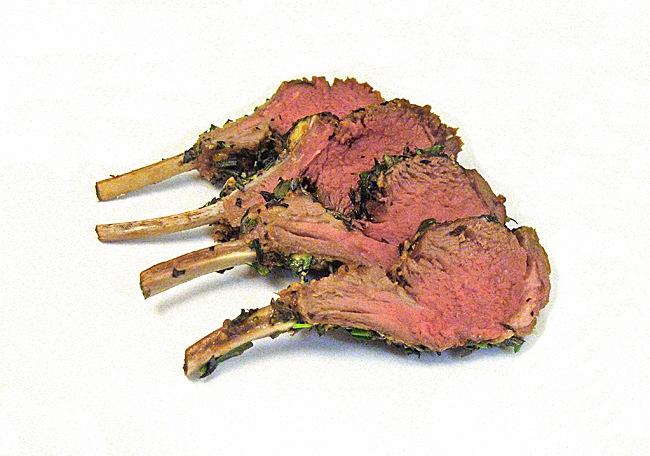
0 Recipe #234: Herb-Encrusted Rack of New Zealand Baby Lamb
This recipe was created with my pal Junko (@runpdx) in mind. See, I remembered! :)
Rack of lamb makes an elegant, festive meal for holidays & special occasions. It's often served for spring holidays, but since lamb itself isn't seasonal, it can, of course, be enjoyed any time of year. Whether you make this recipe for parties or as an any-day-of-the-week indulgence, this dish is certain to be a big hit with your dinner guests. It's simple & easy to make, & yet looks very impressive and beautiful when placed on the table. :)
New Zealand baby lamb is commonly acknowledged as one of the best types of lamb on the planet. It's delicate in flavor, and so, goes quite nicely with more robust flavors like rosemary, garlic, mint, & oregano, all of which are, of course, found in this recipe. :)
On that note, it's really important to go easy on the herbs & spices for this dish: The rack of lamb tastes so good on its own that the seasoning should complement the lamb, not beat it into submission. ;) Flavor balance in general is particularly important for this recipe, as the specific cooking & preparation techniques of this dish really bring out its individual flavor elements in a very distinct fashion. Rack of lamb has clean, well-defined flavors & there's no masking mistakes or flavor imbalances; each & every flavor component is instantly detectable. However, if you follow the below directions exactly as they are written, you should be just fine in that regard. :)
One final note: I'd like to point out that this recipe calls for a dry, delicate white wine instead of a red. This choice might surprise some, since the commonly accepted practice -- one which has remain unchanged for many years, save the more recently revised thinking within some circles of the food & wine communities -- has typically been to pair white wines with fish & red wines with meat, both as an ingredient and as a beverage to serve with the meal. However, a dry, delicate white is actually a much more appropriate choice for this dish & here's why: On the whole, reds tend to be much more robust & astringent than most whites due to greater concentrations of tannins, which is going to be way too overpowering for the other elements in this dish. Also, the typical oaky finish of many reds isn't going to complement the other flavors. Other cuts of lamb will work better with reds. A clean, dry but delicate white varietal best suits the flavors & textures of this particular preparation of rack of lamb. Again, flavor balance was the main consideration behind this choice.
Herb-Encrusted Rack of New Zealand Baby Lamb
Ingredients:
1 Tbsp. extra virgin olive oil (use Greek extra virgin olive oil if available)
1 Tbsp. fresh thyme leaves, very finely minced
1/2 Tbsp. fresh oregano leaves, very finely minced
1/2 Tbsp. fresh marjoram leaves, very finely minced
1/2-1 c. (or more) mild, dry white wine (Be sure to pick a delicate varietal!)
1/2 c. (or more) low-sodium chicken broth
a few small squeezes of lemon juice (about 1-2 tsp., or to taste) (optional)
Directions: One hour before you plan to cook the lamb, remove rack of lamb from refrigerator so that it can reach room temperature before it's cooked, which ensures even heat distribution during cooking. After the lamb has been prepped (i.e., frenched, washed, patted dry, trimmed, defatted -- with only a thin layer of surface fat remaining on the top face, i.e., meat side, of the rack, to preserve the meat's tenderness -- & cut into 2 sets of 3 chops each & 1 set of 2 chops), diagonally score the fatty side of each chop that you've just trimmed by making shallow cuts through the remaining surface fat, spacing each cut about a 1/2" apart.
Next, heat olive oil on low heat in a large (12-13"), nonstick sauté pan. Add shallots & garlic & sauté for 2-3 minutes. While shallots & garlic are cooking, lay lamb chops on a plate & season all over with salt & pepper, sprinkling from a distance for even distribution. Then roll chops around the plate to absorb any remaining salt & pepper. Next, thoroughly combine all fresh herbs in a large bowl & set aside. Turn up heat to medium & sear chops on all sides -- left, right, front, back (i.e., also called the "skin side"), & bottom faces -- for about 3-4 minutes per side (for medium rare), or until golden brown. (Cook about 2-2 1/2 minutes per side for rare.) When it comes to cooking the bottom sides of the chops, you'll most likely need to hold each set of chops upright (ie., vertically) & then tilt them in various configurations in order to cook them on the remaining sides. If you don't want to cook them in batches, which takes a lot longer, I'd recommend leaning them upright against the interior sides of the pan (for hands-free support), so you can cook the bottom sides of the chops and still have a free hand to scrape off the fond (i.e., the "brown bits" that've formed at the bottom of the pan) to keep it from burning. After all, you aren't an octopus. :)
During the searing process, the shallots & garlic will begin to brown. As soon as this happens, deglaze the chops with dry white wine, adding 1/4 c. at a time (waiting until each portion of liquid cooks down before adding the next), & continue searing until all sides of the chops have been done. (Add as much wine as necessary to keep the liquid in the pan from drying up & the fond from burning. The pan should never become dry during cooking.) Remove chops from pan & place onto a different heat-proof plate. (This step is VERY important as you don't want to cross-contaminate the cooked meat with the raw juices left on the previous plate.) Then, with a wide, heat-proof pastry brush, hold each set of chops with heat-proof tongs & generously coat them with Dijon mustard. It's important to do this step while the chops are still hot, so that the mustard melts & is thus absorbed into the lamb. Next, gently press each set of chops into the bowl of fresh herbs, making sure to coat the chops on all sides. As you finish coating each set of chops, lay them skin (& bones) side down (i.e., "meat side up"), one at a time, onto the same sauté pan you just used for searing, pour in 1/4 c. chicken broth, & roast in the center of an oven preheated to 400°F for 7-11 minutes, or until a meat thermometer, inserted into the thickest part of the meat, registers an internal temperature of at least 145-150°F for medium rare. Please note: If you don't own an instant-read thermometer, you will need to insert it into the meat before you place the rack of lamb into the oven. (For rare, a 1 lb. rack of lamb should be cooked for about 5-7 minutes, or until a meat themometer registers an internal temperature of at least 140°F. Please note that cooking meat at anything below this temperature will not kill off harmful bacteria like salmonella & listeria.) Half way through the cooking time (i.e., at about the 4-5 minute mark), add the remaining 1/4 c. chicken broth.
When ready, remove from oven, set pan on an unused/cool burner, & let rest for 5-10 minutes before slicing. (The temperature of the meat will climb an additional 10 degrees as it rests, which is just perfect for the final resting temperature for medium rare.) Then, transfer to a non-porous cutting board & cut the lamb into individual chops by slicing between the bones, so that each chop falls away from the rack.
While the lamb is resting, return the original sauté pan with the remaining liquids back to an available stove top burner. Cook over high heat until boiling, then reduce to a simmer & continue to cook until the liquids in the pan have been reduced by half. (Sauce should have thickened substantially by this point.) Be sure to scrape off the fond from the bottom of the pan. Then remove pan from heat & let cool for 10 minutes. Reserve the fond & juices, & set aside. Before serving, squeeze a few drops of lemon juice over both sides of each lamp chop, if desired.
To serve, transfer four chops to each plate & drizzle with jus. You can either display the finished dish by layering each chop like toppled dominoes or, for an enhanced artistic presentation, place 3 or 4 lamb chops in the center of each plate, placing the ends upright, and tie them together with very thin culinary twine. For extra visual impact, surround the lamb with steamed or sautéed vegetables in a decorative fashion, and serve either atop polenta or with a side of roasted, mashed or baked potatoes.
Yield: 2 servings, or 4 baby lamb chops (i.e., half a 1 1lb. rack) per person.
Chef's Notes: If you're looking for a good rack of lamb, both Whole Foods & Trader Joe's are good places to shop. I bought an excellent-tasting 1 lb. organic rack of baby New Zealand lamb at Whole Foods for a little under $20, which doesn't really cost much more than other types, in terms of comparable cuts. (Buying organic ensures that your meat hasn't been pumped full of hormones and chemicals.) If you're trying to figure out how much lamb to buy, figure that a 1 lb. rack of lamb feeds 2 people. It's worth paying for a high-quality cut of meat. The meat is so tender, juicy, & flavorful, it'll knock your socks off. This is not the type of dish where you want to cut corners, so whatever you do, don't skimp. Lay down the buckage & you'll be glad that you did. It's really important to get quality cuts for this dish.
Also make sure you get a small rack of lamb, which typically means a younger lamb & thus more tender meat; don't be fooled into thinking that larger cuts mean more flavor or taste. The price is calculated by weight, so you'll also save yourself some extra money by not going overboard. You'll be surprised how filling a small rack of lamb can be, especially if you serve it with a baked potato or some other vegetable side, which I'd recommend that you do for a more balanced meal.
If you're feeling adventurous, you can also try frenching your own racks of lamb. For directions on how to do this, I'd suggest watching the video, "How to French a Rack of Lamb." Personally, I'd rather just save myself the trouble & let the butcher do it. After all, butchers do this sort of thing all the time, so of course they are experts at it too.
Sunday, January 16, 2011
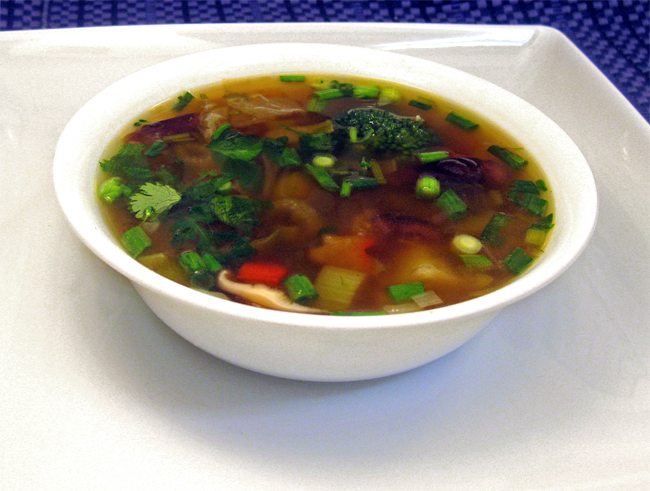
0 Recipe #233: Chinese-Style Vegetable Soup
OK, just one more easy-to-type-up recipe, and then the next one's going to be the aforementioned rack of lamb recipe, I promise. :) Not trying to string you along, but frankly, I've been feeling a little bit like a recipe-writing machine lately & need a little break from the time-intensive writing for a day or two. As you may've observed, I've been churning out posts at the rate of one per day for several days in a row, & it's starting to take its toll. Next thing you know, I'll be dreaming about broccoli jumping over fences instead of sheep. ;) Let's hope it isn't the killer cauliflower dream again. Haha! JUST kidding, people. It hasn't gotten that dire... yet. LOL!
But seriously, I do think about other things besides food & recipes. Maybe not lately, but I do. ;)
Alright, I'll quit making silly jokes & messing about, & will just get to the vegetable soup recipe already....
True to form, today's recipe happens to fit quite conveniently into this month's "cabbage recipes" theme. :) OK, it's only one vegetable featured amongst many, but hey, technically speaking, that still counts. ;)
This soup is very straightforward & easy to make. There's really nothing to it -- you just sauté a bunch veggies for about 5 minutes, & then toss the rest of the ingredients into the pot & simmer for 20-25 minutes. Just set the timer, & you're all set.
This soup gives you the best of both worlds: You get a lot of flavor for a minimal amount of effort. :) The soup tastes incredibly rich, and yet, it's very lowfat & packed with nutrients. The broth is incredibly flavorful & multi-dimensional. It'll seem like you spent hours slaving over a hot stove, when really, it was closer to 20 minutes. ;) No worries, your secret's safe with me. :)
1 1/2 Tbsp. garlic, peeled & finely minced (about 3 large cloves)
1/4 c. baby carrots, julienned or diced (about 8 baby carrots)
1/4 c. parsnips, peeled & sliced crosswise into 3/8" rounds & then quartered (about 1 large parsnip)
3/4 c. celery, diced
1/4 c. fennel (bulb only), diced into 1/2" cubes
1/2 c. fresh shiitake mushrooms, sliced into 1/4" thick pieces
1/8 tsp. ground white pepper
1/4 tsp. red chili pepper flakes, or to taste
1 c. Chinese (or green) cabbage, julienned
1/2 c. red bell pepper, stemmed, de-ribbed, seeded, & diced (1/2 medium-sized pepper)
Garnishes:
1/4 c. fresh cilantro, roughly chopped & tightly packed
1/2 c. scallions (including green stalks), sliced crosswise into 1/4" thick rounds (about 8 large scallions)
If you like, you can also add other vegetables to the soup -- i.e., mung bean sprouts, shredded daikon, bamboo shoots, baby carrots, snow peas, &/or sliced water chestnuts, etc.
If you are serving this soup as a main course, you'll need to give it more nutritional substance by adding protein & carbs. For instance, you could add a 1/2 c. silken tofu (diced into 1/2" cubes) and 2 blocks (or 4 servings) of dried chow mein stir-fry noodles (1/2 block per person). (This would be enough for 3-4 servings.) If you'd like to try other types of noodles, soba noodles would work as well. For other protein options, try steamed chicken, shrimp, or beef, or a combination of any of these selections. Also, a bit of melted miso paste would taste particularly good in the soup as well. (If you're going to add miso paste, don't add it until the soup has been removed from the heat & cooled for at least 10 minutes. Otherwise, the heat will denature its nutrients.)
If you'd like your soup to have a bit more heat (with regard to piquancy, not temperature), sriracha sauce would also be a great addition.

Saturday, January 15, 2011
0 Recipe #232: Savory, Sumptuous Noodle Kugel

Yes, the much-awaited, herb-encrusted rack of lamb recipe I posted details about on Twitter & Facebook is coming soon, I promise. :) It's just a very time-consuming recipe to write. No worries; that doesn't mean it'll be a long post, but just that a lot of thought has gone into the preparation of this dish.
This one's a lot easier to type up, so I thought I'd post this recipe first, which should hopefully tie you over until then. :) If you're looking for new lunch or dinner menu ideas to put into your rotation, here's one that takes just minutes to prepare....
As you may've noticed, I tend to cook various cusine types in "waves." One week, I'm really into making Asian food and the next I'm craving something completely different. Earlier this week, I made matzo ball soup, and now I'm in the mood to offer more selections from Jewish cuisine. This time, I'd like to present a recipe for a lesser-known dish, noodle kugel. This is another food that Ashkenazi Jews brought over with them when they immigrated to America.
Kugel (in Yiddish, spelled קוגעל or sometimes קוגל, & pronounced kuh-gehl), is a baked egg noodle & cheese casserole, with a presentation similar to lasagna but without the tomato sauce & Italian seasonings. ;) In terms of flavor, it's sort of like a Jewish version of mac & cheese, but with wide egg noodles & (ideally!) a much lighter texture & taste. There are many different versions of noodle kugel, which often vary from household to household, but they all basically contain egg noodles. Potato kugel, on the other hand is altogether different entity. (There are no noodles in that dish.)
Lots of people -- particularly those living in the metropolitan NY-NJ area -- tend to be familiar with this dish, regardless of their background. Erik's family, who are from that general area, also like this dish as well; his mother served it as a side dish one year, during one of the family's winter holiday gatherings. We had kugel on Christmas. :)
Kugel is a much-loved dish, and is often served during the winter months, because it's typically served hot or warm. Some people also like to serve it cold, but I don't particularly care for it this way. To me, all that cheesy flavor just tastes better hot. I'd rather make it hot & then just reheat any leftovers. Wait, did I say lefftovers? You think there are going to be any leftovers? ;) But seriously, it's usually made in a large glass casserole dish, & thus, can't typically be consumed in one sitting, unless your dinner guests are either many in number or really, really hungry. ;) So unless you plan to invite the entire 82nd Airborne division of the US army over to your house for dinner, you'll probably be refrigerating or freezing some for later. :)
There are basically two versions of this dish, savory & sweet. Of course, the savory version is the one we'll be making today.
The savory version is typically served as a lunch or dinner entrée. It's typically comprised of things like eggs, egg noodles, cottage cheese, butter, full-fat cream cheese, regular sour cream, a pinch of sugar, & salt. As you can see, in its original form it can be rather fattening -- like 95% percent of most Ashkenazi cuisine! (This also explains why I haven't offered many Jewish recipes on my recipe blog. ;) And when I do, they are all revamped into much healthier versions.) Of course, my version of noodle kugel is not fattening at all: First of all, there's no cream cheese or butter, which, not surprisingly constitutes 95% of the fat content (& at that, almost exclusively saturated fat too!) in the typical, old-fashioned version, & it also doesn't contain sugar. And second, I use nonfat cottage cheese, which is my secret for making delicious-tasting kugel. The cottage cheese actually tastes more like ricotta after it's been whipped in an electric mixer & then cooked. I honestly swear that you really can't even taste the difference. It still tastes incredibly rich, all the same, even without all the fat. Frankly, the sugar & the cream cheese are really quite unnecessary in terms of texture & flavor, and only serve the clog the arteries & wreak havoc with the complexion. ;)
Instead of doing your standard kugel*, which I think is typically rather bland & boring in & of itself, I've decided to offer you a much more flavorful version. I made this version of the recipe for my parents & also a few family friends for lunch during one of my more recent visits to see my parents, & they all really liked it. (I always love cooking for my family & family friends when I come home!)
The other kind of kugel, the sweet version, tends to be served as a dessert, and contains raisins, something I don't typically care for in my desserts, with a few rare exceptions. To me, raisins taste better only in certain kinds of breads, like cinnamon swirl or panettone. However, I'm not a big fan of them in challah, because to my mind, challah should be savory & served with things like matzo ball soup. :) But that's just me. Add to that the fact that I personally can't stand the sweet version of kugel in & of itself (Blech!), which is fine by Erik, as he doesn't like raisins, period. :) (This is also why I prefer the savory preparation of Moroccan couscous, which unlike the sweeter version, doesn't contain raisins.) To me, there's just something not right about eating raisins in soft or moisture-rich sweets; they tend to puff up to the size of small golf balls, like they are trying too hard to be a poor imitation of a grape. ;) If I wanted to eat a grape, I'd actually eat one. I rather like grapes. :)
Anyhow, now that I've completely ranted about raisins & sweet kugel, I will say this: As mentioned in previous blog posts, I didn't grow up eating lots of sweet foods, so maybe that explains it. However, I do enjoy desserts -- provided they don't contain raisins (!) -- & cuisines that feature savory dishes with just a hint of sweetness -- i.e., Thai & Korean foods, for example. But 100% sweet noodle dishes? No thanks. However, savory kugel, on the other hand, is quite delicious. :)
OK, enough about that. I'd much rather talk about the savory version of kugel. :) So, if you like noodles & cheese together, then this dish is for you. :) And, who the heck doesn't love the combination of noodles & cheese?!

Savory, Sumptuous Noodle Kugel
Ingredients:
1/2 Tbsp. extra virgin olive oil (for coating glass baking dish)
1/2 tsp. ground black pepper, or to taste
1/4 tsp. red chili pepper flakes (optional)
2 Tbsp. Italian flat-leaf parsley, finely minced & densely packed (or 2 tsp. dried)
1 Tbsp. fresh marjoram leaves, finely minced & densely packed (or 1 tsp. dried)
8-10 c. water (for boiling noodles)
Yield: Serves 8-10.
Chef's Notes: *If this is your first time making kugel, and you'd prefer to try the traditional version instead as your first experience, just following the same basic instructions above but omit the following ingredients: shallots, red chili pepper flakes, parsley, oregano, basil, & marjoram.

Friday, January 14, 2011
0 Recipe #231: Potato-Fennel Pancakes With Dill-Sour Cream Sauce & Caviar
 Perfect for parties, winter holidays, & pretty much any kind of get-together, this recipe is an elegant, and also much healthier, spin on the classic Russian appetizer, potato pancakes. You'll notice that this version is sautéed, not fried. For an even healthier version, you can also bake it in the oven at around 350°F, until golden brown on both sides, & that way, you can just omit the olive oil altogether.
Yeah, I know what I said before, but I guess I hadn't completely gotten the caviar recipes out of my system yet, that is, until now. :) What spurred on this recipe was actually something quite practical: I noticed that there were a still a few servings of caviar left in the bottom of the tin after making the last caviar recipe, so I wasn't exactly going to let it go to waste. As they say, "necessity's the mother of invention." Or, maybe in that case, the expression should be, "Waste not, want not," or some other trite, overused saying. ;)
Now that the tin's been completely emptied, it'll most likely be a while until another caviar recipe appears on this blog. So savor it. Pun intended. :)
Potato-Fennel Pancakes With Dill-Sour Cream Sauce & Caviar
Potato Pancake Ingredients:
1/2 c. fennel (bulb only), shredded
1/2 c. yellow onion, peeled & shredded (about 1/4 large onion)
1/4 c. shallot, peeled & finely minced (about 1 large shallot)
2 tsp. fresh thyme leaves, densely packed
1 tsp. fresh marjoram leaves, roughly chopped & densely packed
2 Tbsp. fresh, Italian flat-leaf parsley, finely minced
1/2 Tbsp. fresh Tuscan Blue rosemary leaves, finely minced (optional)
3 Tbsp. scallions, sliced crosswise into 1/4" thick rounds
Directions: Prepare the sour cream sauce: Throughly combine ingredients in a medium-sized bowl & set aside.
Make the pancakes: Before combining ingredients, make sure all of the excess liquid has been completely squeezed out of the potatoes. This step is very important, as the ingredients won't bind together if the mixture's too wet. Place shredded potatoes, shredded fennel, shallot, & egg together in a large, deep mixing bowl. Thoroughly combine. Then fold in beaten eggs, followed by flour, baking powder, salt, & pepper, making sure to thoroughly combine after each addition. Next, toss in all of the fresh herbs & scallions, & mix well. Scoop out some of the mixture and, if you're making the larger pancakes, place it into a 4 1/2" hamburger patty mold (with a perforated bottom to allow the liquids to drain) & press down to compact it into the mold. If you're making the 2 1/2" version for party hors d'œuvres, you can use a mini hamburger mold to shape the pancakes. Both pancake sizes should be about a 1/2" thick. Make sure you don't place too much batter into the molds, or else they'll exceed this height & won't be cooked all the way through. When it doubt, make thinner pancakes. :) (The reason I like to use molds is that it makes it easier to release them into the sauté pan without falling apart.) If you don't have either size molds, just shape the pancakes with your hands, molding them to the appropriate dimensions. As you make each patty, transfer them to a parchment-covered baking sheet. Repeat this process until all of the pancakes have been created.
Sauté the pancakes: In a large (12-13") nonstick sauté pan, heat 1 Tbsp. olive oil on high heat. Flick/drop a dab of water into the pan from a distance; if it sizzles, the oil is hot enough. Turn down heat to medium-high & place only as many pancakes will reasonably fit into the pan at a time. Work in batches: Cook only 2 at a time for the larger pancakes, & 4 at a time for the smaller sized ones. Do not crowd the pan or this will make it difficult to flip them. Use a splatter screen to avoid getting burned by spluttering oil. If the pan gets too hot & the oil is really popping out of the pan, turn down heat slightly. Sauté until browned and crisp, about 3 minutes per side, only adding the remaining 1 Tbsp. of olive oil if absolutely necessary. Turn down heat if the pancakes start to brown too quickly. Transfer each completed batch to a heat-proof baking sheet (or large plate). When done, transfer to plates (or a serving platter, if you'll be making them as hors d'œuvres). Drizzle each pancake with dill-sour cream sauce, then top with a teaspoonful of caviar & sprinkle with chives. Allow each guest the option of seasoning their own pancakes with additional salt & pepper, to taste, according to individual preferences. Serve immediately.
Chef's Notes: If you won't be serving the pancakes right away, do not add the toppings until serving time. Refrigerate sour cream sauce & caviar until ready to serve. Reheat pancakes a few minutes prior to dining. Please note that the pancakes and caviar can stand at room temperature for up to 2 hours; however, it's much better to refrigerate the caviar, as it tastes better cold.
Wine Pairings: Choose a full-bodied, demi-sec white wine. Champagne, sparkling white wine, or a regular crisp white would work. In terms of specific varietals of wine wine, I'd recommend pairing this dish with either a Sémillon, Reisling, Gewürztraminer, or a Vouvray.
Thursday, January 13, 2011
0 Recipe #230: Niña Colada Smoothie
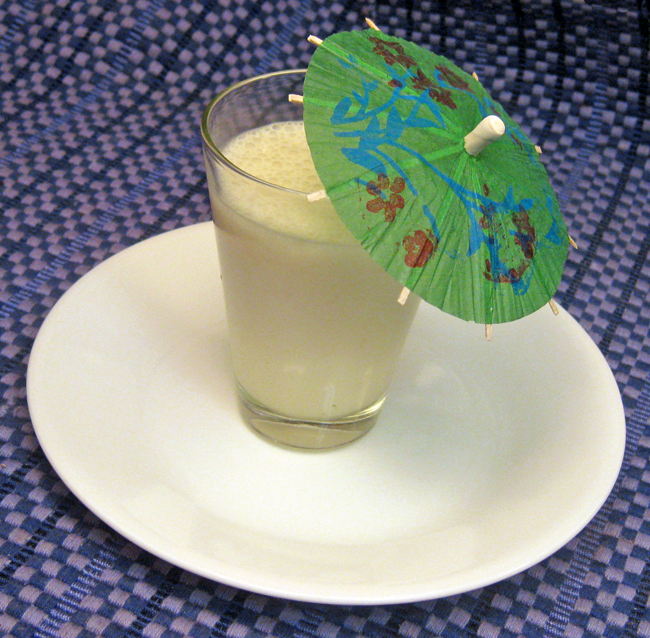
Longing for warmer weather? Thinking of permanently vacationing on a tropical island? ;) Here's the perfect drink to melt away the winter time blues.... The only ice you'll be thinking about is the one in your tropical smoothie. :) You won't be thinking much about winter when you've got an refreshing umbrella drink in your hand!
2 c. pineapple juice (not from concentrate!)
1 c. unsweetened lite coconut milk from a can
1 Tbsp. honey
Wednesday, January 12, 2011
0 The Real Scoop On "Pre-Fab" Matzo Ball Soup
Of course, this is a free country, & it's their prerogative to do as they choose. However, we as consumers can also do as we choose. :) And let's not forget: These companies are also perfectly capable of making decisions regarding which products they choose to offer to the consumer. That being said, these companies, like all companies have to cover their bottom line & still make a profit, or they won't be in business for long. Of course, if consumers start demanding healthier products, I'm sure they'll get their collective acts together & offer healthier alternatives. In fact, many of them actually do, just not for most of their matzo ball soup-related fare. So, matzo ball soup manufacturers, please feel free to make the appropriate changes to make the aforementioned products healthier, & I will gladly tout your matzo ball soup-related products to the skies. :)